Februar 2024
What’s New
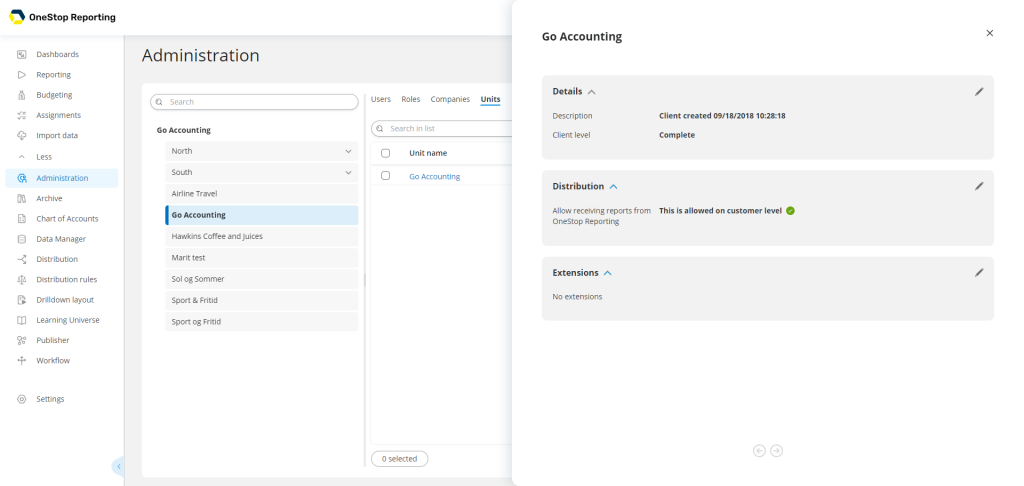
“New” Administration
We have now moved all of the Administration settings from the old Administration to the “new” Administration. The new Administration makes it easier to handle users, companies, clients, and groups. Keep reading to find out more about the changes and improvements in this release that will make your experience with OneStop Reporting even better!
Removed Client settings tab and moved the settings to sidebar under the Units tab
We have removed the Client settings tab and moved the settings — Details, Distribution, and Extensions — to the sidebar for the clients on the Units tab.
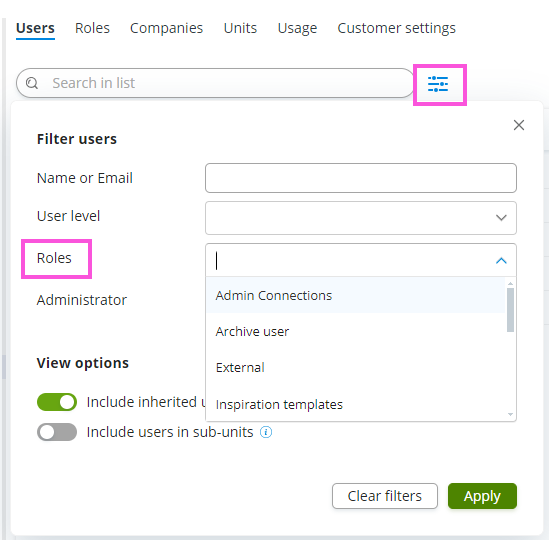
Possibility to filter on Roles
We have added the possibility to filter on roles on the Users tab.
To do so;
- Click Administration.
- Click the Users tab.
- Click
 the Filters.
 - Select role from the Roles list.
Move content to another user in “new” Administration
We have moved the functionality for moving content to another user to the new Administration. NOTE: You can move content to another user without removing the user.
To do so;
- Click Administration.
- Click the Users tab.
- Select ✅ the user you want to move content from.
- Click Actions > Move content. NOTE: If the user has no content, you will not see this option.
- Under Move content to, select the user you want to transfer content to.
- Click Next.
- In the Confirm action dialog box, confirm the action by entering the name of the user the content is moved from.
- Click the Start moving button.
NOTE: There are a few things to consider when moving content: You need to make sure the receiving user has the appropriate licenses, roles, permissions and data accesses or the user might not see all the moved content. Also note that all history of reports and jobs will be removed. If you want to keep historic runs of a report, you need to first send it to the archive, before moving the content.

Delete users added to “new” Administration
We have moved the functionality to delete users to the new Administration.
To do so;
- Click Administration.
- (If applicable) Click on top, group, or client level.
- Go to the Users tab.
- Select user(s).
- Click Actions > Delete users.
- In the Delete user dialog, enter the name of the user or the first user in the list to confirm the deletion. NOTE: You will get a warning if any of the users you are trying to delete have content, and they will not be deleted.
- Click Delete. The user(s) is removed from all clients and groups.
NOTE: If a user has content, he or she will not be deleted. You can, however, move their content to another user as described above.
However, we have made it possible to delete a user when having shared reports that are not in use.
- Only possible if reports are not used in publisher jobs or packages set up by the user.
- Only possible if the category is shared to the user and not owned by the user.
Edit company details in the “new” Administration
You can now edit company details in the Administration.
Go to the Company tab and click on a company.
Here you can edit:
- Country
- Free Text information (see Add Free Text information to companies for more information)
- Company access for users

Create and manage Groups added to the “new” Administration
You can now create and manage groups of clients in the Administration.
To do so;
Create new group
You can create groups and subgroups to organize your clients. Creating groups is a good way for larger organizations, such as accounting firms, to organize their customers.
To create a new group:
- Click Administration.
- At the top/customer or group level, click the Units tab. NOTE: When you are at the group level, you create sub-groups.
- Click Actions > Add group.
- In the Add group dialog box, enter a name for the group.
- Click the Confirm button.
Add clients to the group
- Click Administration.
- At the top/customer, group, or client level, click the Units tab.
- Select the client you want to move. NOTE: You can only move one client at a time.
- Click Actions > Move client.
- In the Move… dialog box, select the group from the list and click Change. The client is moved to the group, and the group users in the destination group will automatically be added as client users in the client you moved to.
NOTE: If you move a client from one group to another, the group users from the original group are removed from the client.
We have also made the groups collapsible in the sidebar for easier overview of your groups and clients.
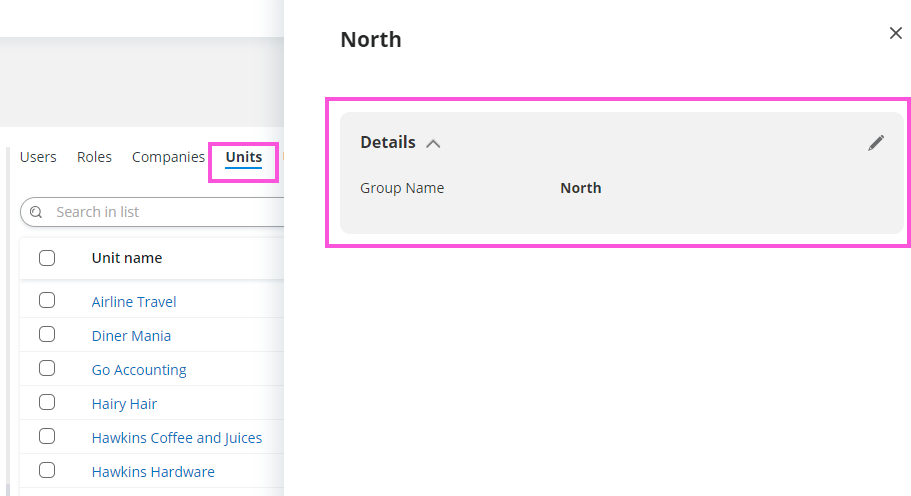
Edit group details in the “new” Administration
Users can now check or edit group details by clicking the group on the Units tab.
Delete group moved to “new” Administration
You can now delete groups in the “new” Administration.
To do so;
- Go to Administration.
- Go to the Units tab.
- Select ✅ a group or multiple groups.
- Click Actions > Delete groups.
NOTE: If a group contains content you cannot delete and you must remove group content, such as
- subgroups and clients
- users
- distributed reports
before you are able to delete the group.
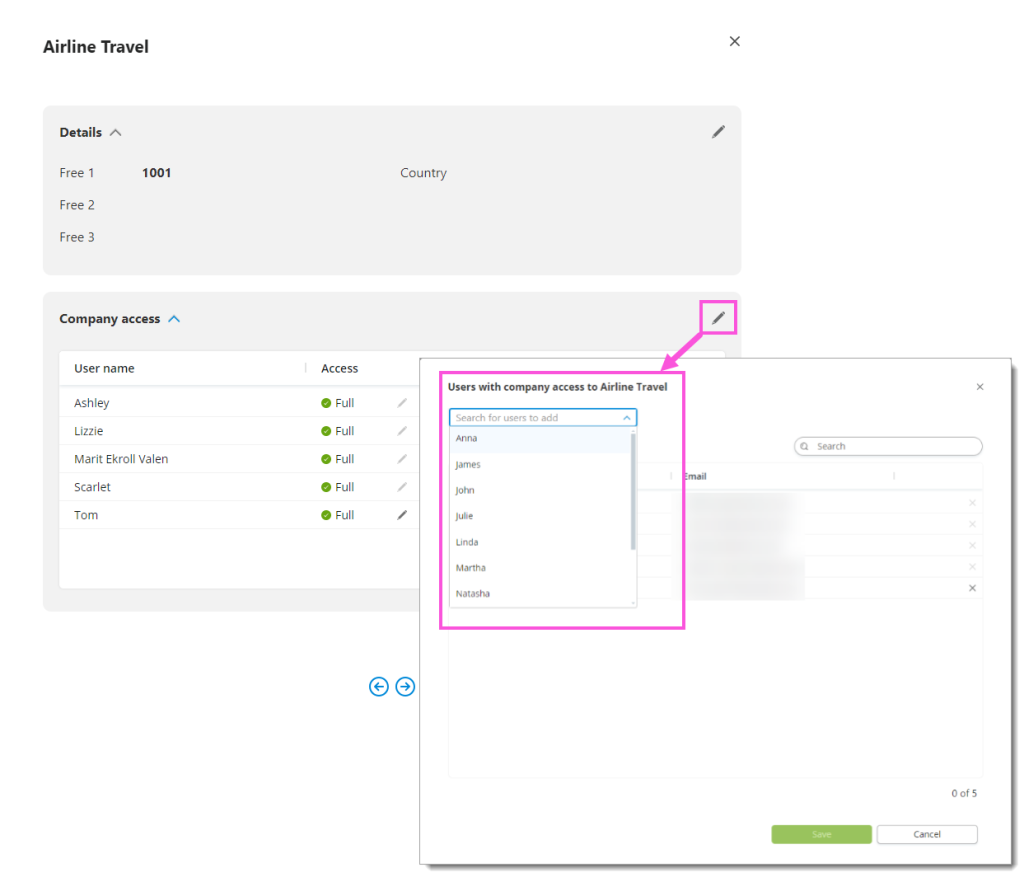
Overview and possibility to give users access to companies from the Companies tab
Administrators can now view who has company access and give users access on the Companies tab.
To give access via the Companies tab;
- Go to Administration.
- Go to the Companies tab.
- Click on a company.
- Next to Company Access, click ✏️ Edit.
- On the Users with company access to… dialog, select the user who should have access from the list.
NOTE: You can give multiple users company access on the Users tab.
Set data filters on a company in the “new” Administration
- Go to Administration.
- Go to the Companies tab.
- Click on a company.
- Next to Company Access, click ✏️ Edit.
- Next to the user’s name, click ✏️ Edit data access filter. NOTE: If the pencil is grayed out, the user has Full data access from the permissions.
- Click modules and dimensions in the list to the left-hand side of the dialog. The filter is displayed in the right-hand pane. NOTE: If you add identical modules or dimensions as filters, these filters are grouped with the logical operator And. Click And to change the logical operator.
- Click Where to select whether to include (Where) or exclude (Where not) data that matches this filter.
- Click In to select an operator.
- Click {no filter} (or any other criteria displayed in the box) to specify the criteria for the filter.
- Select values from the list. The filter box at the bottom of the dialog is updated with the selected values. You can also enter values manually.
- Use ranges: Deselect this option to show all values in a range.
- Include blank: Select this option to also include data where no value exists (NULL).
- Click Use value. The filter is added to the list.
- Repeat steps 6-13 to add more filters. Example: Use the “Where Module In *” filter to give access to all data, and then add a “Where not dimension In dimension name” to exclude one or more dimensions.
- Click OK when you are done.
The user will get a  Limited access indication under the Access column.
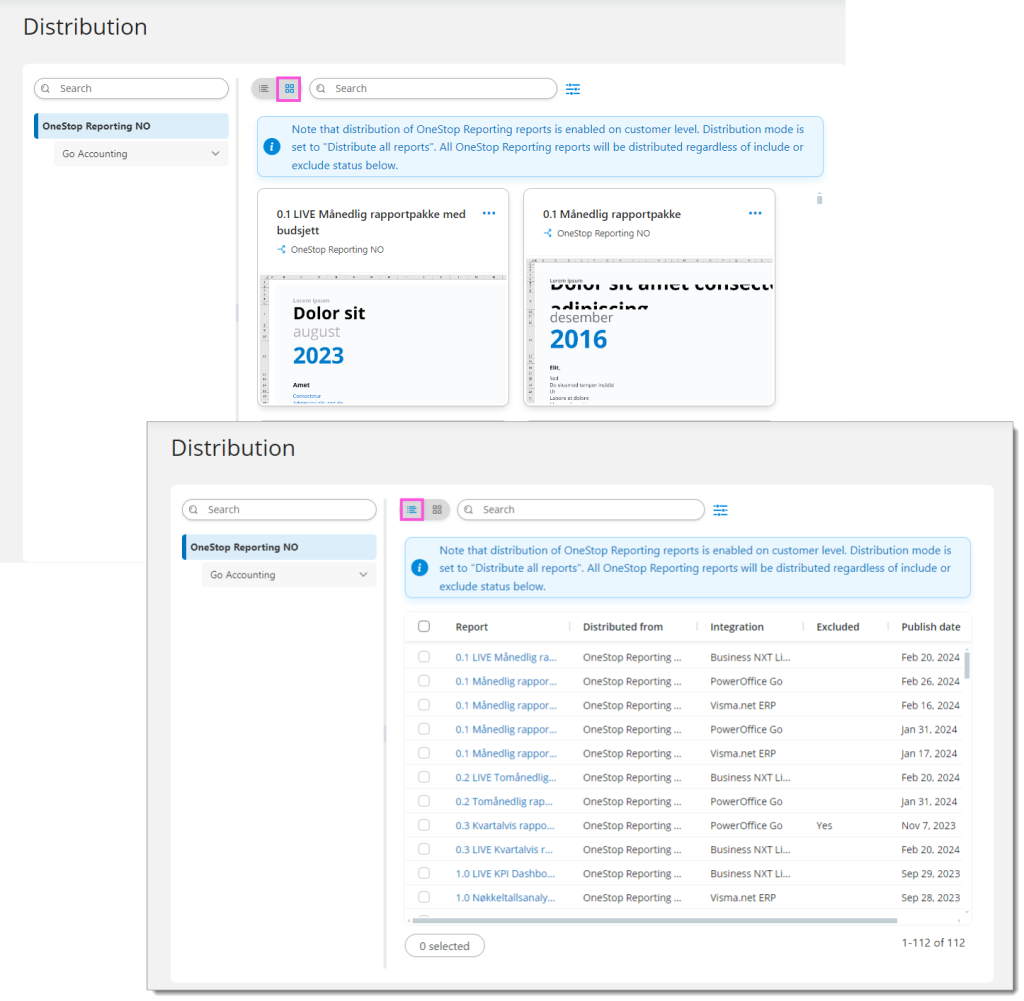
Added listview in Distribution
We have added Listview in Distribution:
Bug fixes and feature requests per integration
| Integration | Module in Report Designer | Factset/Dimension | Attribute/Measures | Comment |
|---|---|---|---|---|
| 24SevenOffice | General Ledger | Transactions | NaN | Changed the period link in from using Date to using Period Date. |
| 24SevenOffice | NaN | NaN | NaN | Fixed an issue where data from more than 20 years ago was not imported. |
| BNXT Live | General Ledger | Historic supplier Transactions | NaN | Fixed an issue with drilldown |
| Visma Business BNXT BNXT Live | General Ledger | Account IB | NaN | Added IB measures based on Currency, Currency2 and Quantity |
| Innsikt | General Ledger | ARR per Customer | NaN | Added the factset |
| Innsikt | General Ledger | Accounting Offices | NaN | Added the factset |
| PowerOffice Go | General Ledger | Transaction | NaN | Added the Location dimension |
| BNXT | General Ledger | Bank partner no | Company | Fixed an issue where group reporting was not working for Bank Partner. |
| Innsikt | General Ledger | Accounting Offices | NaN | Changed some attributes to measures |
| Tripletex | General Ledger | MainProject | NaN | Changed to only display projects that act as main projects |
| Innsikt | General Ledger | Accounting Offices | NaN | Added new measure field |
| Visma Business BNXT BNXT Live | General Ledger | Batch | NaN | Added a separate dimension for Batch and linked it to Voucher. It should now be possible to combine filters from Batch and other dimensions in Voucher |
| PowerOffice Go | General Ledger | Location | NaN | Added a separate general dimension for Location which is linked in Account Transactions. The old Location dimension is only linked to project and will function as it did before. |
Integration-specific fixes
| Integration | Module in OSR | Comment |
|---|---|---|
| Visma Administrasjon | Budget | Fixed an issue where updating/deleting old budget transactions was not working. |
| BNXT BNXT Live | Chart of accounts | Fixed an issue with Expression names for the Swedish Chart of Accounts |
| VismaNet | Import | Fixed an import issue for Shipments and Inventory Transactions |
| VismaNet | Import | Fixed various truncate issues that caused imports to fail for certain customers. |
| VismaNet | Import | Fixed an issue with the import for Customer Invoice and Debit Note Lines |
| 24SevenOffice | Import | Fixed an issue where data from more than 20 years ago was not imported |
| Visma Business BNXT BNXT Live | Import | Deleted records are now removed from the voucher table |