Install OneStop Reporting Cloud Agent
/onestopreporting/help/management/data-connections/data-connection/install-cloud-agent
section
2026-01-16T14:27:01+01:00
# Install OneStop Reporting Cloud Agent
## OneStop Reporting Cloud Agent
A Cloud Agent enables OneStop Reporting to retrieve data from Visma Business databases. It is an application that is installed on a server in the local domain.
## Installing the Agent
The agent installer can be downloaded here: [Cloud Agent](https://portal.onestopreporting.com/api/gateway/cloud-agent/installer)
1. Run the installer.
2. Choose the file path where you want to install the agent.
- Note that the closer the Cloud Agent is to the database server, the faster the connection will be.
- It is recommended to install the agent on a machine that can be left running all the time.
3. Click Install. The administration screen for OneStop Reporting Cloud Agent opens in your browser at [http://localhost:5002](http://localhost:5002).
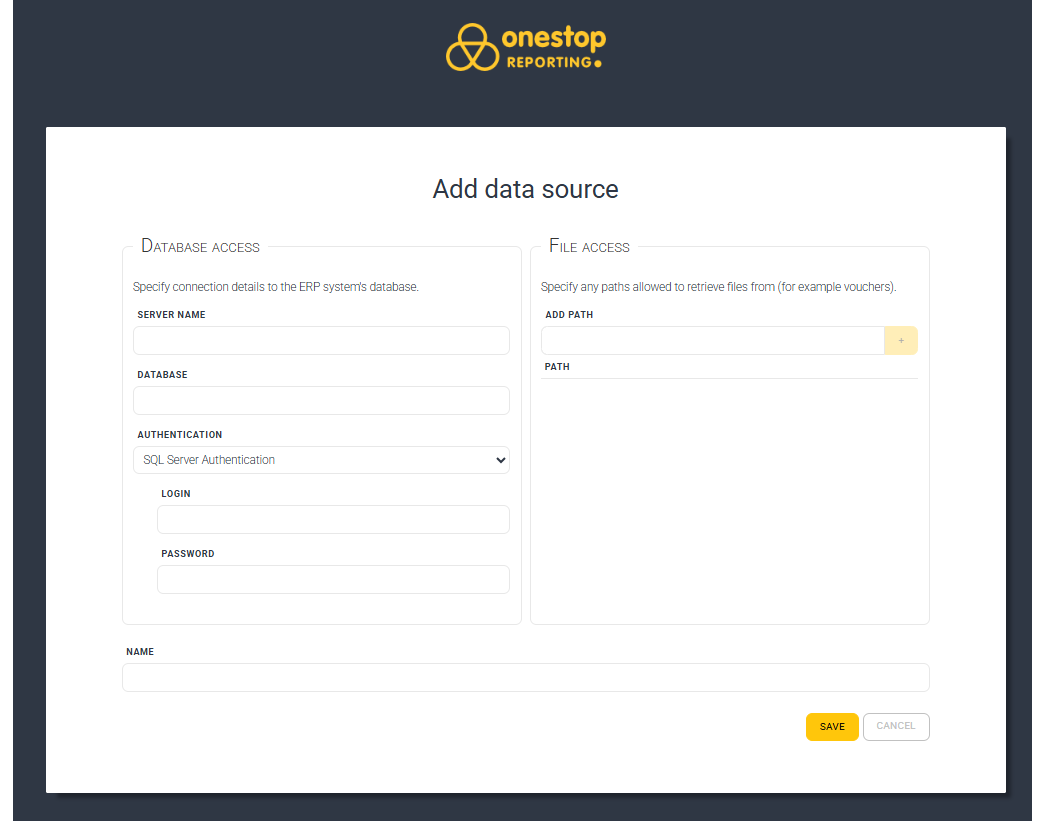
## Adding a Data Source
In OneStop Reporting Cloud Agent Administration, click on "Add data source".
> [!TIP]
> You can access the Visma Cloud Agent Administration at any time to add or modify data sources from [http://localhost:5002](http://localhost:5002).
- In the **Server Name** field, enter the name of the SQL Server.
- In the **Database** field, enter the name of the Visma Business system database, typically called vbsys.
- Under **Authentication**, choose SQL Server Authentication or Windows Authentication.
- If you choose SQL Server Authentication, you must specify Login Name and Password.
> [!NOTE]
> The specified account must have read access to the Visma Business system database and all Visma Business client databases you want to access.
> [!NOTE]
> If you use Windows Authentication, the account running the Cloud Agent service must have access to the databases on the SQL server. The OneStop Reporting Cloud Agent service is by default set up to run with a local system account. However, this can be changed to another account.
- In the **File Access** field: Here you must enter the file path to the area where the vouchers are stored, and the user that the cloud agent authenticates with must have at least read access to the area where the files are located. Multiple areas can be entered here.
- In the **Name** field, enter a name for this data source.
- Click **Save**. You will now receive a Pairing Key. Copy this key and use it when configuring the data connection in OneStop Reporting.
Move OneStop Reporting Cloud Agent to another machine
/onestopreporting/help/management/data-connections/data-connection/install-cloud-agent/move-onestop-reporting-cloud-agent-to-another-machine
page
2026-01-16T14:27:01+01:00
# Move OneStop Reporting Cloud Agent to another machine
These instructions describe how to move an instance of the OneStop Reporting Cloud Agent to another machine without the need to reconfigure data connections, companies, or reports in the OneStop Reporting portal.
## Instructions
In the steps below, we will refer to the current machine hosting the agent as *OldMachine* and the new machine as *NewMachine.* These terms will be used to indicate where to perform the steps.
> [!TIP]
> The term *Cloud Agent service* refers to the Windows service named *OneStop Reporting Cloud Agent*.
1. On OldMachine: Stop the Cloud Agent service.
2. On NewMachine: Install the Cloud Agent.
3. On NewMachine: Stop the Cloud Agent service.
4. On OldMachine: Copy the agent\'s configuration folder to an intermediate location. The folder is usually located here (but depends on the chosen installation location): *C:\Program Files\OneStop Reporting\CloudAgent\Agent\Configuration\\*
5. On NewMachine: Delete the agent\'s configuration folder.
6. On NewMachine: Paste the configuration folder from the intermediate location to the agent.
7. On NewMachine: If Windows credentials are used, reconfigure the Cloud Agent service to use the desired account. **NOTE**: This is not needed if only SQL logins are used.
8. On NewMachine: Start the Cloud agent service.
9. On NewMachine: Open the Cloud Agent Admin from the Start menu.
10. On NewMachine: For each data source using SQL logins, the password must be reentered.
11. In the OneStop Reporting portal: Verify the system, for example by running a report.
12. On OldMachine: Uninstall the Cloud Agent. If there are still subfolders are left under the installation location, manually remove them to wipe all traces, such as logs.
Cloud Agent technical document
/onestopreporting/help/management/data-connections/data-connection/install-cloud-agent/technical-document
page
2025-10-02T13:27:12+02:00
# Cloud Agent technical document
1. The cloud agent connects to OSR's data gateway and starts listening for requests. It is ensured that it is OSR’s server by verification of the certificate for the domain.
2. A user runs a report, triggering a request from OSR’s reporting server to the data gateway.
3. The data gateway finds the established connection with the customer's agent and passes on the request. The actual process of finding the corresponding agent is done using a Pairing Key that is a manually transferred secret that is entered into the OSR Portal by the customer administrator.
4. The agent looks up the credentials and settings for the requested data source and executes the request; be it a query against an SQL server or reading a file.
5. The agent reads the result data from the data source.
6. The agent starts streaming back the result data to the data gateway.
7. The data gateway passes on the stream to the reporting service.
Note that all report queries are run directly on the ERP system; thus, always providing up-to-date information. The data generated by queries and retrieved files are not stored by OSR in the cloud in any other form than rendered reports. The agent creates an outbound connection to OSR’s servers. It communicates on outbound port TCP 443. The agent does not require any inbound ports. If you are experiencing connectivity issues due to firewall constraints it is recommended that you whitelist the IP addresses for the Azure North Europe region in your firewall. You can download the Microsoft Azure Datacenter IP list, which is updated weekly. The agent communicates with the servers via HTTPS using the fully qualified domain name (FQDN). The current domain name is gateway.onestopreporting.com.
> [!NOTE]
> Traffic going to `visualstudio.com` or `visualstudioonline.com` are for app telemetry and insights and are not required for the agent to function.