Manage Data Connections/onestopreporting/help/management/data-connectionssection2026-01-16T14:27:01+01:00
# Manage Data Connections
## Creating Data Connections in the OneStop Reporting Portal
You will learn how to create a connection to your financial system so that OneStop Reporting can fetch data for the reports you run in the portal.
**Learn how to:**
- Create a data connection to cloud-based and on-premise systems
- Add multiple connections and companies
- Delete connections
## Introduction
When connecting to a financial system, you can add the connection at the client level (the top level). This allows you to add multiple companies and create multiple clients in one operation. You can also choose whether to add the connection at the client, group, or customer level, depending on how you want to organize your solution.
Take a look at the course [Manage the OneStop Reporting Portal](https://www.vismalearninguniverse.com/learn/courses/461/administrere-onestop-reporting-portalen/lessons/3035:925/onestop-reporting-administrere-onestop-reporting-portalen) to learn more about administration at different levels.
## Creating a Connection for the First Time
> [!IMPORTANT]
> You must be a System User in your financial system to create connections.
The first time you log in to OneStop Reporting, a wizard will guide you through setting up a connection to your financial system. In this example, we will connect to Business NXT.
If you have already connected the reporting solution to a different financial system, you will need to add connections manually. Refer to the chapter on Connections and Companies for guidance.
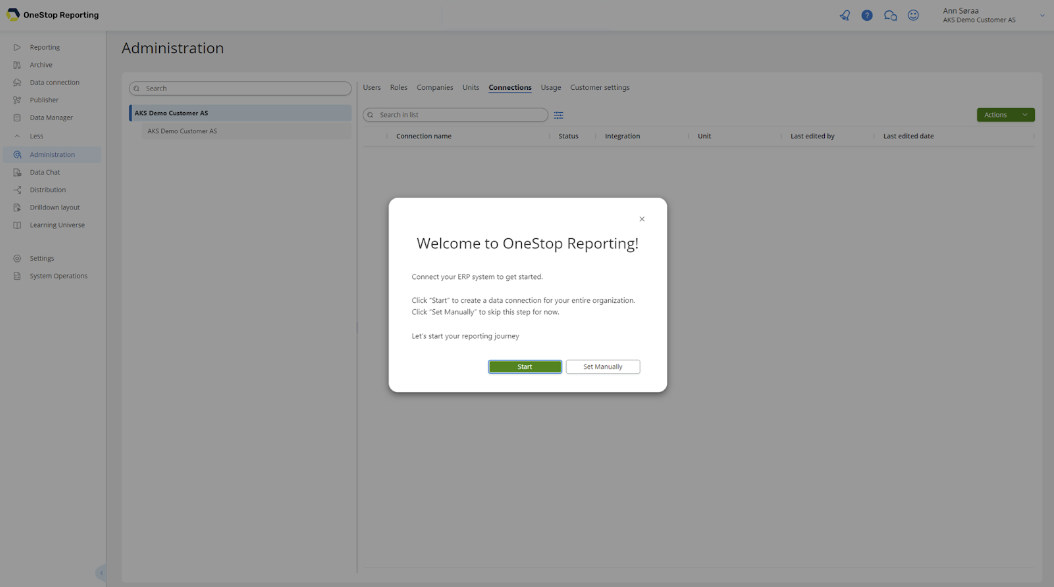
- **Start:** Start the connection wizard
- **Create Manually:** Cancel the wizard and connect manually.
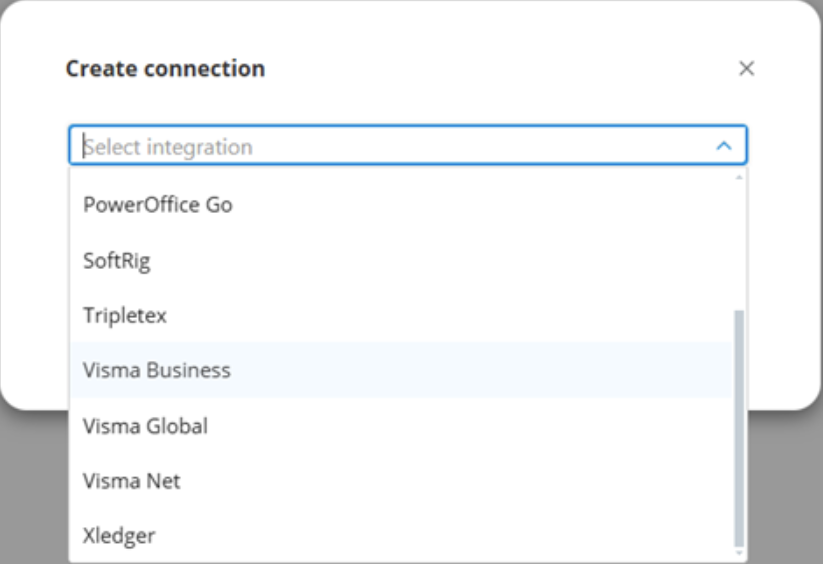
## Cloud-based Financial Systems
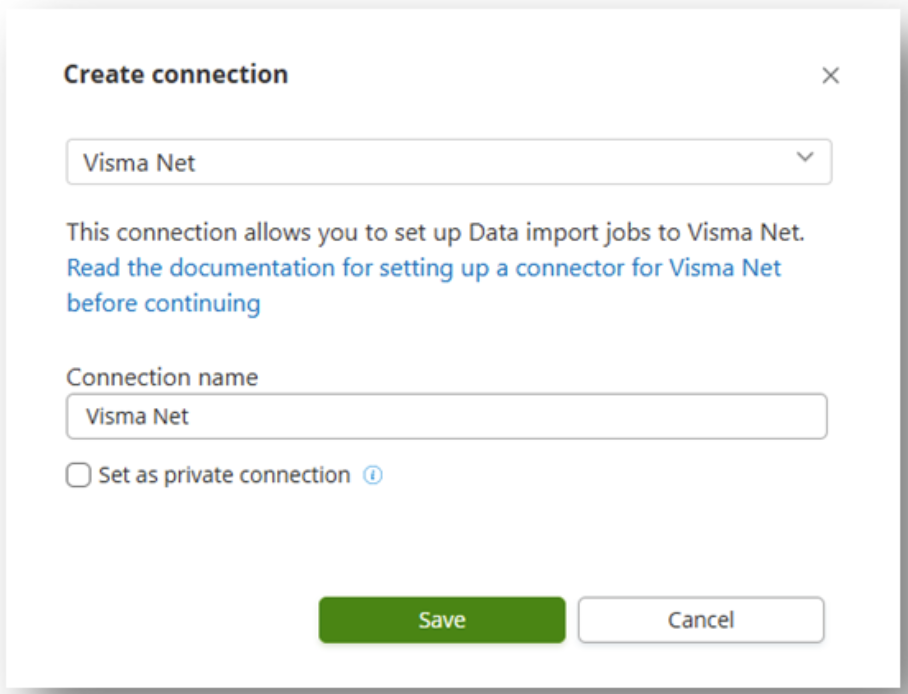
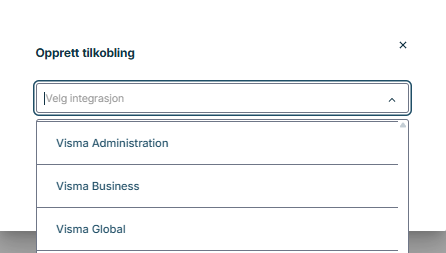
In the **Create Connection** dialog box, choose the connection you want.
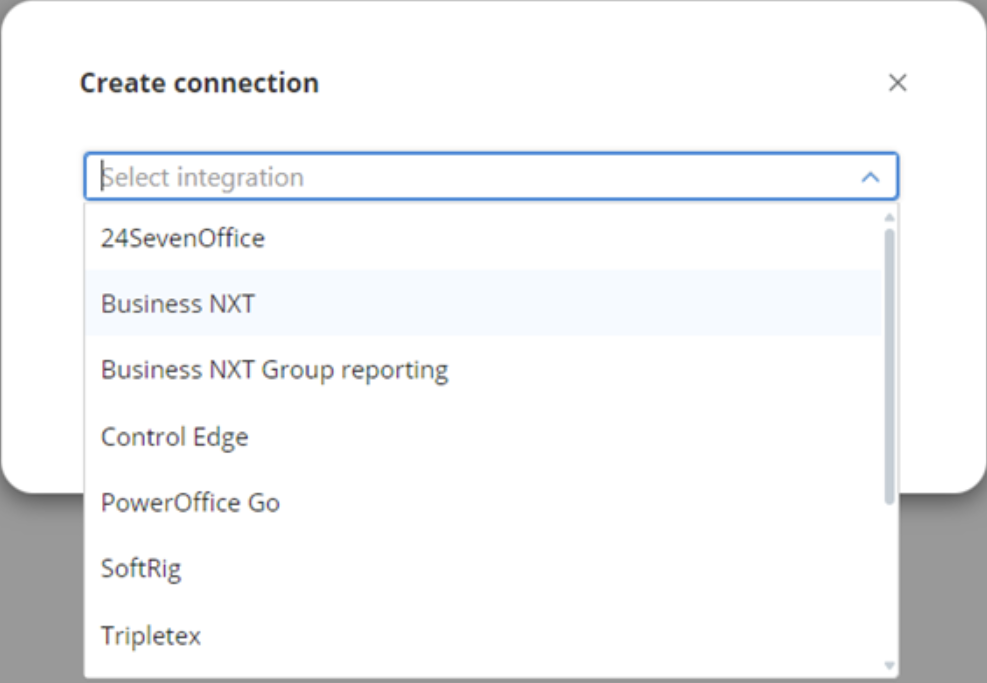
For **Business NXT** customers, there are two ways to connect to Business NXT, depending on your needs in the OneStop Reporting portal:
- **Business NXT:** This method fetches data directly from Business NXT, ensuring real-time and up-to-date data. Choose this connection method if you do not need to run reports with consolidation.
> [!NOTE]
> This is the recommended way to connect to Business NXT.
- **Business NXT Group Reporting:** This method utilizes APIs and requires setting up data import jobs that transfer data at specified intervals. Select this connection method if you need to run consolidated reports.
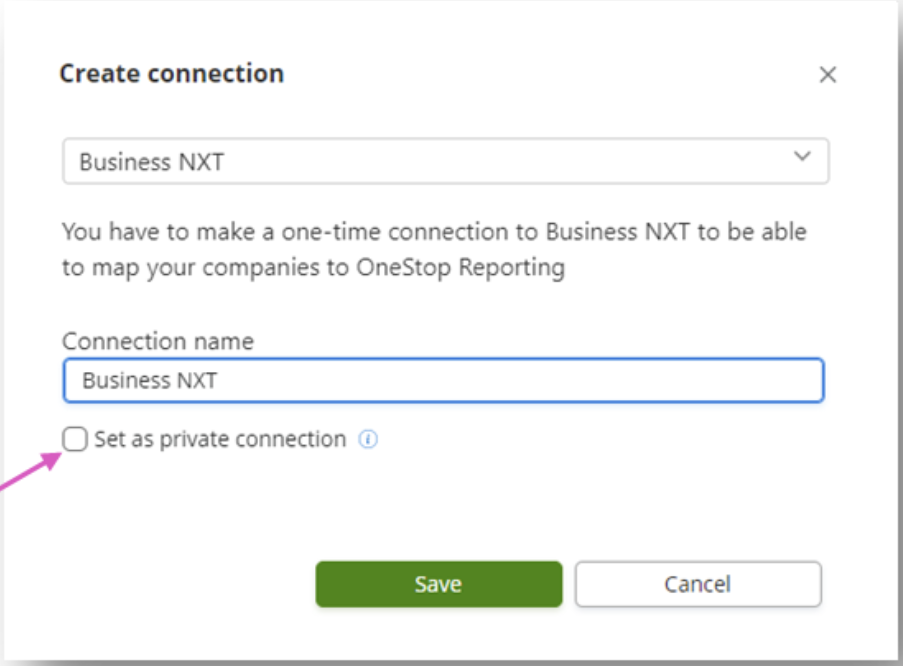
Choose a name for the connection in **Connection Name**.
If you enable **Set as private connection**, only you and customer-level administrators will be able to edit the connection and access all companies.
This dialog box may vary slightly depending on the financial system you are connecting to. [Learn more about setting up a connection for different systems here](../Data-connections/getdata/).
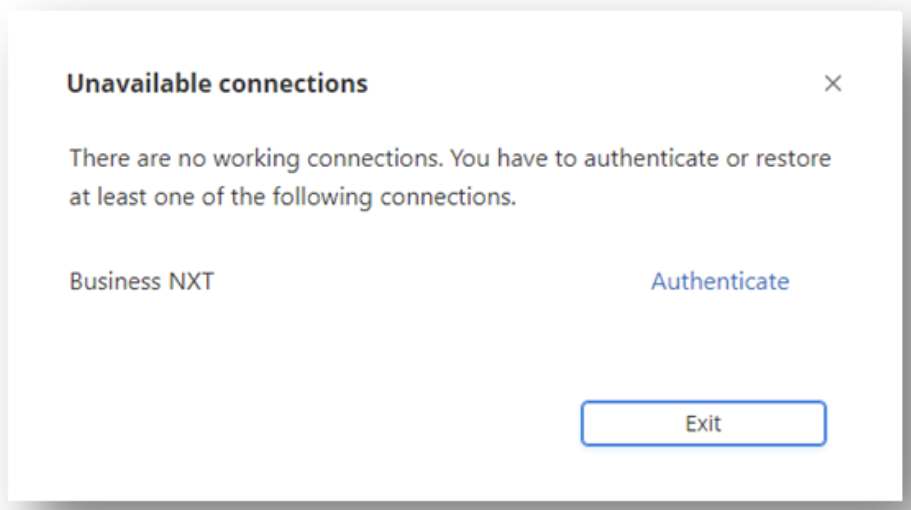
In this case, we need to click on **Authenticate** to approve the connection.
> [!IMPORTANT]
> You must be a System User in the financial system to create connections.
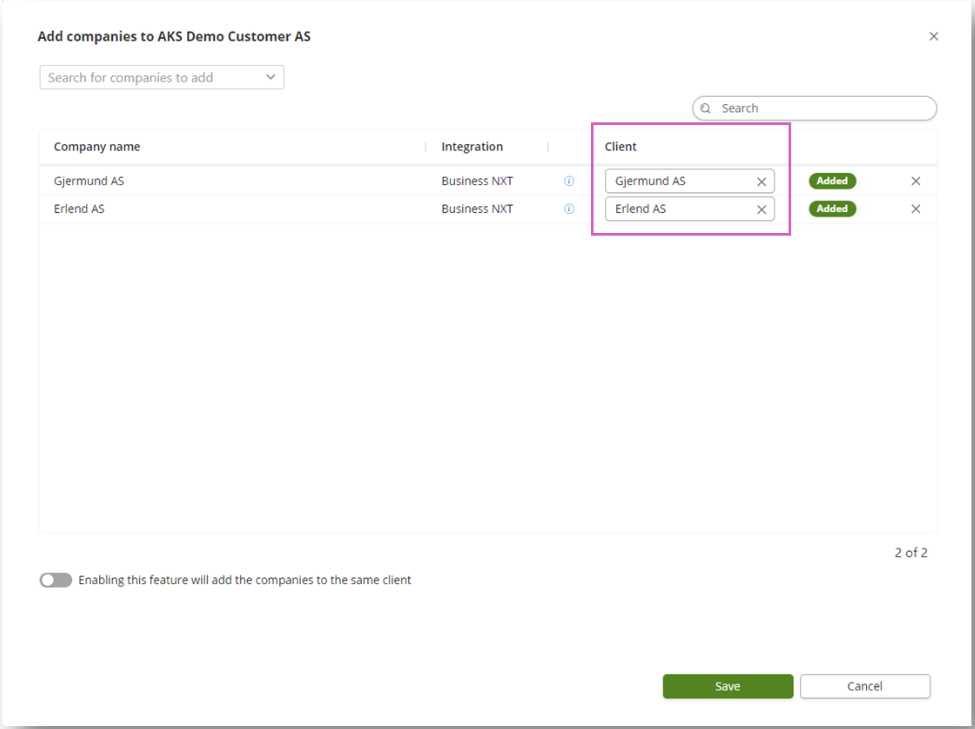
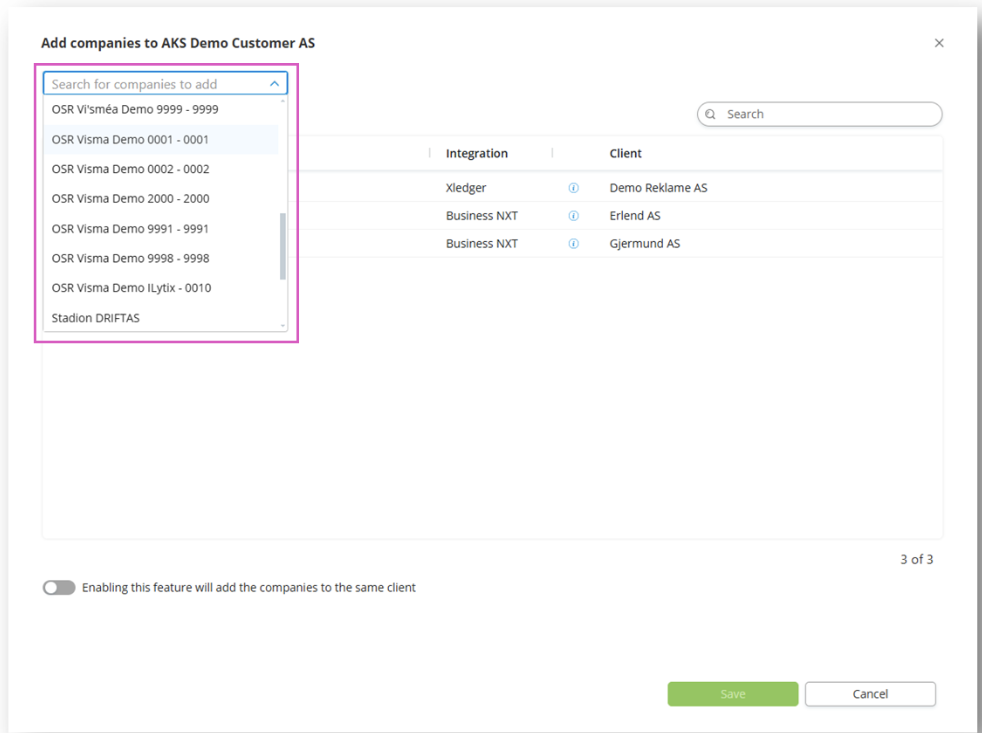
In the **Add companies to...** dialog box, select which companies you want to add to the solution from the dropdown menu.
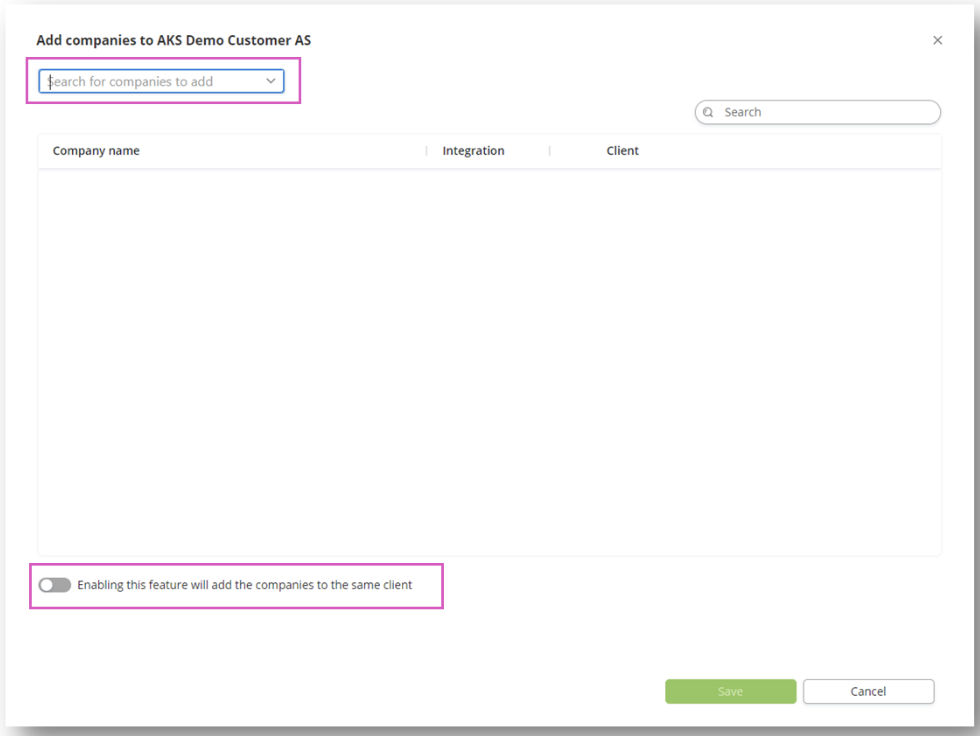
The companies you select are added to the list, and the company is linked to a client with the same name.
You can change the names of the clients before clicking **Save**.
The clients created are now placed directly under the customer level (the top level).
If you want to add the companies to **the same client**, for example, for Group Reporting, you must check the box at the bottom left. Then, enter the desired **name** for the client.
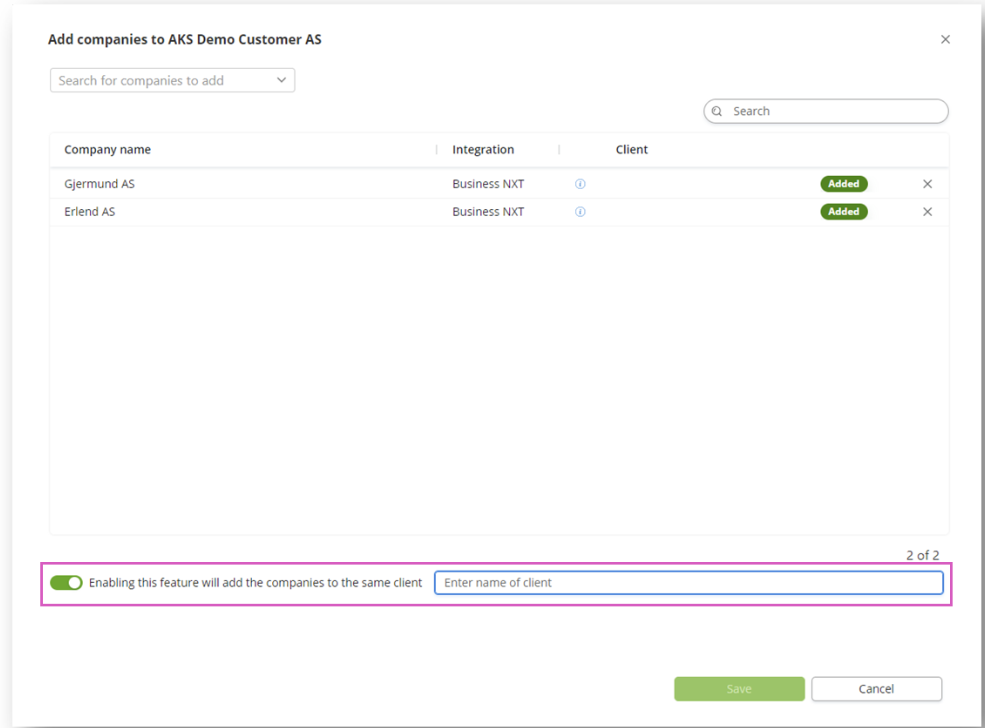
> [!IMPORTANT]
> For Business NXT, this can only be done with the Business NXT Group Reporting connection.
## On-premise Financial Systems
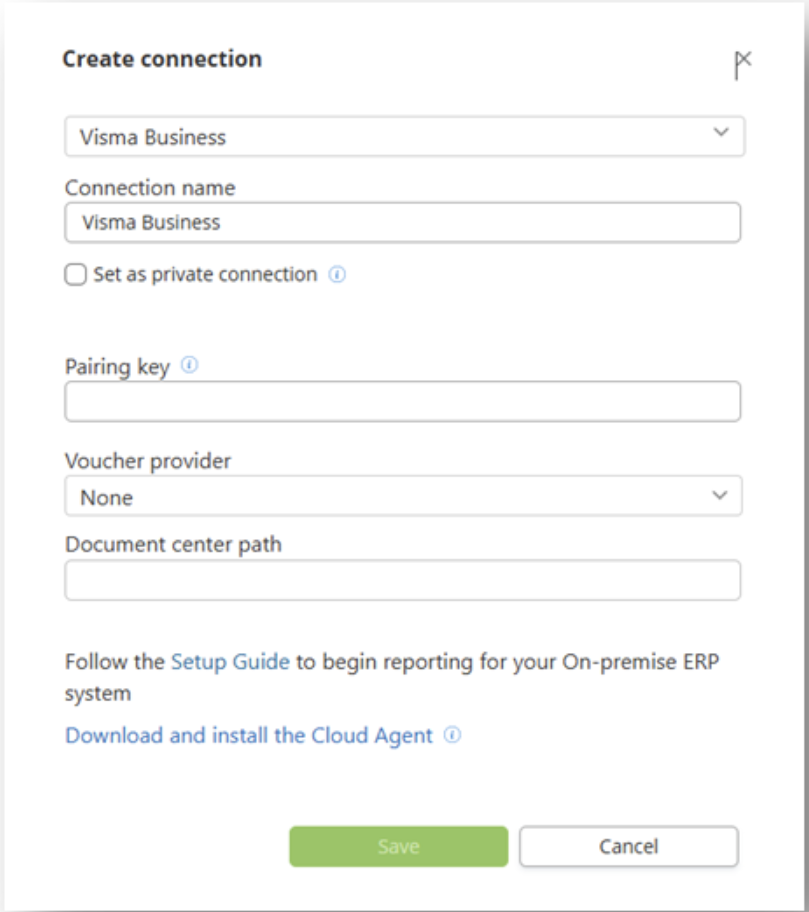
In the **Create connection** dialog, select the connection you desire.
Before you can create a connection, you must have the OneStop Reporting Cloud Agent installed on your server.
Click on **Download and install Cloud Agent** to proceed.
For more information, see the [OneStop Reporting Cloud Agent](https://www.visma.no/onestopreporting/cloudagent/).
> [!NOTE]
> Installation and configuration of the Cloud Agent are typically done by an administrator. It may require specific knowledge of local servers and your ERP system.
[Read more about setting up a connection for on-premise financial systems here](../Data-connections/data-connection).
Choose a name for the connection in **Connection Name**.
If you enable **Set as private connection**, only you and customer-level administrators will be able to edit the connection and access all companies.
Enter the **pairing key**. You can find the pairing key in the Cloud Agent administration interface. You can create a new data source or edit an existing one to obtain the pairing key.
Choose **Invoice Provider** if you use this service.
In the **Document Center path** field, enter the file path to where the documents are stored.
In the **Add companies to...** dialog, select which companies you want to add to the solution from the dropdown menu.
The companies you choose are added to the list, and the company is linked to a client with the same name. You can modify the names of the clients before hitting **Save**
The clients created are now placed directly under the customer level (the top level).
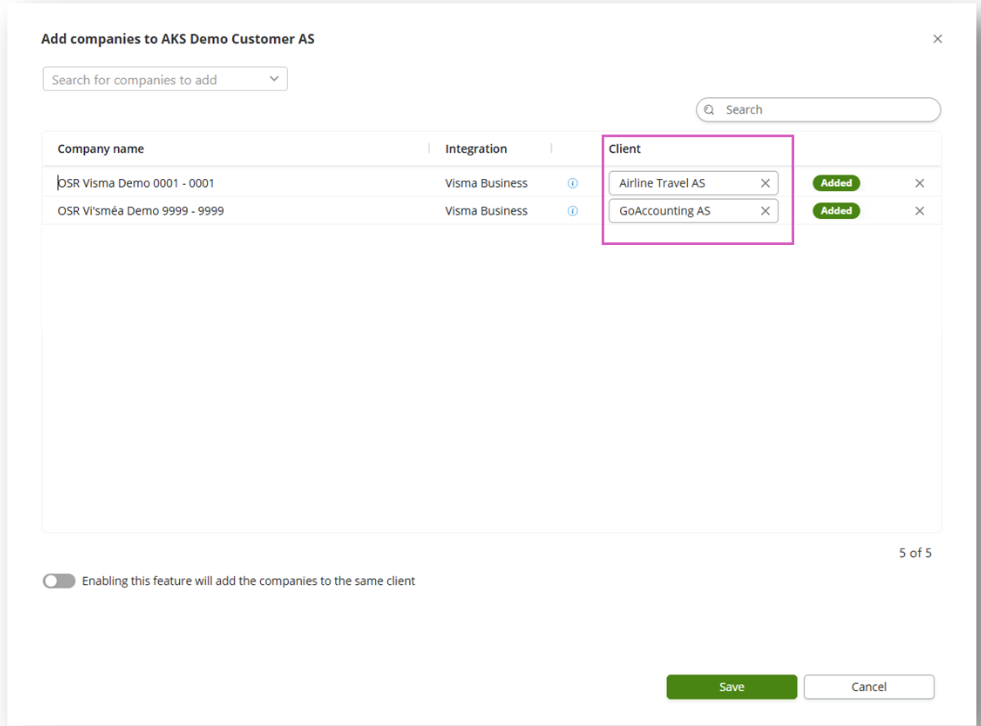
If you want to add the companies to **the same client,** for example, for Group Reporting, you need to check the box at the bottom left. After that, enter the desired **name** for the client.

## Connections and Companies
### Add a Connection
To add a connection for the first time in the solution, a wizard guides you through the setup. If you want to add more connections manually:
- Go to **Administration** and navigate to the **level** (customer, group, or client level) you want to add the connection.
- Go to the **Connections** tab, Click the button with **three dots ...** on the top right corner of the screen, and select **Create Connection**.
Select your financial system from **the list** and enter a **Connection Name**.
Continue following the instructions...
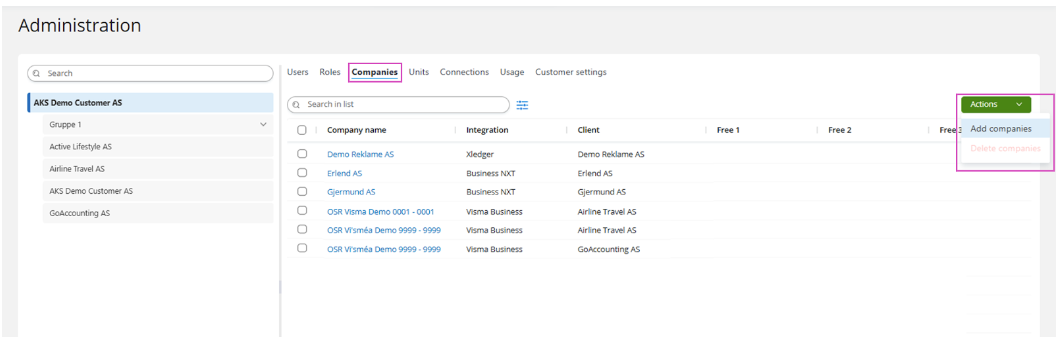
### Add Companies
If you want to add more companies manually:
- Go to **Administration** and navigate to the **level** (customer, group, or client level) you want to add the company.
- In the **Companies** tab, Click the button with **three dots ...** on the top right corner of the screen, and select **Add Companies**.
Continue following the instructions...
## Overview and Status
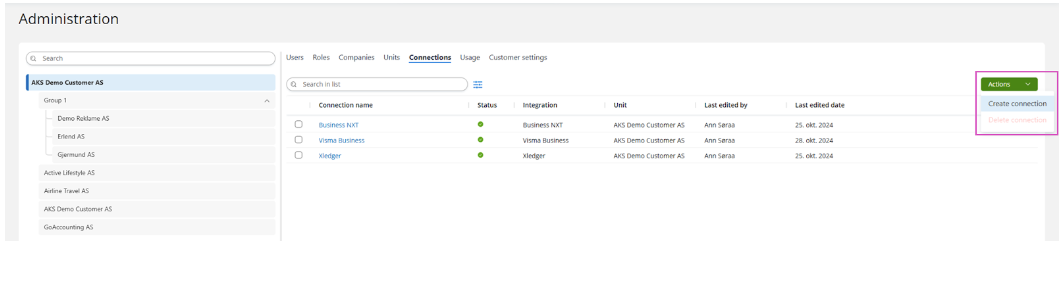
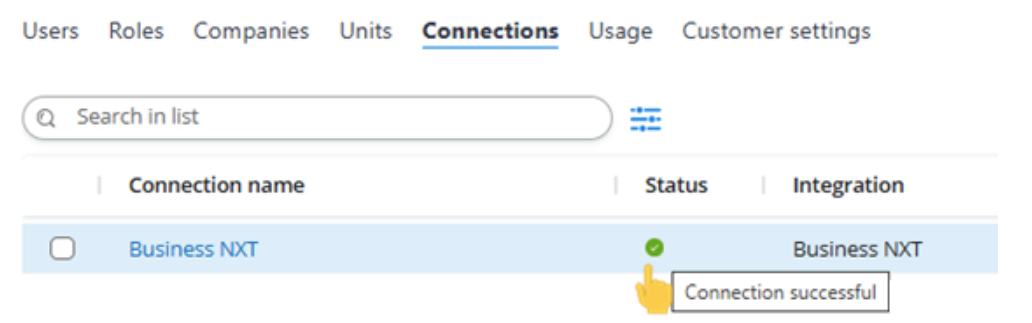
The **Connections** tab displays the available connections at the level you are currently on.
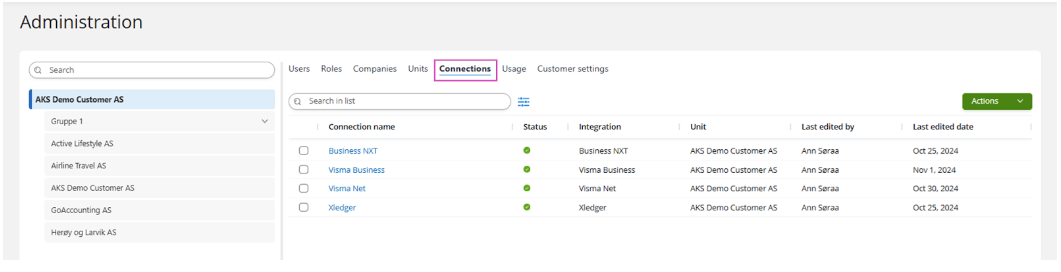
In the **Status** column, an icon representing the connection status is displayed. Hover over the icon to view a tooltip with additional information.
## Properties
Click on the **Connection Name** to open the **sidebar** with the properties of the connection.
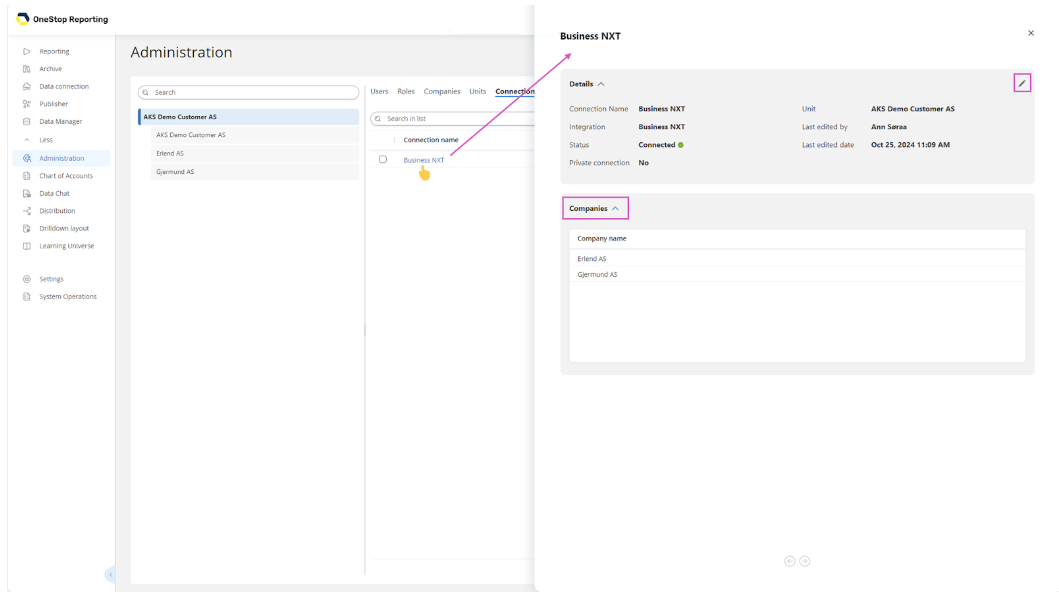
Click on the **pencil icon** ✏️ if you want to change the name of the connection or modify the setting for Private Connection (Yes/No).
Open the **Companies** section to view the companies added through this connection.
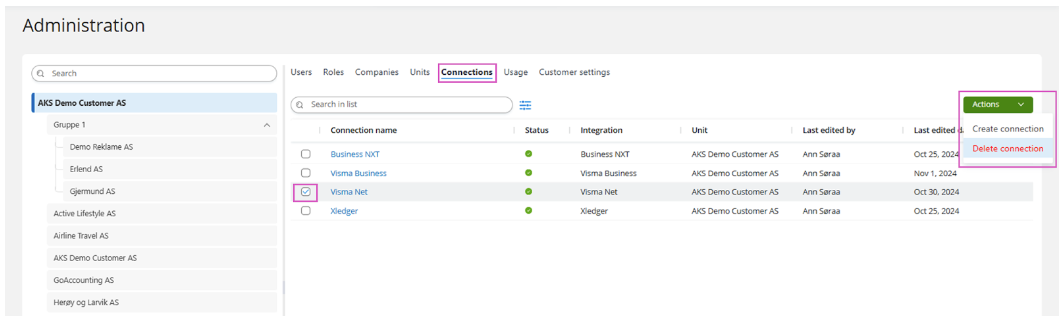
## Delete a Connection
- Go to **Administration** and navigate to the **Connections** tab.
- **Select** the connection you want to delete.
- Click the button with **three dots ...** on the top right corner of the screen, and choose **Delete connection**.
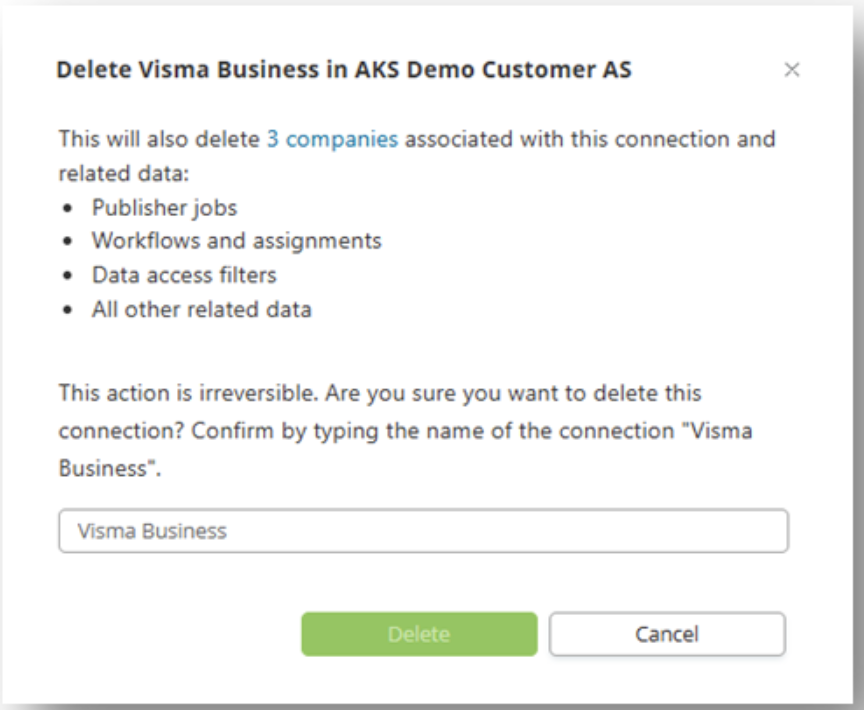
A warning prompt will appear before final deletion. For on-premise solutions and connections that do not require imports (like Business NXT), deleting the connection removes the connection along with the companies and associated data.
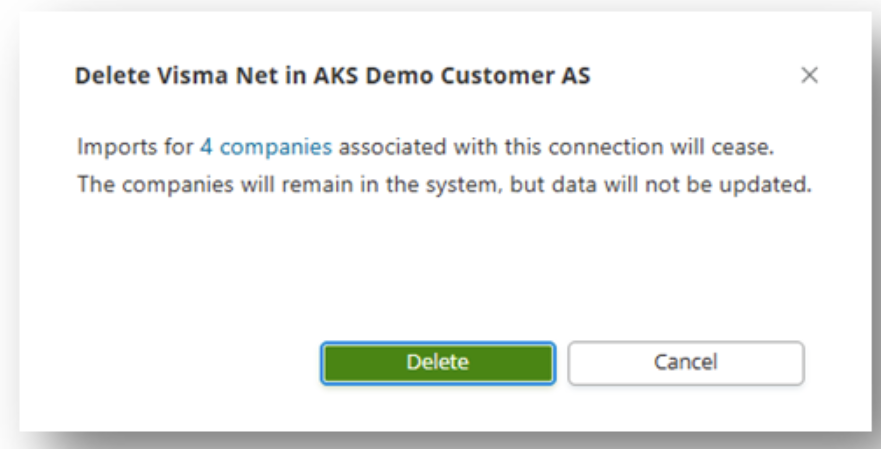
For connections that require imports (like Visma Net), deleting the connection removes the connection, but the companies will still exist without updated data.
Companies must be manually deleted afterward.
## Data Import (for Cloud-Based Systems)
When a company is added to the client, three import jobs are automatically included:
- **Full Data Import:** This runs immediately.
- **Nightly Import the Last 5 Days:** Imports data every night from the last 40 days.
Data connection local (On-prem)/onestopreporting/help/management/data-connections/data-connectionsectionManage data connections to local (On-prem) ERP systems.2026-01-16T14:27:01+01:00
# Data connection local (On-prem)
Manage data connections to local (On-prem) ERP systems.
### Data connection (on-premise)
> [!IMPORTANT]
> Before you can create a connection to your on-premise data sources from OneStop Reporting, you must first install an on-premise data gateway, enabled by the *OneStop Reporting Cloud Agent*.
> [!IMPORTANT]
> Installing and configuring the Cloud Agent is usually done by an administrator. It may require special knowledge of your on-premises servers, as well as your ERP system.
Install OneStop Reporting Cloud Agent/onestopreporting/help/management/data-connections/data-connection/install-cloud-agentsection2026-01-16T14:27:01+01:00
# Install OneStop Reporting Cloud Agent
## OneStop Reporting Cloud Agent
A Cloud Agent enables OneStop Reporting to retrieve data from Visma Business databases. It is an application that is installed on a server in the local domain.
## Installing the Agent
The agent installer can be downloaded here: [Cloud Agent](https://portal.onestopreporting.com/api/gateway/cloud-agent/installer)
1. Run the installer.
2. Choose the file path where you want to install the agent.
- Note that the closer the Cloud Agent is to the database server, the faster the connection will be.
- It is recommended to install the agent on a machine that can be left running all the time.
3. Click Install. The administration screen for OneStop Reporting Cloud Agent opens in your browser at [http://localhost:5002](http://localhost:5002).
## Adding a Data Source
In OneStop Reporting Cloud Agent Administration, click on "Add data source".
> [!TIP]
> You can access the Visma Cloud Agent Administration at any time to add or modify data sources from [http://localhost:5002](http://localhost:5002).
- In the **Server Name** field, enter the name of the SQL Server.
- In the **Database** field, enter the name of the Visma Business system database, typically called vbsys.
- Under **Authentication**, choose SQL Server Authentication or Windows Authentication.
- If you choose SQL Server Authentication, you must specify Login Name and Password.
> [!NOTE]
> The specified account must have read access to the Visma Business system database and all Visma Business client databases you want to access.
> [!NOTE]
> If you use Windows Authentication, the account running the Cloud Agent service must have access to the databases on the SQL server. The OneStop Reporting Cloud Agent service is by default set up to run with a local system account. However, this can be changed to another account.
- In the **File Access** field: Here you must enter the file path to the area where the vouchers are stored, and the user that the cloud agent authenticates with must have at least read access to the area where the files are located. Multiple areas can be entered here.
- In the **Name** field, enter a name for this data source.
- Click **Save**. You will now receive a Pairing Key. Copy this key and use it when configuring the data connection in OneStop Reporting.

Move OneStop Reporting Cloud Agent to another machine/onestopreporting/help/management/data-connections/data-connection/install-cloud-agent/move-onestop-reporting-cloud-agent-to-another-machinepage2026-01-16T14:27:01+01:00
# Move OneStop Reporting Cloud Agent to another machine
These instructions describe how to move an instance of the OneStop Reporting Cloud Agent to another machine without the need to reconfigure data connections, companies, or reports in the OneStop Reporting portal.
## Instructions
In the steps below, we will refer to the current machine hosting the agent as *OldMachine* and the new machine as *NewMachine.* These terms will be used to indicate where to perform the steps.
> [!TIP]
> The term *Cloud Agent service* refers to the Windows service named *OneStop Reporting Cloud Agent*.
1. On OldMachine: Stop the Cloud Agent service.
2. On NewMachine: Install the Cloud Agent.
3. On NewMachine: Stop the Cloud Agent service.
4. On OldMachine: Copy the agent\'s configuration folder to an intermediate location. The folder is usually located here (but depends on the chosen installation location): *C:\Program Files\OneStop Reporting\CloudAgent\Agent\Configuration\\*
5. On NewMachine: Delete the agent\'s configuration folder.
6. On NewMachine: Paste the configuration folder from the intermediate location to the agent.
7. On NewMachine: If Windows credentials are used, reconfigure the Cloud Agent service to use the desired account. **NOTE**: This is not needed if only SQL logins are used.
8. On NewMachine: Start the Cloud agent service.
9. On NewMachine: Open the Cloud Agent Admin from the Start menu.
10. On NewMachine: For each data source using SQL logins, the password must be reentered.
11. In the OneStop Reporting portal: Verify the system, for example by running a report.
12. On OldMachine: Uninstall the Cloud Agent. If there are still subfolders are left under the installation location, manually remove them to wipe all traces, such as logs.
Cloud Agent technical document/onestopreporting/help/management/data-connections/data-connection/install-cloud-agent/technical-documentpage2025-10-02T13:27:12+02:00
# Cloud Agent technical document
1. The cloud agent connects to OSR's data gateway and starts listening for requests. It is ensured that it is OSR’s server by verification of the certificate for the domain.
2. A user runs a report, triggering a request from OSR’s reporting server to the data gateway.
3. The data gateway finds the established connection with the customer's agent and passes on the request. The actual process of finding the corresponding agent is done using a Pairing Key that is a manually transferred secret that is entered into the OSR Portal by the customer administrator.
4. The agent looks up the credentials and settings for the requested data source and executes the request; be it a query against an SQL server or reading a file.
5. The agent reads the result data from the data source.
6. The agent starts streaming back the result data to the data gateway.
7. The data gateway passes on the stream to the reporting service.
Note that all report queries are run directly on the ERP system; thus, always providing up-to-date information. The data generated by queries and retrieved files are not stored by OSR in the cloud in any other form than rendered reports. The agent creates an outbound connection to OSR’s servers. It communicates on outbound port TCP 443. The agent does not require any inbound ports. If you are experiencing connectivity issues due to firewall constraints it is recommended that you whitelist the IP addresses for the Azure North Europe region in your firewall. You can download the Microsoft Azure Datacenter IP list, which is updated weekly. The agent communicates with the servers via HTTPS using the fully qualified domain name (FQDN). The current domain name is gateway.onestopreporting.com.
> [!NOTE]
> Traffic going to `visualstudio.com` or `visualstudioonline.com` are for app telemetry and insights and are not required for the agent to function.Create connection (for on-premise ERP systems)/onestopreporting/help/management/data-connections/data-connection/create-connection-for-on-premise-erp-systemspage2026-01-16T14:27:01+01:00
# Create connection (for on-premise ERP systems)
> [!IMPORTANT]
> Before you can create a connection, you must have the **OneStop Reporting Cloud Agent** installed on your server.
See [OneStop Reporting Cloud Agent](https://docs.vismasoftware.no/onestopreporting/help/management/data-connections/data-connection/install-cloud-agent/) for more information.
> [!IMPORTANT]
> Installation and configuration of the Cloud Agent are usually performed by an administrator. It may require specialized knowledge of your local servers as well as your ERP system.
------------------------------------------------------------------------
Go to **Administration**, and navigate to the level (customer, group, or client level) where you want to add the connection.
Go to the Connections tab, Click the button with **three dots ...** on the top right corner of the screen, and select Create Connection.
In the **Enter Pairing Key** field, enter the pairing key you received when you installed the Cloud Agent.

In the dialog box that appears, select the following **Voucher Provider**:
**None**, if you are not using vouchers.
OR
The voucher provider **Document Center**, if your company uses this service.
In the **Document Center Path** field, enter the file path where the vouchers are stored.
Select ✅ the company/companies you want to create a connection to in the **Companies** list, and complete the wizard.
> [!IMPORTANT]
> Ensure that the path matches the access you provided when you installed the Cloud Agent.
> [!TIP]
> *Don't have the pairing key?*
> **If you did not install the Cloud Agent yourself, you need to contact the person who installed it for you**
> [!IMPORTANT]
> If you have already created a connection and want to create a new one, you can find and copy the pairing key from an existing connection by clicking on the connection and then on  *Edit*
Create Data Connection Cloud/onestopreporting/help/management/data-connections/getdatasection2024-11-18T15:24:36+01:00
# Create Data Connection Cloud
Create a connection for Contracting Works/onestopreporting/help/management/data-connections/getdata/create-a-connection-to-cwpage2025-11-20T09:58:58+01:00
# Create a connection for Contracting Works
## Forutsetninger
Du trenger **Emne-ID**, **API-nøkkel**., og **Leietaker-Id**
Emne-ID, og API-nøkkel kan skaffes ved å kontakte Contracting Works Support.
Leietaker-Id: Denne finner du i webadressen til klienten i Contracting Works.
I vårt eksempel vist her er Leietaker-Id:**10355-vismaosr**

Feltet **firmanavn** under **firmadetaljer** i Contracting Works må fylles ut

## I OneStop Reporting
1. Logg inn i OneStop Reporting og gå til Administrasjon.
2. Velg ønsket nivå (kunde, gruppe, klient) og klikk på Tilkoblinger.
3. Klikk på knappen med de **tre prikkene ...** oppe til høyre på skjermen og velg Contracting Works som integrasjon.
4. Opprett tilkobling: Oppgi koblingsdetaljer I vinduet som kommer opp
Her må du fylle inn:
- **Tilkoblingsnavn** (Gi tilkoblingen et navn)
- **Emne-ID** og **Api-nøkkel**: Kontakt Contracting Works for denne informasjonen.
- **Leietaker-Id**: Denne finner du i webadressen til klienten i Contracting Works. I dette eksempelet er det: 10355-vismaosr

5. Klikk deretter lagre.
6. **Velg selskap du vil legge til:**
- I vinduet som kommer opp må du velge selskap du vil opprette i nedtrekksboksen.
- Om du ikke får opp noen selskap her må du påse at feltet firmanavn er fylt ut under firmadetaljer i Contracting Works.
- Når du har lagt til selskap(ene) klikker du lagre.
Selskapet er nå lagt til i OneStop Reporting!
Opprette integrasjon mot Customer Insight /onestopreporting/help/management/data-connections/getdata/create-connection-to-customer-insightpage2026-01-16T14:27:01+01:00
# Opprette integrasjon mot Customer Insight
> [!IMPORTANT]
> Integrasjon mot Customer Insight må settes opp kundenivå (øverste nivå)) i Administrasjon
> [!IMPORTANT]
> Du må være kunde-administrator for å sette opp integrasjonen
1. Gå til **Administrasjon** i OneStop Reporting i menyen på venstre side
2. Klikk på **Tilkoblinger**
Klikk på knappen med de **tre prikkene ...** oppe til høyre på skjermen >> Opprett tilkobling

3. I Opprett kobling vinduet som kommer opp under **Velg integrasjon** må du velge **Customer Insight**

4. Gi koblingen ett navn.
Klikk **Lagre**

5. Klikk i nedtrekks boksen for å velge selskap som skal legges til, her vil du kun ha ett selskap

6. Gi klienten ett valgfritt navn og klikk **lagre**
> [!NOTE]
> Vi anbefaler at du gir klienten et navn som er lett gjenkjennlig som feks Cusromer Insight da denne klienten er kun ment for denne integrasjonen
Du har nå opprettet integrasjon mot Customer Insight
Create integration with VismaNet/onestopreporting/help/management/data-connections/getdata/opprette-integrasjon-mot-visma-netpage2026-01-16T14:27:01+01:00
# Create integration with VismaNet
Go to **Administration** in the OSR Portal, and navigate to the **level** (customer, group, or client level) where you want to add the connection.
Go to the **Connections** tab, Click the button with **three dots ...** on the top right corner of the screen, and select **Create Connection**.
Select Visma Net from the dropdown menu, give the connection a name, and click **Save**.
Enter the **username and password** you use in Visma.net and complete the wizard.
> [!IMPORTANT]
> The user must have access to the Finance module in Visma.net.
**You have now created access to Visma.net.**
Opprette integrasjon mot Tripletex/onestopreporting/help/management/data-connections/getdata/opprette-integrasjon-mot-tripletexpage2025-11-20T09:58:58+01:00
# Opprette integrasjon mot Tripletex
Dersom du har en regnskapsførerkonto i Tripletex, er det mulig å opprette en API brukernøkkel for flere klienter
Dette kalles Regnskapskontorets brukernøkkel. For mer informasjon om dette, se:
## API nøkkel i Tripletex mot OSR
Dette må du gjøre
**I Tripletex**
Sørg for at integrasjon i Tripletex er aktivert.
1. Gå til «Selskap > Mitt abonnement» i hovedmenyen.
2. Se på seksjonen «Moduler og tilleggstjenester».
3. Bestill tilleggstjenesten «Integrasjoner».
4. Les gjennom vilkårene og klikk på «Aktiver».

Du må ha Smart- eller Komplett pakken, og være konto- eller brukeradministrator for å aktivere «Integrasjoner».
## Klientenes nøkkel
**Lag nøkkel**
1. Gå til «Lønn > Ansatte» eller «Kunde > Kontakter» i hovedmenyen, og velg den brukeren du ønsker å registrere brukernøkkelen på.
2. Velg fanen «API-tilgang». Denne fanen finner du også på deg selv.
3. Registrer en nøkkel ved å klikke på «Ny nøkkel».
*Brukernøkkelen kan kun ha samme eller mindre tilgang til systemet som det brukeren du lager nøkkelen på har*

1. Huk av for «Tilpasset oppsett» og velg hvilke type tilganger du ønsker å gi integrasjonen. Se en oversikt over hva de ulike tilgangene gir under.
2. Huk av for Regnskapskontorets brukernøkkel.
3. Velg OneStop Reporting i feltet «Applikasjon».
4. Skriv inn OneStop Reporting i feltet «Applikasjonsnavn».
5. Legg inn hva du ønsker å kalle integrasjonen i oversikten i feltet «Gi nøkkelen et navn».
6. Klikk på «Opprett nøkkel» for å få opp den unike brukernøkkelen.

Kopier nøkkelen og lagre det på et dokument eller lignende, slik at du har den tilgjengelig.
OBS! sørg for at du ikke kopierer med mellomrom og bulletpoint. Brukernøkkelen vises kun én gang. Du er selv ansvarlig for å ta vare på den.

## Koble nøkkel mot klienter i Tripletex
Nå som regnskapskontorets API-brukernøkkel er laget, må den knyttes opp mot klient.
Slik gjør du det:
1. Gå til "Klient>Tilganger" i hovedmenyen.
2. Klikk på "Legg til API-nøkkel" øverst til høyre.

3. Velg API-brukernøkkelen(e) under feltet "API-nøkkel" og gi alle tilgangene den trenger under "Tilgangsmal". Velg deretter hvilke klienter som API-brukernøkkelen skal brukes på.
4. Klikk på "Lagre endringer" for å knytte brukernøkkelen mot klientene.

**Slik aktiverer du API - brukernøkkelen inne på klienten din i Tripletex**
1. Klikk på selskapsvelgeren øverst til venstre i Tripletex. Velg klienten du skal aktivere brukernøkkelen på.
Se bilde

2. Klikk på "Selskap>Regnskapsfører" i hovedmenyen.
3. Sørg for at det er valgt riktig regnskapsfører i feltet "Regnskapsfører", og huk av for "API-tilgang" i seksjonen "Generelle tilganger".
4. Klikk på "Lagre".

## Legg inn nøkkelen i OneStop Reporting
Gå til **Administrasjon** i OSR Portal, og gå til det **nivået** (kunde-, gruppe- eller klientnivå) du ønsker å legge til tilkoblingen
Gå til fanen **Tilkoblinger**, Klikk på knappen med de **tre prikkene ...** oppe til høyre på skjermen, og velg Opprett tilkobling.
Velg Tripletex som integrasjon
Under Ansatttoken legger du inn nøkkelen fra Tripletex

**Hva gjør man dersom man ikke har lagret nøkkelen og ikke finner den igjen?**
I Tripletex:
Finn ansatt- eller kontaktkortet nøkkelen ligger på. Som oftest er den registrert hos brukeradministrator i kontoen.
Klikk på fanen "API-tilgang".
Klikk på "Gjenopprett nøkkel".
Du får opp en ny nøkkel som erstatter den gamle.
Sørg for å lagre den nye brukernøkkelen et trygt sted.
Legg inn den nye brukernøkkelen i integrasjonen.
Create integration with Xledger/onestopreporting/help/management/data-connections/getdata/opprette-integrasjon-mot-xledgerpage2025-11-20T09:58:58+01:00
# Create integration with Xledger
**I OneStop Reporting, gå til Administrasjon \> Tilkoblinger \> Klikk på knappen med de tre prikkene ... oppe til høyre på skjermen \> Velg Xledger.**
Enter a name for the connection, login information, and input the Entity Code (Eier-ID).

## How to Generate Entity Code in Xledger ##
**1. Open Xledger**
**2. Go to Administration \> Entity.** Click on the folder icon and find your *Eier-ID.*

The Eier-ID is set for a single company or for a domain/group. If the Eier-ID is set at the domain/group level, OneStop Reporting will be able to retrieve the Eier-ID for underlying companies.
Enter your *Eier-ID (Entity Code)* when creating access to Xledger in the OSR Portal.
**3. Go to Administration \> Access Control \> Local Access.**
A user account is used to export from Xledger to OneStop Reporting. The user account must have the *Web Service* access.
The user account used to export from Xledger to OneStop Reporting must have the *Web Service* access.

Note that access can be set at the domain/group level. This access will then be inherited by underlying companies.
**4. Go to Administration \> Access Control \> Web Service Access.**
The same user account must be granted access to the *Web Service* methods used by OneStop Reporting. OneStop Reporting uses all *Web Service* methods.
Create integration with PowerOffice Go/onestopreporting/help/management/data-connections/getdata/opprette-integrasjon-mot-poweroffice-gopage2025-07-02T11:31:16+02:00
# Create integration with PowerOffice Go
To allow OneStop Reporting to access data from PowerOffice Go, the client key of the PowerOffice Go user must be entered in the OSR portal. It's this client key that is used to retrieve your data, not your username or password. The user retrieving the client key from PowerOffice Go must be an **Administrator.**
Follow the steps below to retrieve your client key:
1. In **PowerOffice Go**, go to **Settings** in the menu.
2. Select **Extensions**.
3. Choose **Add Extensions**.
4. Click on the dropdown menu and select **OneStop Reporting**.
5. Copy your **ClientKey** (from PowerOffice Go). **NOTE:** The *ClientKey* is the client key you need to enter in the **Retrieve Data** dialog to access your data from PowerOffice Go.
6. Select **OK**.

Create integration with 24SevenOffice/onestopreporting/help/management/data-connections/getdata/opprette-integrasjon-mot-24sevenofficepage2026-01-16T14:27:01+01:00
# Create integration with 24SevenOffice
1. Go to **Administration** in the OSR portal.
2. Click **Connections**.
3. Click the button with **three dots ...** on the top right corner of the screen and select **Create Connection**.
4. Select **24SevenOffice**.
5. Fill out the following:
Connection name (optional)
Your username for 24SevenOffice
Your password for 24SevenOffice

6. **Select company:** Check the company or companies you want to create access for and complete the wizard.
**You have now created access to 24SevenOffice.**
> [!IMPORTANT]
> If multiple people create connections to the same company, it will appear as two separate companies in OneStop Reporting. Therefore, it is best that only one person creates a connection to a company.