Drilldown
/onestopreporting/help/report-designer/creating-reports/drilldown
section
2024-08-02T13:54:26+02:00
# Drilldown
The simple *Drilldown* option allows users to see the underlying detail of the value presented in the report.
To enable this feature;
1. Select a *measure* field in the report definition.
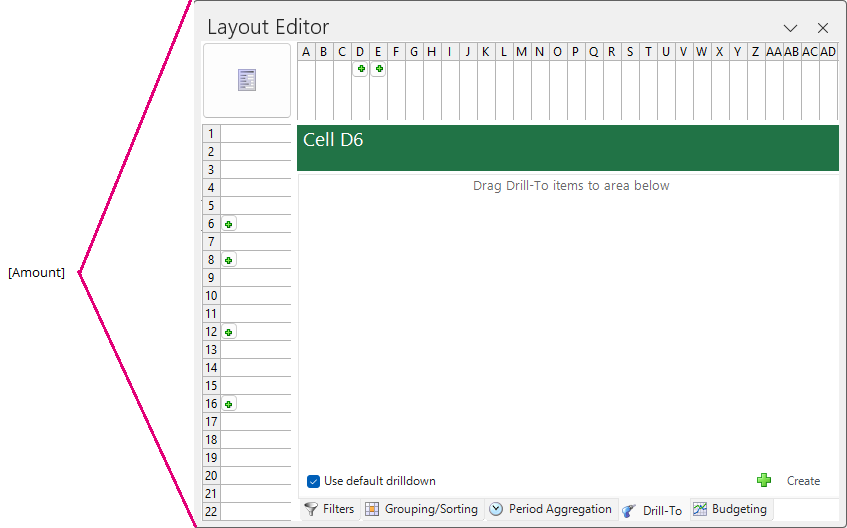
2. In the **Layout Editor**, click the **Drill-To** tab, and select the **Use Default Drilldown** checkbox.
After you have executed the report, you can drill-down on any number to see the underlying journal entry level details from the same module;
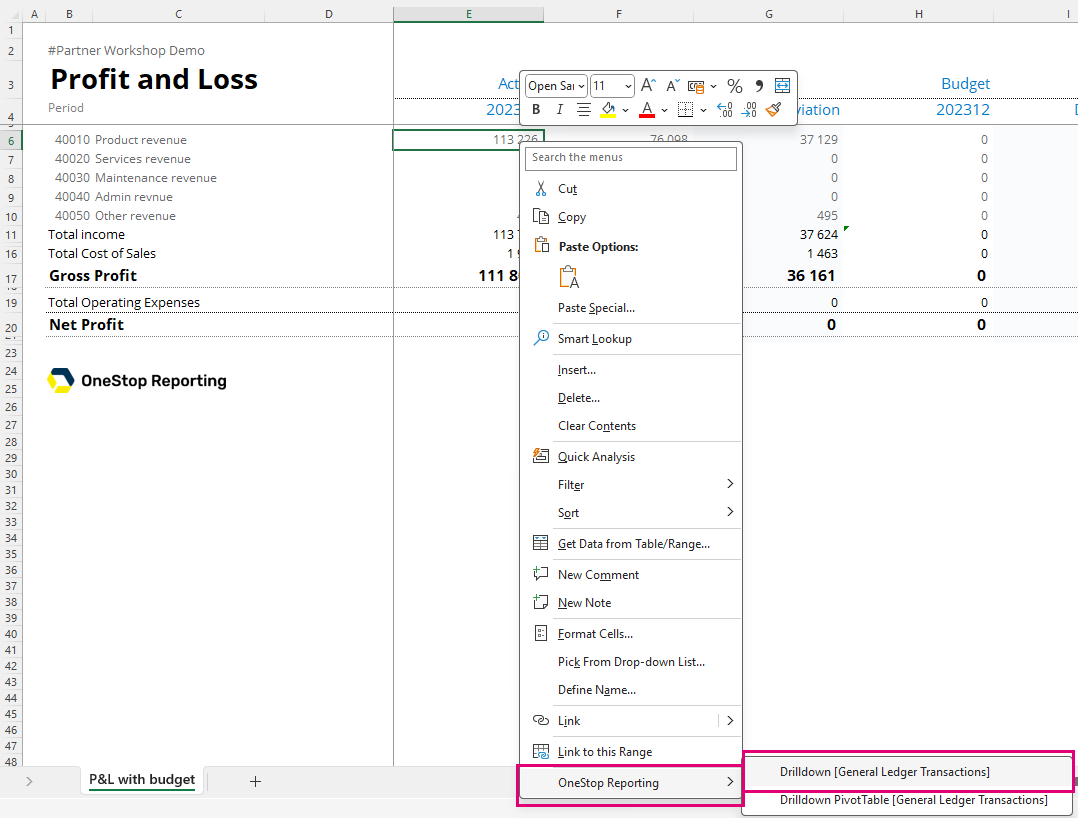
1. Right-click any number in the executed report.
2. In the right-click menu, choose **OneStop Reporting** and then **Drilldown**.
The result of the drill-down will appear in a new worksheet in Excel named *\#DrillDown* and each resulting column will automatically be given filters.
### Customizing the default drilldown view
You can customize the default drilldown view to display fields of your choice and in the order of your preference.
[Drill-To](./drill-to)
Drill-To
/onestopreporting/help/report-designer/creating-reports/drilldown/drill-to
section
2024-08-02T13:54:26+02:00
# Drill-To
**Drill-To** is an advanced drilldown feature that allows users to drill down across multiple modules. For example, users can begin with a report showing values from the *General Ledger*, and then drill down to see the underlying values from the *Accounts Receivable* sub-ledger.
To use the *Drill-To* feature, you must configure the *Drill-To Definition* in the report template. *Drill-To Definitions* must be created on the cell level, by selecting a cell that will be the common dimension between the two different modules. For instance, the shared dimension could be the *Account* number or the *Voucher* number. When the *Drill-To* feature is used, **Report Designer** will use the specified dimension to retrieve entries from the sub-ledger.
The figure below shows the interfaces involved in configuring the **Drill-To** feature.

| | **Button** | **Function** |
|----|----|----|
| **1** | **Drill-To tab** | This tab is only available when you have selected a cell. |
| **2** | **Use default drilldown** | Select this checkbox to apply the default drilldown option. Deselect this checkbox to create a customized drill-to definition. |
| **3** | **Drill-To item** | A list of *Drill-To definitions* applied to the specific cell is generated. You can edit or delete the definition by clicking on the appropriate buttons. |
| **4** | **Create** | This button will create a new *Drill-To* definition and open the Drill-To Builder. |
You can configure the *Drill-To Definition* through the **Drill-To Builder**. The configuration is required so that **Report Designer** is able to filter through to the proper sub-ledger using parameters or drill source dimensions.
 *Figure: Drill-To Builder dialog box*
| | **Interface Name** | **Function** |
|----|----|----|
| **1** | **Name** | Create a descriptive name so you can easily identify the *Drill-To Definition*. |
| **2** | **Search** | Search for data items in your ERP system. |
| **3** | **Module list** | In this section, the selection of *Modules* is displayed. From the list of *Modules*, drag dimensions into the *Drill-To* details and filters section to configure the *Drill-To Definition*. |
| **4** | **Drill-To details** | Data items can be dragged into this section to create column headers in the resulting *Drill-To* worksheet. The column headers can be reordered by dragging the header title. Moreover, the data item can be removed by clicking on the header title once. |
| **5** | **Drill-To filters** | Data items can be dragged into the filters section so that the *Drill-To Definition* can be configured to filter to the correct detailed transactions. |
When using the **Lookup** button in the *Drill-To* filters, you have these options:
 *Figure: Drill-To Lookup dialog box*
| **Tab** | **Description** |
|----|----|
| **List** | On this tab, you can select a filter based on a constant value. |
| **Parameter** | On this tab, you can select a filter based on a parameter from the report definition. |
| **Drill-To** | On this tab, you can select a filter based on the attribute context of the *Drill-To* originating cell. The available fields on this tab are based on the dimensions and attributes that are used in the particular row or column in the report definition. |
Configure a Drill-To definition
/onestopreporting/help/report-designer/creating-reports/drilldown/drill-to/how-to-configure-a-simple-drill-to-definition
page
2024-08-02T13:54:26+02:00
# Configure a Drill-To definition
In this section, a simple *Drill-To Definition* will be created that allows users to run a P&L statement and drill to the HR sub-ledger. In the HR sub-ledger, there are details of the employee salaries. However, in the simple P&L statement, only a summary value exists.
Begin with a simple P&L statement as shown in the figure below. The *Drill-To Definition* will be created in cell E12 and will be configured to drill to the HR sub-ledger.

Follow these steps to configure this *Drill-To Definition*:
1\. Click on the cell that corresponds to the Amount field for the Expenses section.
2\. In the **Layout Editor**, on the **Drill-To** tab, click the **Create** button  to create a new definition*.*

The **Drill-To Builder** dialog box opens.
3\. In the **Name** field, enter GL to HR Drill.
4\. In the Module list, open the *Payroll* sub-ledger.
5\. From the *Payroll* sub-ledger, drag the dimensions you want to display in the Drill-To report into the **Drill-To details** area*.*

Next, you must configure the filters used to drill to the values in the sub-ledger. These filters are crucial for setting up the correct *Drill-To Definition*. The dimensions used in the original report template can be used so that data from unrelated dimension codes can be filtered out.

For this particular example, the *Account* and *Period* filters reference the drill source account and periods. This means that the **Report Designer** will reference the dimension code found in the particular row or column when the *Drill-To* feature is used.
The *Category* dimension uses a static filter, whereas the *Department, Entity,* and *Scenario* filters use the parameters from the report definition.
The *Drill-To Definition* has now been configured and the report is ready to be run.
### Use the Drill-To option in an executed report
1. Right-click on cell E15.
2. In the right-click menu, click the **OneStop Reporting \> Drill-To** menu option.
 *Figure: Generated report with the OSR Drill-To right-click option*
The Drill-To result creates a new sheet and displays values based on the Drill-To details and filters that were configured in the above steps.
 *Figure: Drill-To sheet in an executed report*
Drill-To Definitions
/onestopreporting/help/report-designer/creating-reports/drilldown/drill-to/drill-to-definitions
page
2026-01-16T14:27:01+01:00
# Drill-To Definitions
Drill-to definitions created in the report definition are displayed in the **Drill-To Definitions** pane.
Drill-to definitions created in the **Layout Editor** can be reused throughout various sections of the **Report Designer** by dragging them from the **Drill-To Definitions** pane into the **Drill-To** tab of the **Layout Editor**.
 *Figure: Drill-To Definitions pane and the Drill-To tab on the Layout Editor*
### Edit a Drill-To Definition
1. In the **Drill-To Definitions** pane, select the definition.
2. Click the **Edit** option at the bottom of the pane.
### Delete a Drill-To Definition
1. In the **Drill-To Definitions** pane, select the definition.
2. Click the **Delete** option at the bottom of the pane.
New Drill-To definitions must be created from the **Layout Editor**.
> [!TIP]
> For more details on how to use the *Drill-To* feature, see [Drill-To](../drill-to-definitions) and [Configure a Drill-To Definition](../how-to-configure-a-simple-drill-to-definition)