Report Designer user interface
/onestopreporting/help/report-designer/introduction/report-designer-interface-2
section
2026-01-16T14:27:01+01:00
# Report Designer user interface
The next sections give you an overview of the three components of OSR Report Designer: the **OneStop Reporting** Excel ribbon, the **Layout Editor** window, and the **Report Designer** menu.
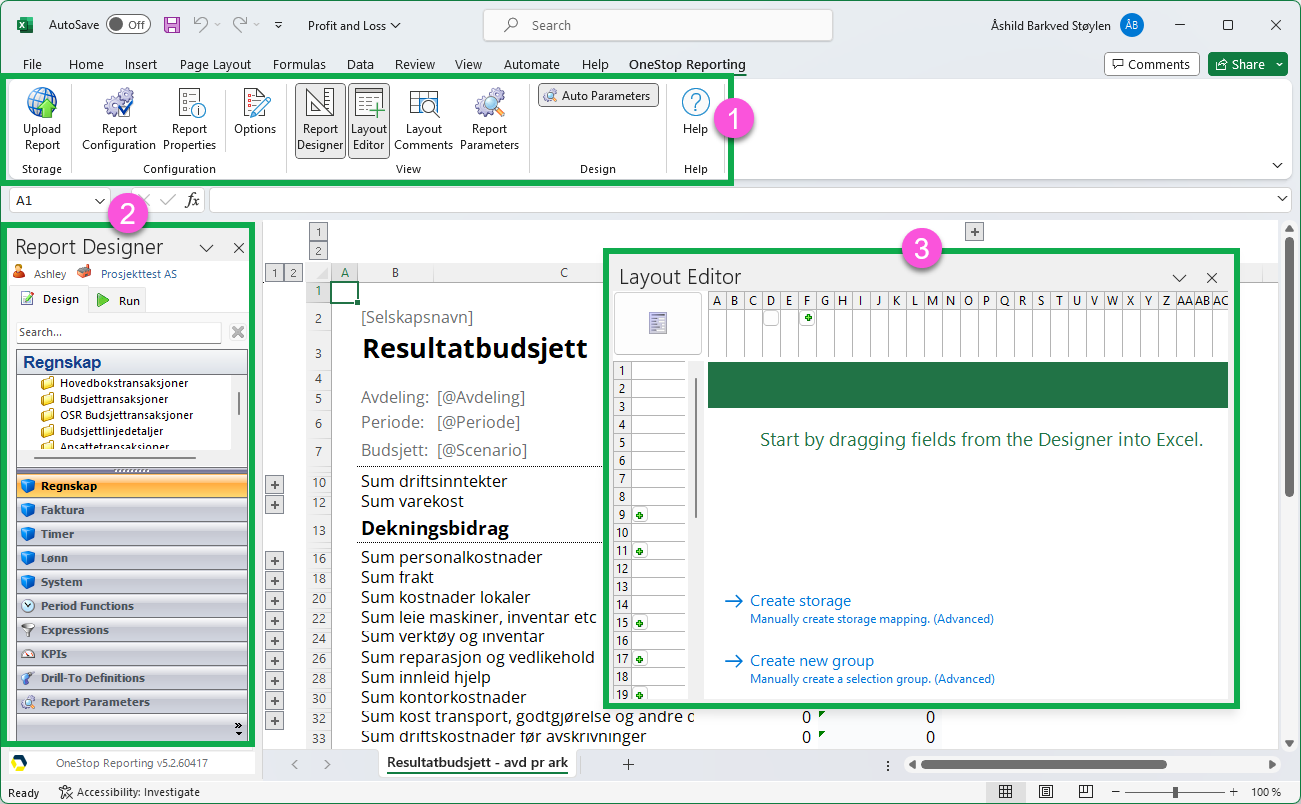
| **Number** | **Component** |
|---|---|
| 1 | OneStop Reporting Excel ribbon |
| 2 | Report Designer menu |
| 3 | Layout Editor window |
Layout Editor
/onestopreporting/help/report-designer/introduction/report-designer-interface-2/layout-editor
page
2026-01-16T14:27:01+01:00
# Layout Editor
The **Layout Editor** allows you to create, edit, and delete business rules when designing reports. Click the **Layout Editor** button  in the **OneStop Reporting** Excel ribbon to open this window. The **Layout Editor** is primarily used for managing filters, grouping/sorting and functions for cell, row, column, and sheet level business rules.
The **Layout Editor** window contains the elements shown in the figure:
*Figure: Layout Editor interface elements*
## Report Level (Sheet filters) (1)
Selects the entire report so that rules (parameters) can be applied to the entire Excel report.
## Column/ Row Level (Column selections/Row selections) (2)
You can select a column or row to create, edit, or delete business rules at the column or row level.
> [!TIP]
> For more information about the property hierarchy, see [Property hierarchy](./../../../creating-reports/property-hierarchy).
## Data display settings (3)
You can specify the settings for displaying the data in the report.
| **Option** | **Function** |
|---|---|
| *Expanding* | If selected, the report will list the details of dimensions and create what is known as an *expanding group;* that is, list each account rather than grouping the accounts together and displaying a total. Only available at row or column level. |
| *Display blank records* | If selected, the report will display dimensions with blank records in the report; that is, if the checkbox is cleared, empty datasets will not be displayed. Only available at row or column level. |
| *Limit* | If selected, the report will display dimensions with blank records in the report; that is, if the checkbox is cleared, empty datasets will not be displayed. Only available at row or column level. |
## Edit area for filters, grouping/sorting and period aggregation (4)
In this area, you can specify settings for the [filters](./../../../creating-reports/layout-editor/filters), [grouping/sorting](./../../../creating-reports/layout-editor/grouping-and-sorting) and period aggregation.
## Tabs for Filters, Grouping/Sorting, Period Aggregation (5)
The tabs allow you to configure different rules for the selected level.
For more details on the various options, see the [Layout Editor](./../../../creating-reports/layout-editor) section.
One Stop Reporting Excel ribbon
/onestopreporting/help/report-designer/introduction/report-designer-interface-2/osr-excel-ribbon
section
2024-08-07T11:22:23+03:00
# One Stop Reporting Excel ribbon
The **OneStop Reporting** Excel ribbon is found at the top of the Excel window and provides easy navigation and access to the key functions in the **Report Designer.**
| Excel ribbon button | Function |
|----|----|
|  | Allows you to upload a report to the OneStop Reporting portal. NOTE: Reports are automatically uploaded to the portal when you save. |
|  | Opens the Report Configuration dialog box, which allows you to configure the company. |
|  | Allows you to input optional additional information, such as the report title and description. Also allows you to enter the password for protected worksheets. |
|  | Provides access to report behavior settings, details on the version of Report Designer, and miscellaneous options. |
|  | Opens and closes the Designer menu on the left side of the screen, where you find the integrated fields from the ERP system as well as pre-defined period functions. |
|  | Opens and closes the Layout Editor window, where you can apply filters, sorting, and grouping for the report. |
|  | Enables and disables layout comments that display the filters, groupings, and functions used in the sheet, row, column, or cell level of the report. |
|  | Opens and closes the Report Parameters dialog box, where you can manage the properties for the parameters that have been applied to the report definition. |
|  | Enables and disables automatic creation of parameters. When disabled, report parameters will not be created unless you explicitly create one using the Report Parameters dialog box. |
Options
/onestopreporting/help/report-designer/introduction/report-designer-interface-2/osr-excel-ribbon/options
section
2024-07-04T17:39:28+02:00
# Options
#### **Options**
Clicking the **Options** button opens the **Report Designer Options** dialog box. This dialog contains two tabs:
1. Designer tab
/onestopreporting/help/report-designer/introduction/report-designer-interface-2/osr-excel-ribbon/options/1-the-designer-tab
page
2024-08-07T11:22:23+03:00
# 1. Designer tab
## Designer tab

| Option | Function |
|----|----|
| Always open Report Designer in Run mode | If the checkbox is selected and a saved report is opened, Report Designer will always open with the Run tab active. |
| Insert field title above cell on drop | If the checkbox is selected, when a data field is dragged into an Excel sheet, Report Designer will automatically create a title one cell above the data field. The title can be modified or deleted in the cell. |
| Show tooltips in modules | If the checkbox is selected, you will get tooltips with extra technical information from the ERP system when hovering over a data item in the Report Designer menu. |
| Create Group Dialog | The vertical slider has three settings (Always, Conditionally, and On CTRL). Depending on its position, Report Designer will always, conditionally, or never prompt the user to create a new group when a data field is dragged into the report definition. If the slider is set to On CTRL, OSR Report Designer will never prompt the user and the user must manually create a group by holding the CTRL key while dragging the field.  |
| Application | Allows you to select a language for the OSR application using a drop-down list. |
| Integration Dictionary | Allows you to select a language for the integration package using a drop-down list. |
2. Application tab
/onestopreporting/help/report-designer/introduction/report-designer-interface-2/osr-excel-ribbon/options/2-the-application-tab
page
2024-08-07T11:22:23+03:00
# 2. Application tab
## Application tab

| Option | Function |
|----|----|
| Auto-connect | If selected, Report Designer will always connect when Excel is run. However, if the checkbox is cleared, you are required to manually connect Report Designer before designing or running a report. |
| Auto-start report | Opening Excel by double-clicking a OneStop Reporting report via Windows Explorer overrides the setting under Auto-connect, and the OSR Report Designer Excel COM add-in starts automatically when Excel is opened. To prevent the OSR Report Designer Excel COM add-in from starting even when Excel is opened by double-clicking a OneStop Reporting report, you must select the Auto-start report checkbox. To prevent the OSR Report Designer Excel COM add-in from starting automatically no matter how Excel is started, both the Auto-connect and the Auto-start report checkboxes must be cleared. |
| Sign in automatically | If the checkbox is selected, OSR Report Designer will automatically sign in with the previously logged-on user. |
| Portal URL | Shows your OneStop Reporting portal URL. |
| Licensed to | Displays the license information. |
| About... | Click this button to get information about the Report Designer version, build number and the license information. |
Report Properties
/onestopreporting/help/report-designer/introduction/report-designer-interface-2/osr-excel-ribbon/report-properties
page
2025-06-13T15:38:13+02:00
# Report Properties
The **Report Properties** are available from the OneStop Reporting ribbon in Excel. They can be accessed by clicking the **Report Properties** button.
### General tab
You can view and change information, such as, title, description, author, and get information on when the report was created and last modified.
### Protection tab
This security property enables you to specify the password used in Excel's built-in protection, so that it allows **Report Designer** to unprotect the workbook as needed.
Excel has two different built-in security features:
- The first is security on the Excel file level. Users may protect the entire file by requiring password to open and modify the workbook. This type of security does not interact with **Report Designer** and purely restricts who can access the report definition. For more information on security on the file level, refer to the appropriate Microsoft Excel documentation.
- The second type of built-in security for Excel is the protect worksheet or protect workbook feature. By using either of these features, users can lock the worksheet cells so that users may not modify the contents of locked cells unless the worksheet or workbook is unprotected. If this feature is used, there is a direct interaction with **Report Designer** reading the protected report definition. Therefore, report designers must provide the password used to lock the worksheet/workbook in the Report Properties -\> Protection tab. Otherwise, the report will not be generated and an error message will be shown.
### Reporting tab
The Report properties for **Reporting** are:
- **Keep formulas in run report:**
- When selected, all formulas are kept when running the report in OneStop Reporting. This allows you to make calculations after the report has been executed in **Reporting**. **NOTE**: This option does not apply to budget templates
- When deselected, all formulas in the generated report are removed during processing, and the values are replaced with actual cell values. This option may improve the performance of the report and reduce run time. **NOTE**: The drilldown function works as normal even though the formulas are removed from the report template.
- **Replace indirect references**:
- When selected, all indirect references, i.e. INDIRECT() are replaced with direct references in order to improve performance in formulas. This does not work for complex reference arguments to INDIRECT. **NOTE**: This option will also affect budget templates.
### Budgeting tab
The Report properties for **Budgeting** are:
- **Force refresh when opening report in Portal:**
- When selected, this property will force a report (or a budget template) instance in the portal to be executed each time the report is opened.
- Some conditions that warrant its use would be:
- 1\) to ensure the user is working with the latest data within the budget form. If left unchecked, the data in a history item report will display the data the last time the report was executed by that user.
- 2\) if budgeting data has been updated since the last time the report/form was executed, the report should be refreshed to show the latest status. **Note**: Checking this property means that the execution will also happen when clicking on a history item (previously run report) in the left menu of the report page in the Portal. You should keep this in mind if reports are heavy and take a long time to run.
- **Protect non-input cells:**
- When selected, it automatically protects all cells in the budget template that do not have any defined budgeting storage rule. This protection applies when running the budget template in **Budgeting** or **Assignments**, but does not take effect in **Report Designer**. This means that end-users will be prevented from editing other cells than data input cells.
- For advanced budgeting templates with a combination of storage rules with cells requiring user input and/or cells with calculated values where input is not required, you will need to use Excel functionality to protect the sheet and unlock input cells. To do this, deselect the automatic OSR protection property.
- **Allow Line Item Detail:** The **Budgeting** module allows for specifying line item details of budget transactions. For example, as an administrator, you would like the End-user to specify additional details about travel expenses. To enable this, you need to make sure this option is checked. Read more about [Line Item Detail here](./../../../../../budgeting/report/edit-budget-data/add-line-item-details)
Report Designer menu
/onestopreporting/help/report-designer/introduction/report-designer-interface-2/report-designer-menu
page
2026-01-16T14:27:01+01:00
# Report Designer menu
## Report Designer tabs
The **Report Designer** contains two tabs:
- The **Design** tab generates the ERP modules and dimensions based on the integration that you are connected to.
- The **Run** tab allows you to select parameters and execute reports.
*Figure: Report Design tabs*
Depending on which tab is active, certain functions within **Report Designer** will be deactivated.
The **Design** tab contains the areas shown in the figure:

**Design** tab
| | **Option** | **Function** |
|---|---|---|
| **1** | Data items | A list of data items from the ERP system. Drag data items into the Excel sheet to create a report template. When you mouse over a data item name, you can see the system name of the data item. For more information, see [Data Items](./../../../creating-reports/data-items). |
| **2** | ERP modules | A list of ERP modules integrated from the ERP system. The modules contain the dimensions and measures that can be used to create a report. In addition, period functions and report parameters are included below the list of modules. When you hold the cursor over a module name, you can see the system name of the module. |
| **3** | OneStop Reporting functionality | A list that includes functionality, such as period functions, expressions, KPIs, and drill-to definitions. |
**Run** tab
| | **Option** | **Function** |
|---|---|---|
| **3** | Parameters | Parameters defined in the report design will be listed. You can specify a parameter by using the **Lookup** button. |
| **4** | **Run** button | To execute the report, click the **Run** button. You can run the report in **Report Designer** or it can be published to a regular Excel worksheet by clicking the drop-down arrow.  |