Developer Portal - Sample Set Up
/vismanetapi/setting-up-your-integration/ui-automation/developer-portal-sample-setup
section
Steps to set up a sample UI Automation application in the Visma Developer Portal.
2025-11-28T09:38:52+01:00
# Developer Portal - Sample Set Up
Steps to set up a sample UI Automation application in the Visma Developer Portal.
## Setting up an application on Developer Portal
This is a suggested sample setup in the Developer portal. If you need
more detailed information, please refer to the official [Developer portal documentation](https://docs.connect.visma.com/)
documentation.
This documentation will only cover the settings and parameters in the
developer portal that we used to set up our sample application.
## Details
- **Application type**: Web App
- **Name**: Should be something user-friendly; this will be visible to
the user in the consent pop-up on first-time use.
- **Grant types**:
- Authorization code: (X)
- Client Credentials: (X)
- **Redirect URIs**: The URL to your application where the user gets
re-directed after the pop-up sign-in flow.
> \[!TIP\]
>When developing locally and testing, you can, for
> example, add (For security measures,
> remember to remove this when it is not in use)
- **Privacy policy URI**: Your application's privacy policy
- **Terms of service URI**: Your application's terms of service
## Application policy
**Authorization**
Single tenant -\> Allow all users
## Credentials
**Generate secret**
Used to get the access token for the scope UI
activation API later
## Integrations
Connect to the APIs that you need. This table below is meant for
guidance:
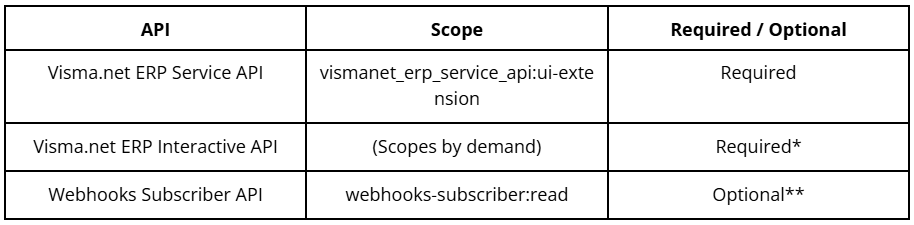
\*The UI Automation application uses the interactive API of Visma Net
ERP to GET, POST, PUT, DELETE data from Visma Net ERP.
\*\*To make your work easier, you can sign up for the
tenant_application_added webhook from Connect Webhooks Subscriber API.
This webhook will tell your backend system as soon as a customer
approves your application in the App Store.This feature allows you to
automate setup and the automatic delivery of your UI Automation. The
next section, Webhooks, contains additional details about this
functionality.
> \[!NOTE\]
>
> The Visma Admin role API user is required to access the UI
> Automation. This role is necessary for interacting with the Visma Net
> ERP interactive API.
## Webhooks
If you want to use the "Tenant Application Added" webhook, follow these
steps:
1. Click "New subscription" in the Webhooks - My Subscription table in
the Developer Portal.
2. Set "Visma Connect idP" as the publisher.
3. Choose the "Tenant Application Added" event, and optionally, the
"Tenant Application Deleted" event.
4. Choose your webhook URI.
5. Make sure not to select a tenant.
6. Click Next and Create subscription
## App store
Publish your app to the App Store using invitation code or publicly
available. We recommend using the invitation code to begin with.
> \[!NOTE\]
>
> The customer will use the Invitation Code in the Visma App Store. That
> customer must have the "Integration Administrator" role on the
> application "App Store" and for the specific company where they want
> to approve the integration.
1. Generate an invitation code in Credentials tab in Visma Developer
Portal
2. Customer logs in to and enters the
invitation code to grant access
3. If you set up Tenant Application Added you will now receive a
webhook with customer information. This can be used to automate the
upcoming steps "Activating an UI Automation"