Manage credit policy
/visma-net-erp/help/customer-ledger/manage-credit-policy
section
2026-02-19T17:09:06+01:00
# Manage credit policy
Manage credit policy - overview
/visma-net-erp/help/customer-ledger/manage-credit-policy/manage-credit-policy-overview
page
Businesses do not always pay their suppliers immediately for received goods or services.
2026-02-19T17:09:06+01:00
# Manage credit policy - overview
Businesses do not always pay their suppliers immediately for received goods or services.
Businesses do not always pay their suppliers immediately for received goods or services.
To
avoid running out of cash, your company may need to set up proper management of customer
credit.
Credit management tools may include tools for managing customer credits, tracking
customers' outstanding balances, and treating bad debts.
With Visma Net, you can use the following credit management tools:
+ **Payment terms** You configure payment terms to define documents' due dates. Payment terms may be used for giving a customer discount for early payment. For details on configuring and applying payment terms, see: [About payment terms](/visma-net-erp/help/customer-ledger/manage-credit-policy/payment-terms/about-payment-terms/).
+ **Credit verification** You can enable a credit check process for each customer that automatically puts overdue invoices on hold and forbids the issuing of new invoices for a customer that has failed a credit check. For details on configuring and applying credit verification rules, see: [About credit verification](/visma-net-erp/help/customer-ledger/manage-credit-policy/about-credit-verification/).
+ **Customer credit hold** You can manually put a customer on hold any time you consider it necessary. For more information, see: [About customer credit hold](/visma-net-erp/help/customer-ledger/manage-credit-policy/about-customer-credit-hold/).
+ **Overdue charges** You can configure additional charges to be applied to outstanding balances of customers who are consistently paying too late or not paying in full. For details on configuring and applying overdue charges, see: [About overdue charges](/visma-net-erp/help/customer-ledger/manage-credit-policy/overdue-charges/about-overdue-charges/).
+ **Statement cycles** You can configure customer statement cycles to provide customers with information about their balances with your organisation. For details, see: [Statement cycles - overview](/visma-net-erp/help/customer-ledger/manage-credit-policy/statement-cycles/statement-cycles-overview/).
+ **Dunning letters** You can configure a series of dunning letters to remind customers about overdue invoices. For details on configuring customer notifications, see: [Manage dunning letters - overview](/visma-net-erp/help/customer-ledger/manage-dunning-letters/manage-dunning-letters-overview/).
+ **Direct write-off method** You can use the direct write-off method to handle expenses that are required to run the business or that have been incurred in the operation of the business. For details on configuring and using direct write-offs, see: [Write-off methods - overview](/visma-net-erp/help/customer-ledger/manage-credit-policy/write-off-methods/write-off-methods-overview/).
> [!NOTE]
> We do not recommend that you use the direct write-off method for handling bad debts as it often violates the matching principle of accounting because it recognises bad debt expense that is partly related to a previous accounting period.
+ **Allowance method** You can handle bad debts by using the allowance method. The allowance method is a better alternative to the direct write-off method because it follows the matching principle of accounting. For details on configuring and using allowance method, see: [Write-off methods - overview](/visma-net-erp/help/customer-ledger/manage-credit-policy/write-off-methods/write-off-methods-overview/).
The following topics will help you to configure and use the credit management tools of your choice.
## Topics
+ [About payment terms](/visma-net-erp/help/customer-ledger/manage-credit-policy/payment-terms/about-payment-terms/)
+ [About credit verification](/visma-net-erp/help/customer-ledger/manage-credit-policy/about-credit-verification/)
+ [About customer credit hold](/visma-net-erp/help/customer-ledger/manage-credit-policy/about-customer-credit-hold/)
+ [About overdue charges](/visma-net-erp/help/customer-ledger/manage-credit-policy/overdue-charges/about-overdue-charges/)
+ [Statement cycles - overview](/visma-net-erp/help/customer-ledger/manage-credit-policy/statement-cycles/statement-cycles-overview/)
+ [Write-off methods - overview](/visma-net-erp/help/customer-ledger/manage-credit-policy/write-off-methods/write-off-methods-overview/)
Related pages
Concepts
About customer credit hold
/visma-net-erp/help/customer-ledger/manage-credit-policy/about-customer-credit-hold
page
You may encounter an unfortunate situation when a customer has not paid for a long time and has not responded to any inquiries or requests for payment.
2026-02-19T17:09:06+01:00
# About customer credit hold
You may encounter an unfortunate situation when a customer has not paid for a long time and has not responded to any inquiries or requests for payment.
You might have notified the customer about due invoices with a series of dunning letters or in some other way. You can put a hold on the customer's credit until the issue is resolved.
An employee who is authorised to manage customer credit can apply credit holds to the customers involved by using the [Manage credit holds (AR523000)](/visma-net-erp/help/customer-ledger/customer-ledger-windows/manage-credit-holds-ar523000/) window. Once a credit hold has been applied to a customer account, no new sales orders or invoices can be created for this customer.
An authorised user can manually release a customer from credit hold by changing the customer
status from **Credit hold** to **Active**.
To do this, the authorised user's role should
have access to the **Status** field of the [Customers (AR303000)](/visma-net-erp/help/customer-ledger/customer-ledger-windows/customers-ar303000/) window.
Related pages
Concepts
Windows
Payment terms
/visma-net-erp/help/customer-ledger/manage-credit-policy/payment-terms
section
2026-02-19T17:09:06+01:00
# Payment terms
About payment terms
/visma-net-erp/help/customer-ledger/manage-credit-policy/payment-terms/about-payment-terms
page
Payment terms define the specific details of the seller's payment requirements that the buyer should meet in order to purchase goods on credit.
2026-02-19T17:09:06+01:00
# About payment terms
Payment terms define the specific details of the seller's payment requirements that the buyer should meet in order to purchase goods on credit.
Payment terms define the specific details of the seller's payment requirements that
the buyer should meet in order to purchase goods on credit.
These details include the date when a payment should be made, the conditions for cash discounts when any outstanding balance is paid early, and the setting that determines whether an outstanding balance is to be paid as a single instalment or in multiple instalments.
In this topic, you will read about how to set up payment terms and assign them to
business accounts (customers and suppliers), and how to configure instalment buying
and cash discount offering.
Also, the topic explains the details of calculating the
payment periods and cash discount periods.
## Plan payment terms
You need to plan the payment terms your company offers to customers, as well as
outline the details of the payment terms offered to your company by suppliers, which
are already defined, in preparation for entering them into the system.
We recommend
that you decide on the following points when you plan each set of payment terms:
+ The length of the payment period and the ways its due date is calculated.
+ The cash discount conditions and the way they are affected by the length of the payment period.
+ The number of instalments and the instalment payment schedule (if the company offers instalment buying).
> [!NOTE]
> You can configure a cash discount for only a single-instalment payment.
If your company has been operating for some time, you already have established payment
terms.
We recommend that you compare the payment terms your company offers to
customers and the payment terms offered to your company by suppliers, because in Visma Net, you can use the same payment terms for both customer payments and payments to
suppliers, if needed.
## Set up payment terms
These are the general steps you need to perform to create a set of payment terms by using the [Payment terms (CS206500)](/visma-net-erp/help/common-settings/common-settings-windows/payment-terms-cs206500/) window:
1. You specify a descriptive ID for the payment terms you want to configure. The length of an ID can be up to 10 Unicode symbols.
> [!NOTE]
> We do not recommend using any special symbols in the IDs of entities.
1. You define the scope of the payment terms: whether they apply to only customer documents, only supplier documents, or both types of documents.
1. You configure how a due date is calculated for a document.
1. Optional: You configure the cash discount conditions.
1. Optional: If needed, you change the default instalment type of payment terms, which is **Single**, to **Multiple** and define the number of instalments and their payment schedule.
## Configure the assignment of payment terms
By using the payment terms that have been manually or automatically assigned to a
document, the system calculates the due date of the document.
If a cash discount is
applied, the system also calculates the end date of the cash discount period and the
cash discount amount for the document.
In Visma Net, you can assign payment terms to the following types of documents:
+ Customer ledger: Invoices, debit notes, and overdue charges
+ Supplier ledger: Purchase invoices and credit adjustments
To make the system automatically assign payment terms to customer documents, you
assign the payment terms to customer classes, and by default, a customer is assigned
the payment terms specified for the customer class it belongs to. You can manually
specify the payment terms for each customer (or override the class setting) by using
the [Customers (AR303000)](/visma-net-erp/help/customer-ledger/customer-ledger-windows/customers-ar303000/) window. When you
create a document and select a customer, the system automatically associates with
the document the payment terms specified for the customer.
(The payment terms for the
document can also be overridden.)
Automatic assignment of payment terms to supplier documents is configured similarly to automatic assignment of payment terms to customer documents, with terms being assigned to supplier classes. You also can manually specify or change the payment terms for each supplier by using the [Suppliers (AP303000)](/visma-net-erp/help/supplier-ledger/supplier-ledger-windows/suppliers-ap303000/) window.
## Set up due date calculation
Certain settings specified for the payment terms in the [Payment terms (CS206500)](/visma-net-erp/help/common-settings/common-settings-windows/payment-terms-cs206500/) window determine the payment period: the time interval that starts when a customer purchases a product or a service (on the document date) and ends when the customer's payment is due. In Visma Net, you do not specify the length of the payment period; you instead specify the way the document due date will be calculated based on the date of the document's creation.
By specifying the appropriate **Due date type** setting in the [Payment terms (CS206500)](/visma-net-erp/help/common-settings/common-settings-windows/payment-terms-cs206500/) window, you can calculate the due date based on one of the following factors:
+ **A day in a month** (the **Day of next Month**, **End of month**, **End of next month**, and **Day of the month** options): You can specify a day of the month (in the **Due day 1** field) to be the due date for all documents issued before this day, or the end of the current or next month can be the due date.
+ **A fixed number of days** (the **Fixed number of days** and **Fixed number of days starting next month** options): You can specify the period of time (in the **Due day 1** field) that is used to calculate the due date, based on the document date or the first day of the next month. (To determine the due date of the document, the system adds the specified number of days to either the document date or the first day of the next month.)
+ **Multiple custom dates** (the **Custom** option): With this option selected, you can set two time intervals for the document dates and specify a due date for each interval. The parameters for configuring the first interval are **Due day 1**, **Day from 1**, and **Day to 1**, and the parameters for configuring the second interval are **Due day 2**, **Day from 2**, and **Day to 2**.
The following rules are applied to each set of days:
+ The end day should be greater than the start day.
+ If the value of the **Due day N** parameter is greater than (or equal to) the value of the **Day to N** parameter, the due date will be in the current month.
+ If the value of the **Due day N** parameter is less than the value of the **Day to N** parameter, the due date will be in the next month.
> [!NOTE]
> **Attention**:
> If a document date doesn't match either interval, the due date
> won't be calculated.
> For example: If a document is dated 1/31/2018 and the intervals
> are 1–15 and 16–30, then the due date won't be calculated for the
> document.
For more examples of the ways a payment period is calculated, see: [Examples of credit and cash discount periods.](/visma-net-erp/help/customer-ledger/manage-credit-policy/payment-terms/examples-of-credit-and-cash-discount-periods/)
## Configure instalment payments
Outstanding balances can be paid in a single instalment or multiple instalments.
To
configure instalment payments, select the **Multiple** option in the
**Instalment type** list.
By default, the instalment type for new payment
terms is **Single**.
You then specify the number of instalments, the frequency
or schedule, and the instalment method.
You can configure either an instalment frequency or an instalment schedule.
To
configure a frequency, in the **Instalment frequency** field, you
can select the interval between instalments.
The following payment frequency
options are available:
Weekly
: Instalments will be one week apart.
Monthly
: Instalments will be one month apart.
Semi-monthly
: Instalments will be a half a month apart.
To determine how the amounts of instalments are calculated for the selected frequency, select one of these options in the **Instalment method** list:
Equal parts
: The document total amount (with all the applicable taxes added) is divided into equal parts.
VAT in first instalment
: The amount of the document (the total before VAT) is divided into equal parts, and the VAT amount is added to the first instalment.
To configure an instalment schedule, you leave the **Instalment frequency** field blank and select the **Split by percent in table**
instalment method.
The instalment amounts are calculated according to the
percentages that you specify for each instalment in the **Instalments schedule** table.
For each instalment, you can specify the number of
days from the due date and the percent of the total document amount.
The first
instalment (which is due on the due date) should have **0** in the **Day**
column, and other instalments' dates are specified with the respect to the due
date.
## Configure a cash discount
You can configure a cash discount for only single-instalment payment terms.
The cash
discount is available for a time interval (that is, the cash discount period) that
starts on the document date and ends in the number of days specified in the
**Cash discount settings** section. The cash discount period
falls within the payment period.
If custom due dates are set, discount settings are
applied to both intervals.
The length of the cash discount period is defined by the following parameters:
Discount type
: This parameter defines the method of calculating the end date of the discount period (which is similar to the method of calculating the due date). The option you select in the **Due date type** field determines the options available for selection in the **Discount type** field. If the **End of month** option is selected in the **Due date type** field, configuration of a cash discount is not available.
Discount day
: This parameter determines the number of days or the particular day of the month, depending on the method selected in the **Discount type** field.
For examples of the ways a cash discount period is calculated, see [Examples of credit and cash discount periods.](/visma-net-erp/help/customer-ledger/manage-credit-policy/payment-terms/examples-of-credit-and-cash-discount-periods/)
A cash discount is an amount that is calculated by applying the percent specified in
the **Discount %** field to the total amount of the document.
When
you enter a payment for the document during the cash discount period, the system
deducts the calculated discount amount from the total amount of the document and
generates the payment for the amount or the result of the
deduction.
If a cash discount is applied to a document, it may or may not affect how the system
calculates the taxable amount of a document.
You may indicate to the system how to
calculate the taxable amount for a VAT application in the [VAT (TX205000)](/visma-net-erp/help/vat/vat-windows/vat-tx205000/) window.
For details about how the system
calculates a taxable amount of a document if a cash discount should be applied to
the document, see: [About VAT settings.](/visma-net-erp/help/vat/manage-taxes/about-vat-settings/)
Related pages
Concepts
Tasks
Windows
Examples of credit and cash discount periods
/visma-net-erp/help/customer-ledger/manage-credit-policy/payment-terms/examples-of-credit-and-cash-discount-periods
section
In this topic, you can find examples that demonstrate how the credit period and cash discount period are calculated based on the calculation method of the applicable payment terms.
2026-02-19T17:09:06+01:00
# Examples of credit and cash discount periods
In this topic, you can find examples that demonstrate how the credit period and cash discount period are calculated based on the calculation method of the applicable payment terms.
## Structure of these examples
Each section describes a particular method of calculating the length of credit period and discount period defined by the payment terms. You select the calculation method in the **Due date type** field in the [Payment terms (CS206500)](/visma-net-erp/help/common-settings/common-settings-windows/payment-terms-cs206500/) window.
In each section, the first column of the table lists the options that you can select in the
**Discount type** field, based on the method selected for due date
calculation.
The second column contains sample settings for each option that you could use to
configure the payment terms in the [Payment terms (CS206500)](/visma-net-erp/help/common-settings/common-settings-windows/payment-terms-cs206500/) window, as well as
the document date from the Visma Net
window used to create the document. The third column displays the resulting payment period and cash
discount period for the document date specified in the sample settings. This column includes a
diagram that shows the resulting credit period and cash discount period. The legend of the
diagram is as follows:
+ : Starting and ending dates of the credit period
+ : Days of the credit period
+ : Days of the cash discount period
## Due date type: Fixed number of days
With the **Fixed number of days** calculation method, the payment is due a fixed number of days after the sale or purchase. You specify the number of days in **Due day 1**.
|Discount type|Sample settings|Result|
|---|---|---|
|**Fixed number of days**|In the Payment terms window: + **Due day 1**: **30** + **Discount day**: **7** In the document creation window: + **Document date**: **1/1/2021**|Credit period: 1/1/2021–1/31/2021 Cash discount period: 1/1/2021–1/8/2021 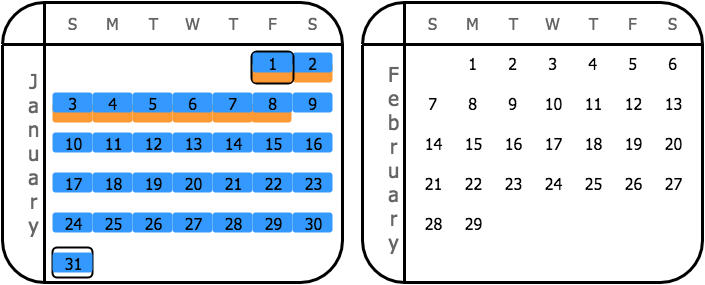|
## Due date type: Day of next month
With the **Day of next month** calculation method, the payment is due on a particular day of the next calendar month after the month of the document date.
You specify the day in
**Due day 1**.
In this example, the value of the **Due day 1** parameter is greater than the number of days in the next month (February); therefore, the system uses the last date in the next month for the calculation of the credit period.
|Discount type|Sample settings|Result|
|---|---|---|
|**Day of next month**|In the Payment terms window: + **Due day 1**: **30** + **Discount day**: **7** In the document creation window: + **Document date**: **1/1/2021**|Credit period: 1/1/2021–2/29/2021 Cash discount period: 1/1/2021–2/7/2021 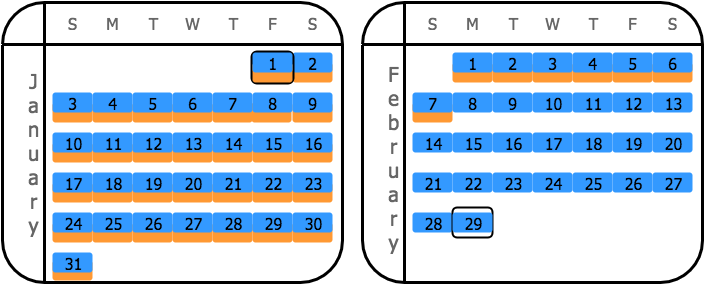|
|**End of month**|In the Payment terms window: + **Due day 1**: **30** + **Discount day**: **N/A** In the document creation window: + **Document date**: **1/1/2021**|Credit period: 1/1/2021–2/29/2021 Cash discount period: 1/1/2021–1/31/2021 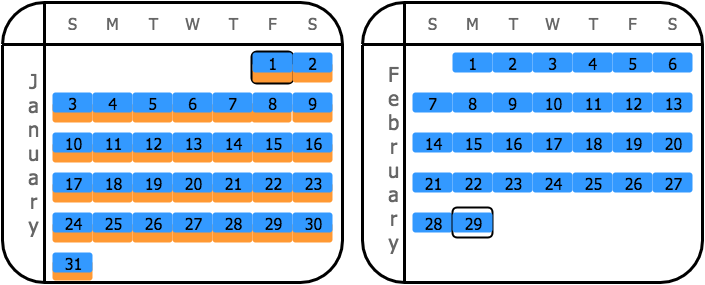|
|**Day of the month**|In the Payment terms window: + **Due day 1**: **30** + **Discount day**: **7** In the document creation window: + **Document date**: **1/1/2021**|Credit period: 1/1/2021–2/29/2021 Cash discount period: 1/1/2021–1/7/2021 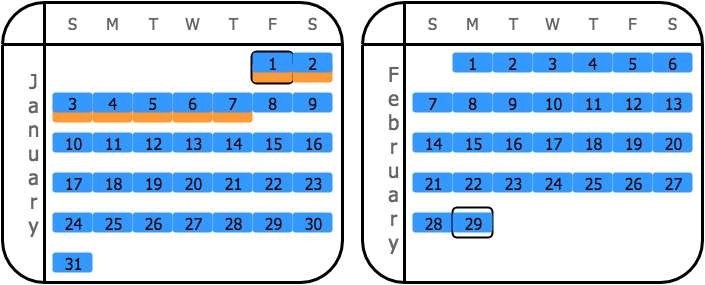|
## Due date type: End of next month
With the **End of next month** calculation method, the payment is due at the end of the next calendar month after the month of the document date.
For this calculation method, note that the credit and cash discount periods are equal if the **End of next month** option is selected in the **Discount type** field.
|Discount type|Sample settings|Results|
|---|---|---|
|**Day of next month**|In the Payment terms window: + **Due day 1**: **N/A** + **Discount day**: **7** in the document creation window: + **Document date**: **1/1/2021**|Credit period: 1/1/2021–2/29/2021 Cash discount period: 1/1/2021–2/7/2021 |
|**End of month**|In the Payment terms window: + **Due day 1**: **N/A** + **Discount day**: **N/A** In the document creation window: + **Document date**: **1/1/2021**|Credit period: 1/1/2021–2/29/2021 Cash discount period: 1/1/2021–1/31/2021 |
|**End of next month**|In the Payment terms window: + **Due day 1**: **N/A** + **Discount day**: **N/A** In the document creation window: + **Document date**: **1/1/2021**|Credit period: 1/1/2021–2/29/2021 Cash discount period: 1/1/2021–2/29/2021 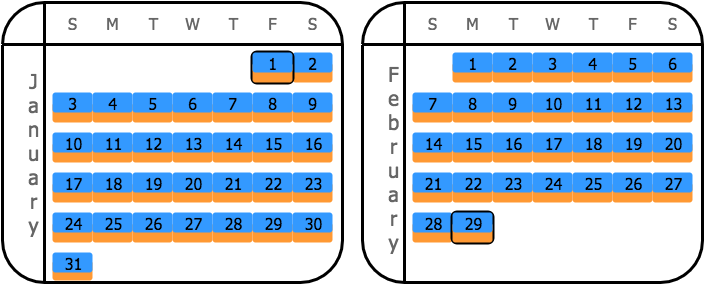|
|**Day of the month**|In the Payment terms window: + **Due day 1**: **N/A** + **Discount day**: **7** In the document creation window: + **Document date**: **1/1/2021**|Credit period: 1/1/2021–2/29/2021 Cash discount period: 1/1/2021–1/7/2021 |
## Due date type: Day of the month
With the **Day of the month** calculation method, the payment is due on a particular day of
the current calendar month, if the invoice is issued before this day.
If the invoice is issued
after this Day of the current calendar month, then the payment is due on the day of the next
calendar month.
You specify the day in **Due day 1**.
|Discount type|Sample settings|Result|
|---|---|---|
|**Day of the month**|In the Payment terms window: + **Due day 1**: **30** + **Discount day**: **7** In the document creation window: + **Document date**: **1/1/2021**|Credit period: 1/1/2021–1/30/2021 Cash discount period: 1/1/2021–1/7/2021 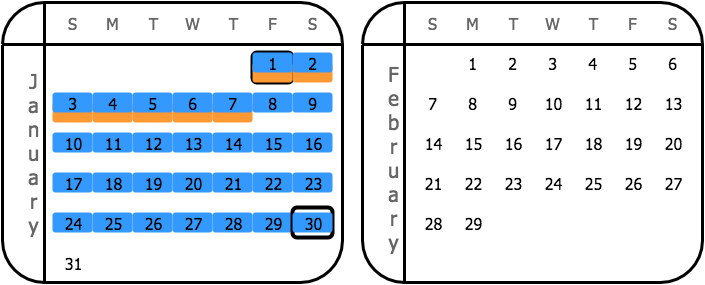|
## Due date type: Fixed number of days starting next month
With the **Fixed number of days starting next month** calculation method, the payment is due a fixed number of days starting the first day of the next calendar month after a sale or purchase. You specify the number of days in **Due day 1**.
|Discount type|Sample settings|Result|
|---|---|---|
|**Fixed number of days starting next month**|In the Payment terms window: + **Due day 1**: **30** + **Discount day**: **7** In the document creation window: + **Document date**: **1/1/2021**|Credit period: 1/1/2021–3/2/2021 Cash discount period: 1/1/2021–2/8/2021 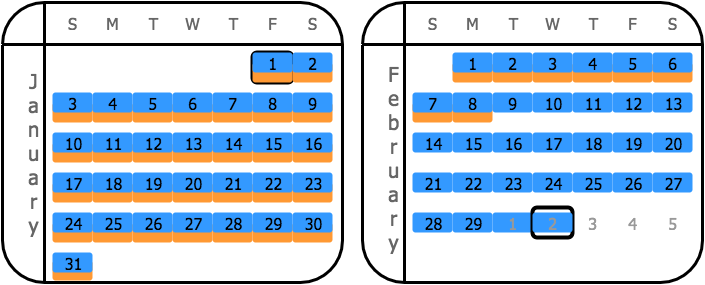|
## Due date type: Custom
With the **Custom** calculation method, you set two time intervals for the document dates
and specify a due date for each interval.
The parameters for configuring the first interval are
**Due day 1**, **Day from 1**, and **Day to 1**, and the parameters for configuring the second interval are **Due day 2**, **Day from 2**, and **Day to 2**.
The sample settings here define the following intervals: 1–15 and 16–31.
The due
date for the first interval is the 10th of the next month for documents issued between day 1 and
day 15 of the current month.
The due date for the second interval is the 25th of the next month
for documents issued between day 16 and day 31 of the current month.
For this calculation method, note that the system shortens the cash discount period to be equal to the credit period if the **End of next month** option is selected as the **Discount type**.
|Discount type|Sample settings|Results|
|---|---|---|
|**Day of next month**|In the Payment terms window: Interval 1: + **Due day 1**: **10** + **Day from 1**: **1** + **Day to 1**: **15** Interval 2: + **Due day 2**: **25** + **Day from 2**: **16** + **Day to 2**: **31** **Discount day**: **7** In the document creation window: + **Document 1 date**: **1/1/2021** + **Document 2 date**: **1/16/2021**|### Document 1 Credit period: 1/1/2021–2/10/2021 Cash discount period: 1/1/2021–2/7/2021 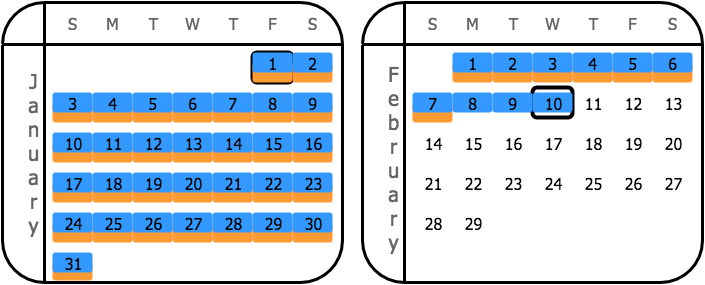 ### Document 2 Credit period: 1/16/2021–2/25/2021 Cash discount period: 1/16/2021–2/7/2021 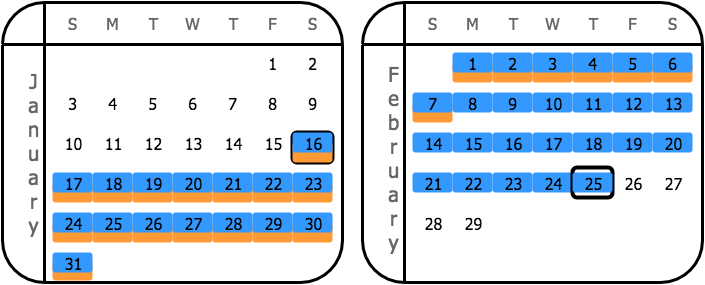|
|**Fixed number of days**|In the Payment terms window: Interval 1: + **Due day 1**: **10** + **Day from 1**: **1** + **Day to 1**: **15** Interval 2: + **Due day 2**: **25** + **Day from 2**: **16** + **Day to 2**: **31** **Discount day**: **7** In the document creation window: + **Document 1 date**: **1/1/2021** + **Document 2 date**: **1/16/2021**|### Document 1 Credit period: 1/1/2021–2/10/2021 Cash discount period: 1/1/2021–1/8/2021  ### Document 2 Credit period: 1/16/2021–2/25/2021 Cash discount period: 1/16/2021–1/23/2021 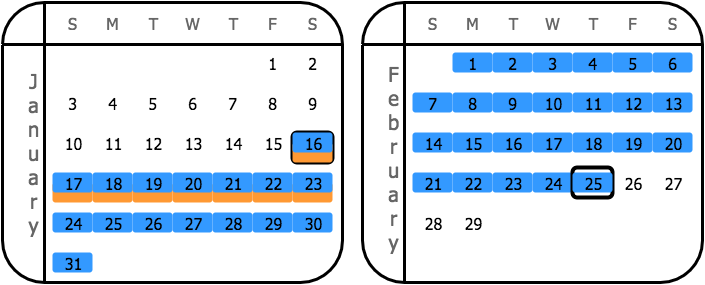|
|**End of month**|In the Payment terms window: Interval 1: + **Due day 1**: **10** + **Day from 1**: **1** + **Day to 1**: **15** Interval 2: + **Due day 2**: **25** + **Day from 2**: **16** + **Day to 2**: **31** **Discount day**: **N/A** In the document creation window: + **Document 1 date**: **1/1/2021** + **Document 2 date**: **1/16/2021**|### Document 1 Credit period: 1/1/2021–2/10/2021 Cash discount period: 1/1/2021–1/31/2021 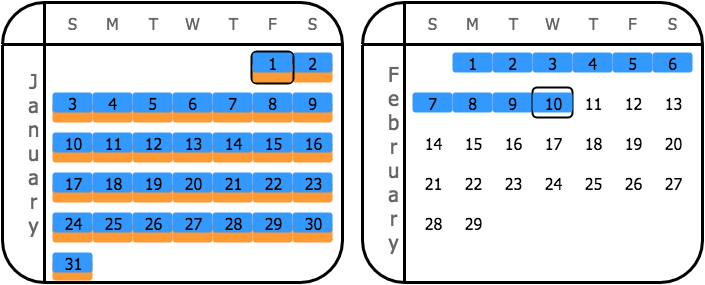 ### Document 2 Credit period: 1/16/2021–2/25/2021 Cash discount period: 1/16/2021–1/31/2021 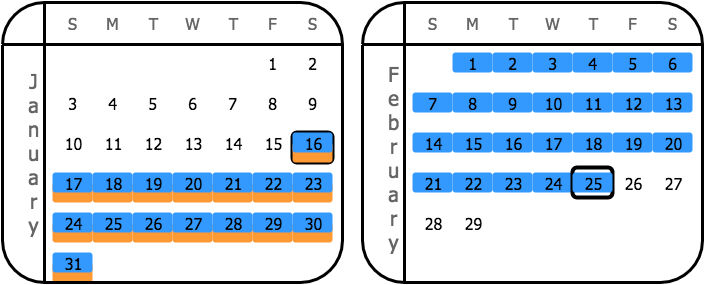|
|**End of next month**|In the Payment terms window: Interval 1: + **Due day 1**: **10** + **Day from 1**: **1** + **Day to 1**: **15** Interval 2: + **Due day 2**: **25** + **Day from 2**: **16** + **Day to 2**: **31** **Discount day**: **N/A** In the document creation window: + **Document 1 date**: **1/1/2021** + **Document 2 date**: **1/16/2021**|### Document 1 Credit period: 1/1/2021–2/10/2021 Cash discount period: 1/1/2021–2/10/2021 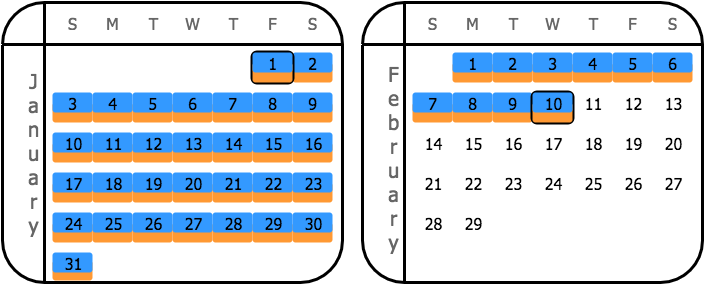 ### Document 2 Credit period: 1/16/2021–2/25/2021 Cash discount period: 1/16/2021–2/25/2021 |
|**Day of the month**|In the Payment terms window: Interval 1: + **Due day 1**: **10** + **Day from 1**: **1** + **Day to 1**: **15** Interval 2: + **Due day 2**: **25** + **Day from 2**: **16** + **Day to 2**: **31** **Discount day**: **7** In the document creation window: + **Document 1 date**: **1/1/2021** + **Document 2 date**: **1/16/2021**|### Document 1 Credit period: 1/1/2021–2/10/2021 Cash discount period: 1/1/2021–1/7/2021 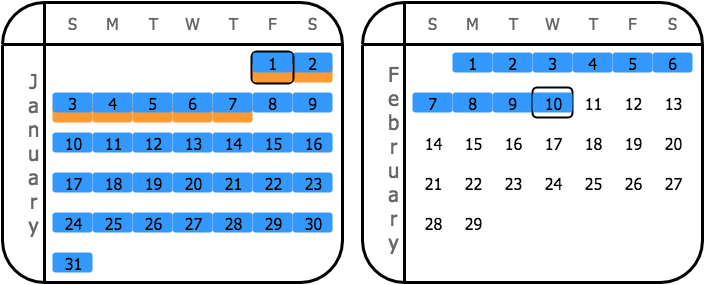 ### Document 2 Credit period: 1/16/2021–2/25/2021 Cash discount period: 1/16/2021–2/7/2021 |
|**Fixed number of days starting next month**|In the Payment terms window: Interval 1: + **Due day 1**: **10** + **Day from 1**: **1** + **Day to 1**: **15** Interval 2: + **Due day 2**: **25** + **Day from 2**: **16** + **Day to 2**: **31** **Discount day**: **7** In the document creation window: + **Document 1 date**: **1/1/2021** + **Document 2 date**: **1/16/2021**|### Document 1 Credit period: 1/1/2021–2/10/2021 Cash discount period: 1/1/2021–2/8/2021 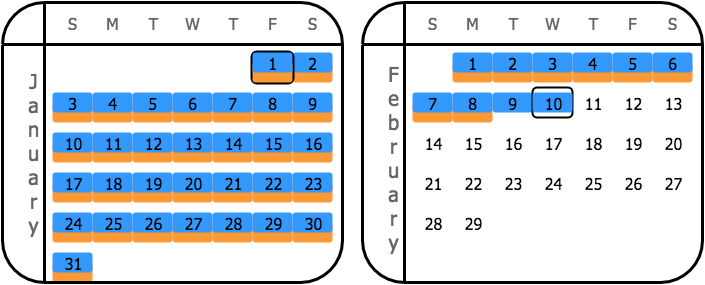 ### Document 2 Credit period: 1/16/2021–2/25/2021 Cash discount period: 1/16/2021–2/8/2021 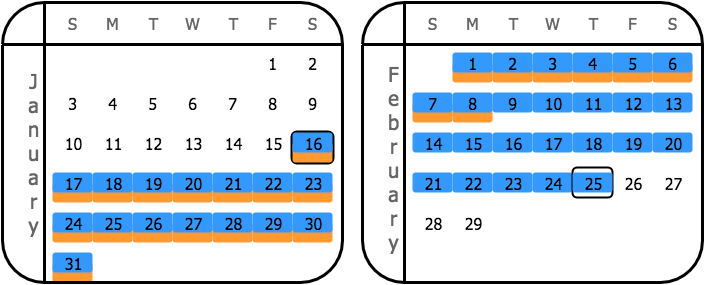|
Related pages
Concepts
Tasks
Windows
Configure single-instalment payment terms
/visma-net-erp/help/customer-ledger/manage-credit-policy/payment-terms/configure-single-instalment-payment-terms
section
You use the Payment terms (CS206500) window to define each set of payment terms, including due dates and conditions for cash discounts when an outstanding balance is paid early.
2026-02-19T17:09:06+01:00
# Configure single-instalment payment terms
You use the Payment terms (CS206500) window to define each set of payment terms, including due dates and conditions for cash discounts when an outstanding balance is paid early.
For more information: [Payment terms (CS206500)](/visma-net-erp/help/common-settings/common-settings-windows/payment-terms-cs206500/).
You use the [Payment terms (CS206500)](/visma-net-erp/help/common-settings/common-settings-windows/payment-terms-cs206500/) window to define each set of payment terms, including due dates
and conditions for cash discounts when an outstanding balance is paid early.
For a
set of payment terms, you can specify the payment as a single instalment (described
in this topic) or as multiple instalments (described in [Configure multiple-instalment payment terms](/visma-net-erp/help/customer-ledger/manage-credit-policy/payment-terms/configure-multiple-instalment-credit-terms/)).
1. Go to the [Payment terms (CS206500)](/visma-net-erp/help/common-settings/common-settings-windows/payment-terms-cs206500/) window.
1. In the **General information** section, in the **Terms ID** field, type the ID of the payment terms. The ID may contain up to ten characters.
> [!NOTE]
> We do not recommend using any special symbols in the IDs of entities.
1. In the **Description** field, type the description of the terms.
1. In the **Visible to** field, select the visibility of these payment terms (that is, under what circumstances they are listed and available for selection). The following options are available:
+ **All**: The terms can be assigned to both suppliers and customers.
+ **Suppliers**: The terms can be assigned to suppliers only.
+ **Customers**: The terms can be assigned to customers only.
+ **Disabled**: The terms are removed from the selection lists for both suppliers and customers.
1. In the **Instalment type** field of the **Instalments settings** section, select **Single**.
1. In the **Due date type** field of the **Due day settings** section, select the due date type. For detailed descriptions of the options, see: [About payment terms](/visma-net-erp/help/customer-ledger/manage-credit-policy/payment-terms/about-payment-terms/).
1. Depending on the due date type, specify the values of the other available elements (if any) in the **Due day settings** section.
1. Optional: In the **Cash discount settings** section, enter the settings that affect the discount for an early payment:
1. In the **Discount type** field, select the discount date type. The availability of options depends on the option selected as the **Due date type**.
1. In the **Discount day** field, specify the number of days or the particular day of the month, depending on the option selected in the **Discount type** field. (This field is unavailable for some **Discount type** options.)
1. In the **Discount %** field, specify the percent to be applied to the document total amount to calculate the discount percentage.
1. Click .
Configure multiple-instalment credit terms
/visma-net-erp/help/customer-ledger/manage-credit-policy/payment-terms/configure-multiple-instalment-credit-terms
section
You use the Payment terms (CS206500) window to define each set of payment terms.
2026-02-19T17:09:06+01:00
# Configure multiple-instalment credit terms
You use the Payment terms (CS206500) window to define each set of payment terms.
For more information: [Payment terms (CS206500)](/visma-net-erp/help/common-settings/common-settings-windows/payment-terms-cs206500/).
You use the [Payment terms (CS206500)](/visma-net-erp/help/common-settings/common-settings-windows/payment-terms-cs206500/) window to define each set of payment terms.
For a set of payment terms, you can specify payment as a single instalment (described in [Configure single-instalment payment terms](/visma-net-erp/help/customer-ledger/manage-credit-policy/payment-terms/configure-single-instalment-payment-terms/)) or as multiple instalments
(described in this topic).
1. Go to the [Payment terms (CS206500)](/visma-net-erp/help/common-settings/common-settings-windows/payment-terms-cs206500/) window.
1. In the **General information** section, in the **Terms ID** field, type the ID of the payment terms. The ID may contain up to ten characters.
> [!NOTE]
> We do not recommend using any special symbols in the IDs of entities.
1. In the **Description** field, type the description of the terms.
1. In the **Visible to** field, select the visibility of these payment terms (that is, under what circumstances they are listed and available for selection). The following options are available:
+ **All**: The terms can be assigned to both suppliers and customers.
+ **Suppliers**: The terms can be assigned to suppliers only.
+ **Customers**: The terms can be assigned to customers only.
+ **Disabled**: The terms are removed from the selection lists for both suppliers and customers.
1. In the **Instalment type** field of the **Instalments settings** section, select **Multiple**.
1. In the **Instalment method** field, select the instalment method, which determines how the system calculates the instalment amounts.
1. If you selected the **Equal parts** or **VAT in first instalment** instalment method, do the following:
1. In the **Number of instalments** field, type the number of instalments.
1. In the **Instalment frequency** field, select the instalment frequency.
1. If you selected the **Split by percent in table** method, do the following for each instalment:
1. In the **Instalments schedule** table toolbar, click ****.
1. In the **Days** column, type the number of days from the due date on which this particular instalment is due.
1. In the **Percent** column, type the percent of the instalment.
1. In the **Due date type** field of the **Due day settings** section, select the due date type. For detailed descriptions of the options, see: [About payment terms](/visma-net-erp/help/customer-ledger/manage-credit-policy/payment-terms/about-payment-terms/).
1. Depending on the due date type, specify the values of the other available elements (if any) in the **Due day settings** section.
1. Click .
Disable credit terms
/visma-net-erp/help/customer-ledger/manage-credit-policy/payment-terms/disable-credit-terms
section
You use the Payment terms (CS206500) window to define each set of payment terms, as well as to change the target audience for which the terms are visible or disable a particular set of payment terms.
2026-02-19T17:09:06+01:00
# Disable credit terms
You use the Payment terms (CS206500) window to define each set of payment terms, as well as to change the target audience for which the terms are visible or disable a particular set of payment terms.
For more information: [Payment terms (CS206500)](/visma-net-erp/help/common-settings/common-settings-windows/payment-terms-cs206500/).
1. Go to the [Payment terms (CS206500)](/visma-net-erp/help/common-settings/common-settings-windows/payment-terms-cs206500/) window.
1. In the **General information** section, in the **Terms ID** field, select the ID of the payment terms that you want to disable.
1. In the **Visible to** field, select the **Disabled** option.
1. Click .
Related pages
Concepts
Tasks
Windows
About credit verification
/visma-net-erp/help/customer-ledger/manage-credit-policy/about-credit-verification
page
Although accurate evaluation of customers' credit worthiness is required, employees may perform it outside of the system by gathering data on the financial health of potential customers, including their current credit score.
2026-02-19T17:09:06+01:00
# About credit verification
Although accurate evaluation of customers' credit worthiness is required, employees may perform it outside of the system by gathering data on the financial health of potential customers, including their current credit score.
In Visma Net, you can configure credit verification rules to prevent risky customers (such as those who pay too late) from accruing debts that cannot be paid.
## Credit verification application in the Customer ledger
Credit verification is invoked each time a user creates an invoice for a customer in Customer ledger.
When you create an invoice and the customer fails the credit check, the system checks the value of the **Hold documents on failed credit check** check box in the [Customer ledger preferences (AR101000)](/visma-net-erp/help/customer-ledger/customer-ledger-windows/customer-ledger-preferences-ar101000/) window, which defines what happens to new invoices if the credit check fails:
+ If the check box is selected, you may save the document (invoice or debit note) with the **On hold** status, but the document cannot be released until the credit violation is resolved.
+ If the check box is cleared, you can save new documents with the **Balanced** status and process them regardless of the credit check result, although the system warns users about customers that have failed their credit check.
## Credit verification application in sales
If the Sales workspace is enabled, credit verification is invoked each time you create an invoice that originates in the Sales workspace. When you create an invoice by using the [Customer invoices (SO303000)](/visma-net-erp/help/sales/sales-windows/customer-invoices-so303000/) window and the customer fails the credit check, the system checks the value of the **Hold invoices on failed credit check** check box in the [Sales order preferences (SO101000)](/visma-net-erp/help/sales/sales-windows/sales-order-preferences-so101000/) window. This check box defines what happens to new invoices if the credit check fails:
+ If the check box is selected, the invoice gets the **Credit hold** status and can be saved with only the **Credit hold** or **On hold** status. For invoices with the **Credit hold** status, in the [Process sales invoices (SO505000)](/visma-net-erp/help/sales/sales-windows/process-sales-invoices-so505000/) window, you can perform the **Release from credit hold** action. When the action is completed, the system saves the invoice with the **Balanced** status and you can process it further.
+ If the check box is cleared, you can save new documents with the **Balanced** status and process them regardless of the credit check result, although the system warns users about customers that have failed their credit check.
Credit verification is invoked for orders that are based on an order type that has
the **Hold document on failed credit check** check box selected
in the [Order types (SO201000)](/visma-net-erp/help/sales/sales-windows/order-types-so201000/) window. For an order of such a
type, when you create a sales order and try to change the status of the sales order
to **Open**, the system performs a credit check of the customer, and if the
customer fails the credit check, the document gets the **Credit hold** status
(and can be saved with only the **Credit hold** or **On hold** status).
For
orders with these statuses, in the [Process orders (SO501000)](/visma-net-erp/help/sales/sales-windows/process-orders-so501000/) window, you can perform the **Release from credit hold** action. This
initiates credit checks for each order selected, and if the credit check is
successful, the order receives a status of **Open**.
## Credit verification rule setup
You can set credit verification rules for individual customers and for groups of
customers.
To provide default credit verification settings for groups of similar
customers, you can specify credit rules by customer class in the [Customer classes (AR201000)](/visma-net-erp/help/customer-ledger/customer-ledger-windows/customer-classes-ar201000/) window.
If needed, you can
disable or redefine the default rules for individual customers by using the [Customers (AR303000)](/visma-net-erp/help/customer-ledger/customer-ledger-windows/customers-ar303000/) window.
In the **Credit verification** field in these windows, you can select one of the following options:
Credit limit
: If the customer's total outstanding balance is greater than the amount specified in the **Credit limit** field, the system generates a warning. If the value in the **Over-limit amount** field is also exceeded, the system puts new invoices on hold or issues a warning, depending on the **Hold documents on failed credit check** setting and (if the Sales workspace is used) the **Hold invoices on failed credit check** setting.
Days past due
: Payment terms are defined and due dates are calculated based on the customer's terms. If the customer has a document that is past due by more days than the number of days past due specified in the **Credit days past due** field, the system puts new invoices on hold or issues a warning, depending on the **Hold documents on failed credit check** setting and (if the Sales workspace is used) the **Hold invoices on failed credit check** setting.
Limit and days past due
: Both types of rules are applied: The customer's debt should not exceed the credit limit, and the payment date should not exceed the due date of an invoice by more days than the specified number of days past due. If either rule is violated (or both rules are), the system puts new invoices on hold or issues a warning, depending on the **Hold documents on failed credit check** setting and (if the Sales workspace is used) the **Hold invoices on failed credit check** setting.
Disabled
: No credit rules are to be applied.
You can view the unused credit limit of a customer in the **Remaining credit limit** field on the **General settings** tab of the Customers window.
Related pages
Concepts
Windows
Overdue charges
/visma-net-erp/help/customer-ledger/manage-credit-policy/overdue-charges
section
2026-02-19T17:09:06+01:00
# Overdue charges
About overdue charges
/visma-net-erp/help/customer-ledger/manage-credit-policy/overdue-charges/about-overdue-charges
page
In Visma Net, you can set up the functionality that makes the system to calculate overdue charges and show them on customer statements to inform customers of additional charges they have incurred for documents that are past due.
2026-02-19T17:09:06+01:00
# About overdue charges
In Visma Net, you can set up the functionality that makes the system to calculate overdue charges and show them on customer statements to inform customers of additional charges they have incurred for documents that are past due.
You can define multiple overdue charge codes (particular overdue charge IDs) with their own rates and other settings that affect when and how overdue charges are applied. Thus, you can adjust Visma Net to fit your existing policies and any policies you want to implement in the future.
The system calculates overdue charges for all customer accounts for which overdue charges are assigned, except for accounts with the **Inactive** or **On hold** status in the [Customers (AR303000)](/visma-net-erp/help/customer-ledger/customer-ledger-windows/customers-ar303000/) window.
This functionality is available only if the **Overdue charges** functionality is enabled in the [Enable/disable functionalities (CS100000)](/visma-net-erp/help/common-settings/enable-or-disable-functionalites/enable-disable-functionalities-cs100000/) window.
## Set up the overdue charge collection process
You perform the following steps to configure the collection and processing of overdue charges:
1. In the [Overdue charges (AR204500)](/visma-net-erp/help/customer-ledger/customer-ledger-windows/overdue-charges-ar204500/) window, you configure at least one overdue charge code, which defines the calculation method and the criteria for collecting charges. For details, see [About overdue charge code definition](/visma-net-erp/help/customer-ledger/manage-credit-policy/overdue-charges/about-overdue-charge-code-definition/).
1. In the [Customer classes (AR201000)](/visma-net-erp/help/customer-ledger/customer-ledger-windows/customer-classes-ar201000/) window, you do the following for each customer class whose customers you want to be subject to overdue charge collection:
1. Select the **Apply overdue charges** check box.
1. Associate the overdue charge code you created with the customer class by specifying the code in the **Overdue charge ID** field.
When a new customer account is created in the [Customers (AR303000)](/visma-net-erp/help/customer-ledger/customer-ledger-windows/customers-ar303000/) window and a customer class is selected, the customer class supplies the default value of the **Apply overdue charges** check box (on the **General info** tab). You can change this default value for any customer account. If the customer account is subject to overdue charge collection (that is, if this check box is selected for the customer), for all of the customer's debit documents, the system displays the **Apply overdue charge** check box on the **Financial details** tab of the [Sales invoices (AR301000)](/visma-net-erp/help/customer-ledger/customer-ledger-windows/sales-invoices-ar301000/) window. By default, the check box is selected, but you can clear the check box for a particular document.
The following options, located in the [Customer ledger preferences (AR101000)](/visma-net-erp/help/customer-ledger/customer-ledger-windows/customer-ledger-preferences-ar101000/) window, affect all customers that are subject to overdue charges and can be set to fit your company's policies:
Apply payments to overdue charges first
: If this check box is selected, payments will be applied first to overdue charges and only then to outstanding invoices, starting with those having the earliest dates. Payment can be applied to a particular invoice only if the **Apply payments automatically** check box is selected for a customer in the [Customers (AR303000)](/visma-net-erp/help/customer-ledger/customer-ledger-windows/customers-ar303000/) window.
Calculate on overdue charges documents
: If this check box is selected, overdue charges will be calculated on overdue charge documents as well as on invoices; thus, the amount of overdue charges compounds.
After configuration is done, you use the [Calculate overdue charges (AR507000)](/visma-net-erp/help/customer-ledger/customer-ledger-windows/calculate-overdue-charges-ar507000/) window to process the overdue documents of customer accounts that are associated with the statement cycle you select in this window. For details, see [Calculate overdue charges](/visma-net-erp/help/customer-ledger/manage-credit-policy/overdue-charges/calculate-overdue-charges/).
## Set up the calculation of overdue charges by statement cycle
By default, the system uses the overdue charge code specified in the applicable customer class to calculate overdue charges. Alternatively, you can indicate to the system that the code should be taken from the applicable statement cycle to calculate charges.
Customer accounts are initially assigned the statement cycle, if any, specified for their customer class. But specifying a statement cycle in a customer class is not mandatory, as it is for a customer account. Additionally, for each customer, you may override the statement cycle that was assigned by default. Therefore, customer accounts within the same customer class may have different statement cycles.
You perform the following steps to set up overdue charge calculation by using the code specified in the statement cycle:
1. In the [Statement cycles (AR202800)](/visma-net-erp/help/customer-ledger/customer-ledger-windows/statement-cycles-ar202800/) window, you specify an overdue charge code for each statement cycle used in the system. You may associate different codes with different statement cycles or use the same code for all statement cycles.
1. In the [Customer ledger preferences (AR101000)](/visma-net-erp/help/customer-ledger/customer-ledger-windows/customer-ledger-preferences-ar101000/) window, you select the **Set default overdue charges by statement cycle** check box, to indicate to the system that the source of the overdue charge code is the statement cycle of the customer account.
After you have performed these configuration steps, the system will use the overdue charge code assigned to the applicable statement cycle to calculate overdue charges for customers and documents included in the charge collection process.
## Process overdue documents
You process the calculation of the overdue charges for the overdue documents (that is, invoices and debit notes) in the [Calculate overdue charges (AR507000)](/visma-net-erp/help/customer-ledger/customer-ledger-windows/calculate-overdue-charges-ar507000/) window. In this window, once you specify the criteria in the selection area, the system displays the documents that comply with the following requirements:
+ The customer of the document is subject to overdue charges or the **Apply overdue charges** check box is selected for the customer account in the **General info** tab of the [Customers (AR303000)](/visma-net-erp/help/customer-ledger/customer-ledger-windows/customers-ar303000/) window.
+ The document is subject to overdue charges or the **Apply overdue charge** check box is selected for the document on the **Financial details** tab of the [Sales invoices (AR301000)](/visma-net-erp/help/customer-ledger/customer-ledger-windows/sales-invoices-ar301000/) window.
To run the calculation process, you click **Calculate** on the window toolbar. If the **Calculate on overdue charges documents** check box is cleared in the [Customer ledger preferences (AR101000)](/visma-net-erp/help/customer-ledger/customer-ledger-windows/customer-ledger-preferences-ar101000/) window, the system calculates simple charges by doing the following:
+ Checking whether an invoice or a debit note is past due by using the associated credit terms
+ Calculating the charges for the days past due (if there are no previous overdue charges for the document)
+ Calculating the charges since the date of the last overdue charges (if overdue charges have been recorded for the document)
After the calculation is done, the system displays the list of overdue documents with the relevant details for each document, including the amounts of calculated overdue charges. You review the calculation results and process either the overdue documents you select (by using the unlabelled check boxes) or all of the documents by clicking either **Process** or **Process all** in the window toolbar.
The result of processing is a customer ledger document of the **Overdue charge** type with the **Balanced** status (or the **On hold** status if **Hold documents on entry** is selected in the [Customer ledger preferences (AR101000)](/visma-net-erp/help/customer-ledger/customer-ledger-windows/customer-ledger-preferences-ar101000/) window).
If the system finds multiple overdue documents for the same customer account, it creates for this customer one document of the **Overdue charge** type that lists the charge amounts for each invoice.
You further process this document of the **Overdue charge** type by using the [Sales invoices (AR301000)](/visma-net-erp/help/customer-ledger/customer-ledger-windows/sales-invoices-ar301000/) window.
If the **Calculate on overdue charges documents** check box is selected in the [Customer ledger preferences (AR101000)](/visma-net-erp/help/customer-ledger/customer-ledger-windows/customer-ledger-preferences-ar101000/) window, the system searches for documents of the **Overdue charge** type as well and calculates charge amounts the same way as it does for the invoices and debit notes.
## Release documents of the Overdue charge type
You release a document of the **Overdue charge** type by using the [Sales invoices (AR301000)](/visma-net-erp/help/customer-ledger/customer-ledger-windows/sales-invoices-ar301000/) window. When you release an overdue document, the system generates a batch with the general ledger transactions. One transaction debits the customer ledger account referred to in the original document (which is usually the default customer ledger account for the customer), and the other transaction credits the Overdue charges account specified in the [Overdue charges (AR204500)](/visma-net-erp/help/customer-ledger/customer-ledger-windows/overdue-charges-ar204500/) window for that charge, as shown in the following table.
|Account|Debit|Credit|
|---|---|---|
|Customer ledger account|Amount|0.0|
|Overdue charges account|0.0|Amount|
If the system finds an unreleased overdue charge document for an overdue document (among other overdue documents of the particular customer), this document is marked with an error and no new overdue charge document is created for overdue documents of this customer account. You can select this document and click **View last charge** to view and release the existing overdue charge document. Then you can calculate and process overdue charges for overdue documents of this customer account again.
Overdue charges may be numbered differently from invoices or notes. VAT are not calculated on overdue charges, and discounts are not applicable to overdue charges.
## Exclude a customer or a document from the charge collection process
To exclude a customer account from the charge collection process, you clear the **Apply overdue charges** check box for the customer account on the **General info** tab of the [Customers (AR303000)](/visma-net-erp/help/customer-ledger/customer-ledger-windows/customers-ar303000/) window.
To exclude a particular document from the process, you clear the **Apply overdue charge** check box for the document on the **Financial details** tab of the [Sales invoices (AR301000)](/visma-net-erp/help/customer-ledger/customer-ledger-windows/sales-invoices-ar301000/) window.
Note: This check box is displayed for the document only if the customer of the document is included in the charge collection process.
About overdue charge code definition
/visma-net-erp/help/customer-ledger/manage-credit-policy/overdue-charges/about-overdue-charge-code-definition
section
By using the Overdue charges (AR204500) window, you can create an unlimited number of overdue charge codes or particular overdue charge entities with their own rates and settings.
2026-02-19T17:09:06+01:00
# About overdue charge code definition
By using the Overdue charges (AR204500) window, you can create an unlimited number of overdue charge codes or particular overdue charge entities with their own rates and settings.
For more information: [Overdue charges (AR204500)](/visma-net-erp/help/customer-ledger/customer-ledger-windows/overdue-charges-ar204500/).
By using the [Overdue charges (AR204500)](/visma-net-erp/help/customer-ledger/customer-ledger-windows/overdue-charges-ar204500/) window, you can create
an unlimited number of overdue charge codes or particular overdue charge entities with
their own rates and settings.
Overdue charges are applied in either the base currency or the
currency of the overdue document.
## Preliminary configuration steps
Before you start setting up overdue charge codes, you need to perform the following steps:
1. You create the following entities (or determine which existing entities you will use), which you need for collecting and recording the overdue charges:
+ A general ledger account of the **income** type and a corresponding subaccount (if applicable in your system) to record each overdue charge and each overdue fee, if you plan to charge one. You can use the same account for recording all overdue charges and overdue fees or create separate accounts for each overdue charge and each overdue fee. For details, see: [Add an account to the chart of accounts](/visma-net-erp/help/general-ledger/manage-chart-of-accounts/add-an-account-to-the-chart-of-accounts/).
+ Payment terms that provide a schedule for paying overdue charge documents. The payment terms used for overdue charges should be created without discounts. You can create just one set of payment terms for overdue charge documents or multiple sets. For details, see: [About payment terms](/visma-net-erp/help/customer-ledger/manage-credit-policy/payment-terms/about-payment-terms/).
1. You plan the overdue charge code or codes needed to suit your company's credit policy. The planning includes the following for each overdue charge code:
+ Selecting the calculation method to be used with the code
+ Deciding on the amount of the overdue charge
+ Deciding on the amount of the overdue fee, if you plan to charge one
+ Defining the criteria for creation of a document of the **Overdue charge** type for this code
The following sections provide detailed information about the settings of the overdue charge codes.
## Calculation methods
The system provides three calculation methods you can use to define the amount that is subject to overdue charges based on the number of days after the due date. The charges can be calculated either for open documents (those that are not fully paid) or for closed documents (those that are fully paid). The base all the methods use for calculation is the open balance of the overdue document.
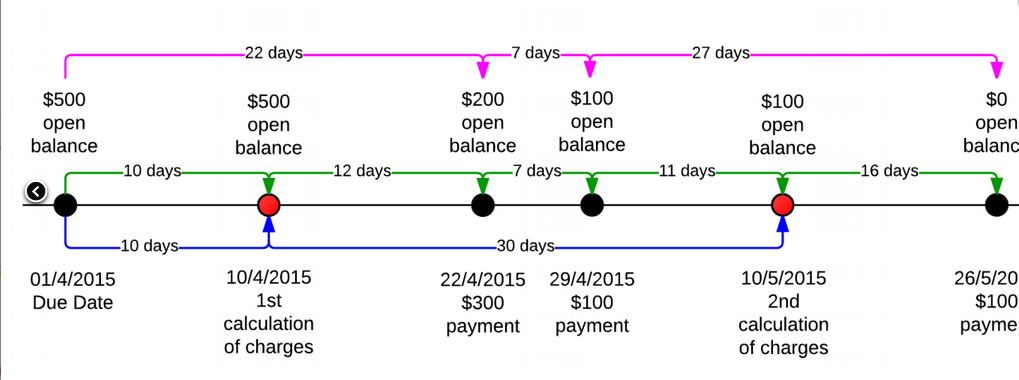
The figure below and the examples show how interest is calculated when you use the different calculation methods. Note that the examples are in US dollars.
For each overdue charge code, you select one of the following options in the **Calculation method** field in the Overdue charges window:
Interest on open entries
: :
The overdue document is subject to charges until it is closed. To calculate the charges for the days past due, the system uses the document’s open balance as of the date of calculation. If overdue charges have been recorded for the document, the system calculates the charges for the number of days since the date of the last overdue charges.
The system calculates overdue charges as follows (the blue lines in the related figure):
1. On the first calculation of charges, the system applies charges to the $500 open entries for 10 days overdue.
1. On the second calculation of charges, the system applies charges to the $100 open entries for 30 days overdue.
1. On the third calculation of charges, the system does not apply charges because the document is fully paid.
Interest on open, partially paid and paid entries
: :
The overdue document is subject to charges until it is closed. To calculate the charges for the days past due, the system uses the document’s open balance for each of these days. If overdue charges have been recorded for the document, the system calculates the charges for the number of days since the date of the last overdue charges.
The system calculates overdue charges as follows (see the green lines in the figure):
1. On the first calculation of charges, the system applies charges to the $500 for 10 days overdue.
1. On the second calculation of charges, the system applies the sum of charges to the $500 for 12 days overdue, to the $200 for 7 days overdue, and to the $100 for 11 days overdue.
1. On the third calculation of charges, the system applies charges to the $100 for 16 days overdue.
Interest on paid entries
: :
The overdue document becomes subject to charges the moment it is closed. To calculate the charges for the days past due, the system uses the document’s open balance for each of these days.
1. The system calculates overdue charges when the document is fully paid (the point when the charges are calculated for the third time in the figure).
1. The charges are the sum of charges applied to the $500 open balance for 22 days overdue, to the $200 open balance for 7 days overdue, and to the $100 open balance for 27 days overdue (the pink lines in the figure).
The calculation method is used along with the charging method, described in the next section of this topic, to determine how overdue documents are charged for a particular overdue charge code.
## Charging methods
A charging method defines how the system charges an overdue document. An overdue charge can be defined either as a fixed amount or as a percentage (annual rate) on an open balance for the number of days late. If the overdue charge is a percentage, the following formula is used to calculate overdue charges, based on the number of days past due.
```
Charge amount = (Percent rate) \* (Number of days past due) \* Open balance / (365 \* 100)
```
A percentage can be configured with a fixed minimum amount or a threshold amount.
If you
configure a percentage with a fixed minimum amount, the system charges an overdue document
for at least the fixed minimum amount. If you configure a percentage with a threshold
amount, the system charges a document only if the calculated charge amount is greater than
or equal to the threshold amount.
For details, see the following subsections of this topic:
### Charging a percentage with a minimum amount
If you define an overdue charge as a percentage on an open balance for the number of days late with a minimum amount specified, the system charges a document as follows:
+ If the charge amount is less than the specified minimum amount, the system charges the document for the minimum amount.
+ If the charge amount is greater than or equal to the specified minimum amount, the system charges the document for the calculated charge amount.
To charge a percentage with a minimum amount, in the **Charging settings** section in the Overdue charges window, you do the following:
+ In the **Charging method** field, you select the **Percent with min. amount** option.
+ In the **Min. amount** field (which appears once you have selected this charging method), you specify the minimum amount an overdue document should be charged.
+ In the **Total threshold** field, you specify the minimum amount of the overdue charge document; if the total amount of the lines of the overdue charge document is less than the total threshold amount, the document will not be created.
+ In the table (which appears once you have selected this charging method), you specify percent rate (or rates) with the date when the rate becomes effective.
### Charging a percentage with a threshold amount
If you define an overdue charge as a percentage on an open balance for the number of days late with a threshold amount specified, the system charges a document as follows:
+ If the charge amount is less than the specified threshold amount, the system does not charge the document.
+ If the charge amount is greater than or equal to the specified threshold amount, the system charges a document for the calculated charge amount.
To charge a percentage with a threshold amount, in the **Charging settings** section in the Overdue charges window, you do the following:
+ In the **Charging method** field, you select the **Percent with threshold** option.
+ In the **Threshold** field (which appears once you have selected this charging method), you specify the amount of charges that should define whether to charge a document.
+ In the **Total threshold** field, you specify the minimum amount of the overdue charge document; if the total amount of the lines of the overdue charge document is less than the total threshold amount, the document will not be created.
+ In the table (which appears once you have selected this charging method), you specify a percent rate (or rates) with the date when the rate becomes effective.
### Charging a fixed amount
An overdue charge can be defined as a fixed amount. To define an overdue charge as a fixed amount, in the **Charging settings** section in the Overdue charges window, you do the following:
+ In the **Charging method** field, you select the **Fixed amount** option.
+ In the **Amount** field (which appears once you have selected this charging method), you specify the fixed amount of the charge for overdue documents.
+ In the **Total threshold** field, you specify the minimum amount of the overdue charge document; if the total amount of the lines of the overdue charge document is less than the total threshold amount, the document will not be created.
Thus, if an open balance of an overdue document is greater than zero, the system charges the specified fixed amount.
## Overdue fee
Some companies charge a fixed amount (a fee) for processing documents of the **Overdue charge** type.
In these cases, a customer must pay the fee amount in addition to the
amount of calculated overdue charges.
A fee is charged for each overdue charge document. An additional line with the fee amount is added to the document.
If your company charges a fee for processing late documents, in the Overdue charges (AR204500) window, for any overdue charge code, specify the following settings:
Fee amount
: The fixed amount to be charged for a document of the **Overdue charge** type. A customer pays the amount in addition to the amount of the overdue charges.
Fee account
: ( **Fee subaccount** ): The account (and subaccount, if applicable) to which fee amounts are recorded.
You can leave these fields empty if your company does not charge fees for overdue charge documents.
Related pages
Concepts
Tasks
Windows
About the criteria for creating an overdue charge document
/visma-net-erp/help/customer-ledger/manage-credit-policy/overdue-charges/about-the-criteria-for-creating-an-overdue-charge-document
page
The processing of overdue documents creates documents of the Overdue charge type.
2026-02-19T17:09:06+01:00
# About the criteria for creating an overdue charge document
The processing of overdue documents creates documents of the Overdue charge type.
When the system finds a customer's overdue document, the system adds this document as a line item to the document of the **Overdue charge** type (which is created once any overdue document is found). If the system has found multiple overdue documents of a customer, the system creates a document of the **Overdue charge** type with multiple lines. These documents of the **Overdue charge** type, also referred to as overdue charge documents, can be viewed in the [Sales invoices (AR301000)](/visma-net-erp/help/customer-ledger/customer-ledger-windows/sales-invoices-ar301000/) window.
You can set up a threshold amount that defines the amount of charges that should initiate the generation of an overdue charge document. You specify this threshold amount in the **Total threshold** field in the [Overdue charges (AR204500)](/visma-net-erp/help/customer-ledger/customer-ledger-windows/overdue-charges-ar204500/) window.
> [!NOTE]
> The overdue fee is not included in the overdue charge document amount that is compared to the threshold.
With the total threshold specified, the system decides whether to create an overdue charge document as follows:
1. It finds an overdue document of a customer or multiple documents of the customer.
1. It calculates the charge amount for each overdue document it found.
1. It compares the total amount of the calculated charges to the threshold amount, and then the system proceeds as follows:
+ If the total amount is greater than the threshold amount, the system creates an overdue charge document for the customer.
+ If the total amount is less than the threshold amount, the system does not create an overdue charge document for the customer.
For example, suppose that your company collects overdue charges only if the charge amount is greater than €10; you thus specify 10 in the **Total threshold** field. Further suppose that your company charges a fixed charge amount of €1. If a customer has at least 10 overdue documents, the system will create an overdue charge document to debit the customer account. If your company instead charges an annual rate, the system behaves in the same way. If the total of calculated percentages for a customer's overdue documents is greater than €10, the system creates an overdue charge document for the customer.
In addition to setting a threshold for the overdue charge amount, you can set a minimum amount and a threshold amount for adding a document as a line to the overdue charge document. You can configure the line threshold for only a charge that is defined as a percentage. To do this, you set up an overdue charge code on the [Overdue charges (AR204500)](/visma-net-erp/help/customer-ledger/customer-ledger-windows/overdue-charges-ar204500/) window and specify the **Charging a percentage with a minimum amount** or **Charging a percentage with a threshold amount** charging method. For details, see [About overdue charge code definition](/visma-net-erp/help/customer-ledger/manage-credit-policy/overdue-charges/about-overdue-charge-code-definition/).
## Overdue fee collection
You may want to charge your customers an additional fee each time overdue charges are
calculated.
In the **Overdue fee settings** section of the [Overdue charges (AR204500)](/visma-net-erp/help/customer-ledger/customer-ledger-windows/overdue-charges-ar204500/) window, you can specify the amount of the overdue fee and the account
and subaccount to register the collected fee to.
The fee is recorded as a separate line in the document of the **Overdue charge** type in the [Sales invoices (AR301000)](/visma-net-erp/help/customer-ledger/customer-ledger-windows/sales-invoices-ar301000/) window.
Related pages
Concepts
Tasks
Windows
Example of how to apply calculation methods
/visma-net-erp/help/customer-ledger/manage-credit-policy/overdue-charges/example-of-how-to-apply-calculation-methods
page
This topic provides examples of the overdue charge calculation methods that can be set in the system.
2026-02-19T17:09:06+01:00
# Example of how to apply calculation methods
This topic provides examples of the overdue charge calculation methods that can be set in the system.
Suppose that a customer's invoice is due on April 1; its open balance is €500 as of the due
date.
The customer paid the invoice after the due date with three payments: €300 on April 22,
€100 on April 29, and €100 on May 26.
The system calculates overdue charges on the 10th day of
each month.
The overdue charge amount is an annual rate of 10% and no thresholds are configured.
The system calculates the overdue charges differently, as described in the following sections of this topic, depending on the calculation method set for the overdue charge code in the [Overdue charges (AR204500)](/visma-net-erp/help/customer-ledger/customer-ledger-windows/overdue-charges-ar204500/) window.
## Interest on balance
If you select **Interest on balance** in the **Calculation method** field in the [Overdue charges (AR204500)](/visma-net-erp/help/customer-ledger/customer-ledger-windows/overdue-charges-ar204500/) window, the system calculates the overdue charges as follows:
1. On the first calculation of overdue charges, the system applies overdue charges to the €500 open balance for 10 days overdue and creates an overdue charge document in the amount of 0.1 \* 10 \* €500 / 365 = €1.37.
1. On the second calculation of overdue charges, the system applies overdue charges to the €100 open balance for 30 days overdue and creates an overdue charge document in the amount of 0.1 \* 30 \* €100 / 365 = €0.82.
1. On the third calculation of charges, the system does not apply overdue charges because the document is fully paid.
Overall, the system debited the customer's account for an additional €2.19 in overdue charges.
## Interest on prorated balance
If you select **Interest on prorated balance** in the **Calculation method** field in the [Overdue charges (AR204500)](/visma-net-erp/help/customer-ledger/customer-ledger-windows/overdue-charges-ar204500/) window, the system calculates the overdue charges as follows (see the green lines in the figure above):
1. On the first calculation of overdue charges, the system applies overdue charges to the €500 open balance for 10 days overdue and creates an overdue charge document in the amount of 0.1 \* 10 \* €500 / 365 = €1.37.
1. On the second calculation of overdue charges, the system applies the sum of charges to the €500 open balance for 12 days overdue, to the €200 open balance for 7 days overdue, and to the €100 open balance for 11 days overdue; it then creates an overdue charge document in the amount of (0.1 \* 12 \* €500 / 365) + (0.1 \* 7 \* €200 / 365) + (0.1 \* 11 \* €100 / 365) = €1.64 + €0.38 + €0.3 = €2.32.
1. On the third calculation of charges, the system applies overdue charges to the €100 open balance for 16 days overdue and creates an overdue charge document in the amount of 0.1 \* 16\* €100 / 365 = €0.44.
Overall, the system debited the customer's account for an additional €4.13.
## Interest on arrears
If you select the **Interest on arrears** option in the **Calculation method** field in the [Overdue charges (AR204500)](/visma-net-erp/help/customer-ledger/customer-ledger-windows/overdue-charges-ar204500/) window, the system calculates overdue charges when the document is fully paid (in the figure, the point when the charges are calculated for the third time).
The overdue charges are the sum of charges applied to the €500 open balance for 22 days
overdue, to the €200 open balance for 7 days overdue, and to the €100 open balance for 27 days
overdue.
The system creates an overdue charge document in the amount of (0.1 \* 22 \* €500 / 365)
\+ (0.1 \* 7 \* €200 / 365) + (0.1 \* 27 \* €100 / 365) = €3.01 + €0.38 + €0.74 = €4.13.
Overall, the system debited the customer's account for an additional €4.13.
Related pages
Concepts
Tasks
Windows
Configure an overdue charge code
/visma-net-erp/help/customer-ledger/manage-credit-policy/overdue-charges/configure-an-overdue-charge-code
section
In this window, you configure an overdue charge code that defines the calculation method, the criteria of collecting charges, and the type of charge collection (fixed amount or percentage).
2026-02-19T17:09:06+01:00
# Configure an overdue charge code
In this window, you configure an overdue charge code that defines the calculation method, the criteria of collecting charges, and the type of charge collection (fixed amount or percentage).
1. Go to the [Overdue charges (AR204500)](/visma-net-erp/help/customer-ledger/customer-ledger-windows/overdue-charges-ar204500/) window.
1. Click  add a new code.
1. In the **Overdue charge ID** field, type an ID for your code. Have a look at the existing codes before you decide on a number or text, so that you don't use the same as an existing ID. You can use both numbers and letters.
1. Optional: Enter a **Description** and select a **Calculation method**. For more information about each calculation method, see [About overdue charges](/visma-net-erp/help/customer-ledger/manage-credit-policy/overdue-charges/about-overdue-charges/).
1. In the **Terms** field, select the terms for the payment.
1. Optional: select the **Base currency** check box if you want the system to calculate the overdue charge by using the base currency.
1. In the **Overdue charge account** field, select an overdue charge account.
1. In the **Overdue charge subaccount** field, press **F3** to choose a subaccount. If you do not use subaccounts, press and hold 0 until all sections in the field are filled.
1. Optional: In the **VAT code** field, select the VAT category.
1. Optional: If your company charges an overdue fee, in the **Overdue fee settings** section, enter the following details:
+ In the **Fee amount** field, type the amount of the overdue fee.
+ In the **Fee account** field, specify the account to which the overdue fee should be recorded.
+ In the **Fee subaccount** field, specify the subaccount to which the overdue fee should be recorded.
+ In the **Fee description** field, type the description of the overdue fee.
1. In the **Charging settings** section, do the following:
+ In the **Total threshold** field, specify the amount of the overdue charges that should initiate the generation of a document of the **Overdue charge** type.
+ In the **Charging method** field, select the method that the system should use to charge overdue documents. The following options are available:
+ **Fixed amount**: If you select this option, you need to specify the fixed amount in the **Amount** field, which appears when you select the **Fixed amount** charging method.
+ **Percent with threshold**: If you select this option, you need to specify the percentage in the Rates table and the threshold amount in the **Threshold** field. Both of these elements appear once you select the **Percent with threshold** charging method.
+ **Percent with min. amount**: If you select this option, you need to specify the percentage in the **Rates** table and the minimum charge amount in the **Min. amount** field. Both of these elements appear once you select the **Percent with min. amount** charging method.
For details, see: [About overdue charge code definition](/visma-net-erp/help/customer-ledger/manage-credit-policy/overdue-charges/about-overdue-charge-code-definition/).
What is next?
[Make overdue and dunning settings in the Customer ledger preferences window](/visma-net-erp/help/customer-ledger/customer-ledger-preferences/make-overdue-and-dunning-settings-in-the-customer-ledger-preferences/)
Related pages
Concepts
Windows
Calculate overdue charges
/visma-net-erp/help/customer-ledger/manage-credit-policy/overdue-charges/calculate-overdue-charges
page
You calculate overdue charges for customer ledger documents by using the Calculate overdue charges (AR507000) window.
2026-02-19T17:09:06+01:00
# Calculate overdue charges
You calculate overdue charges for customer ledger documents by using the Calculate overdue charges (AR507000) window.
For more information: [Calculate overdue charges (AR507000)](/visma-net-erp/help/customer-ledger/customer-ledger-windows/calculate-overdue-charges-ar507000/).
You calculate overdue charges for customer ledger documents by using the [Calculate overdue charges (AR507000)](/visma-net-erp/help/customer-ledger/customer-ledger-windows/calculate-overdue-charges-ar507000/) window.
Once the overdue
charges are calculated, you process selected overdue documents to create open
customer ledger documents with the **Overdue charges** type.
The overdue
charges are based on the settings specified in the [Overdue charges (AR204500)](/visma-net-erp/help/customer-ledger/customer-ledger-windows/overdue-charges-ar204500/) window.
1. Go to the [Calculate overdue charges (AR507000)](/visma-net-erp/help/customer-ledger/customer-ledger-windows/calculate-overdue-charges-ar507000/) window.
1. In the **Overdue charge date** field, select the date for when you want to calculate and process overdue charges.
1. **Optional:** In the **Period** drop-down list, change the financial period to the one that you want to post the document's transactions to.
1. In the **Statement cycle** drop-down list, select a statement cycle. Leave this field blank if you want to calculate overdue charges for all statement cycles. If the check box **Set default overdue charges by statement cycle** is selected in [Customer ledger preferences (AR101000)](/visma-net-erp/help/customer-ledger/customer-ledger-windows/customer-ledger-preferences-ar101000/), you have to specify the statement cycle.
1. Optional: To narrow the document results listed in the table after calculation, select a customer class in the **Customer class** drop-down list and a customer account in the **Customer** drop-down list. These drop-down lists are only displayed if the check box **Set default overdue charges by statement cycle** is not selected in [Customer ledger preferences (AR101000)](/visma-net-erp/help/customer-ledger/customer-ledger-windows/customer-ledger-preferences-ar101000/).
1. Click **Calculate** to calculate the overdue charges. The system now lists the overdue documents and their details, including the number of days past the due date and the charge amounts.
1. In the toolbar, do one of the following:
+ Click **Process all** to create overdue charges documents for all listed documents.
+ Select check boxes for individual documents and click **Process** to create overdue charges documents for only specific documents.
When you have completed this procedure successfully, Visma Net creates customer ledger documents with the type **Overdue charges** and the statuses **On hold** or **Balanced**, depending on the following settings in the [Customer ledger preferences (AR101000)](/visma-net-erp/help/customer-ledger/customer-ledger-windows/customer-ledger-preferences-ar101000/) window: **Hold documents on entry** and **Hold document on failed credit check**.
If the system finds an unreleased overdue charge document for an invoice during overdue charge processing, the invoice is marked with error and no new overdue charge document is created.
You can select an invoice with error and click **View last charge** to view and release an existing overdue charge document. Then you can calculate and process overdue charges for this invoice again.
Related pages
Concepts
Windows
Statement cycles
/visma-net-erp/help/customer-ledger/manage-credit-policy/statement-cycles
section
2026-02-19T17:09:06+01:00
# Statement cycles
Statement cycles - overview
/visma-net-erp/help/customer-ledger/manage-credit-policy/statement-cycles/statement-cycles-overview
page
In Visma Net, you can configure statement cycles for collection procedures.
2026-02-19T17:09:06+01:00
# Statement cycles - overview
In Visma Net, you can configure statement cycles for collection procedures.
At the end of a statement cycle, you prepare statements and send them to your customers. Statements provide customers with records of their financial activity for a specific period and include the ending balance. Customers can reconcile the balances of their accounts with the information in the statements.
## Statement cycle definition
You use the [Statement cycles (AR202800)](/visma-net-erp/help/customer-ledger/customer-ledger-windows/statement-cycles-ar202800/) window to create new statement cycles and modify existing ones. For each statement cycle, you define the following:
+ The schedule. You can generate statements once or twice a month. The **Prepare on** setting offers the following options:
+ **End of month**: If you select this option, statements will be generated on the last day of each month.
+ **Fixed day**: If you select this option, statements will be generated on a particular day of each month. If you select this option, you use the **Day of month** field to specify the number of this day (such as **15** if invoicing occurs on the 15th day of each month).
+ **Custom**: If you select this option, statements will be generated on the two days of the month that you specify. If you select this option, you use the **Day of month** and the **Day of month 1** fields to specify the numbers of these two days.
+ The ageing periods. You can set up four aging periods for each cycle, to group the sums of the balances of open invoices and debit notes by the number of days they are past due. You use the **Ageing settings** section of this window to define the maximum number of days past the due date for each ageing period and the description of the period. If you want aging periods to take into account the balances of credit memos and open payments, select the **Age credits** check box on the **General settings** tab of the [Customer ledger preferences (AR101000)](/visma-net-erp/help/customer-ledger/customer-ledger-windows/customer-ledger-preferences-ar101000/) window.
The system also uses the aging period settings in customer ledger ageing reports, which you can analyse to identify potential cash flow problems.
+ The statement processing options of the cycle. You can use the following options to implement your company's policies:
+ **Require overdue charges calculation before statement**: If you select this check box, when you try to prepare statements, the system checks whether overdue charges have been calculated and, if not, issues a warning that overdue charges should be calculated before the statements are created.
+ **Require payment application before statement processing**: If you select this check box, when you try to prepare statements, the system checks whether all customer payments are applied and, if not, issues a warning that payments should be applied to invoices before statements are created.
+ The overdue charges of the cycle. The **Apply overdue charges** and **Overdue charge ID** settings define, respectively, whether calculation of overdue charges is required for customers assigned to the statement cycle and which overdue charges should be used; these settings apply only if the **Set default overdue charge by statement cycle** check box on the **General settings** tab of the [Customer ledger preferences (AR101000)](/visma-net-erp/help/customer-ledger/customer-ledger-windows/customer-ledger-preferences-ar101000/) window is selected. If the check box is cleared, the overdue charges defined for the customer class are instead applied.
You can assign a statement cycle to a customer class by using the [Customer classes (AR201000)](/visma-net-erp/help/customer-ledger/customer-ledger-windows/customer-classes-ar201000/) window or directly to a customer by using the [Customers (AR303000)](/visma-net-erp/help/customer-ledger/customer-ledger-windows/customers-ar303000/) window.
## Statement type
Visma Net offers two types of statements:
Open item
: The statement lists only open documents of the customer through the date when the statement was prepared.
Balance brought forward
: The statement lists all documents recorded during the last statement cycle period. Also, the amount outstanding from the previous statement is shown at the beginning of the statement.
You can assign either statement type to customer classes and to individual customers. You use the **Statement type** field to set this option for a specific customer class in the [Customer classes (AR201000)](/visma-net-erp/help/customer-ledger/customer-ledger-windows/customer-classes-ar201000/) window and for an individual customer in the [Customers (AR303000)](/visma-net-erp/help/customer-ledger/customer-ledger-windows/customers-ar303000/) window.
## Multi-currency and consolidated statements
By default, the statements are prepared in the base currency; the **Customer statement** (AR641500) report is used. For foreign customers, you can specify that statements should be created in multiple currencies; in this case, the **Customer statement currency** (AR642000) report is used. For customers of a specific customer class, you can specify whether to create the statements in multi-currency format, by using the **Multi-currency statements** check box in the [Customer classes (AR201000)](/visma-net-erp/help/customer-ledger/customer-ledger-windows/customer-classes-ar201000/) window. For particular customers of the class, you can override the class setting by using the option with the same name in the [Customers (AR303000)](/visma-net-erp/help/customer-ledger/customer-ledger-windows/customers-ar303000/) window.
Depending on the policies established in your company, you can prepare a single consolidated statement for each customer or prepare multiple statements for each branch of your company. To prepare consolidated statements for all customers, select the **Consolidate statements for all branches** check box on the **General settings** tab of the [Customer ledger preferences (AR101000)](/visma-net-erp/help/customer-ledger/customer-ledger-windows/customer-ledger-preferences-ar101000/) window. If you want to prepare consolidated statements, in the **Statement from branch** field, you should also select the branch that will be specified as the sender.
Related pages
Concepts
Tasks
Windows
About the statement processing workflow
/visma-net-erp/help/customer-ledger/manage-credit-policy/statement-cycles/about-the-statement-processing-workflow
page
As described in Statement cycles - overview, the configuration of statements involves creating statement cycles, assigning cycles to customer classes and customers, and deciding whether you need consolidated statements.
2026-02-19T17:09:06+01:00
# About the statement processing workflow
As described in Statement cycles - overview, the configuration of statements involves creating statement cycles, assigning cycles to customer classes and customers, and deciding whether you need consolidated statements.
For more information: [Statement cycles - overview](/visma-net-erp/help/customer-ledger/manage-credit-policy/statement-cycles/statement-cycles-overview/).
This topic describes how the processing of statements unfolds.
The statement processing workflow consists of the following stages (each of which is described in detail later in this topic):
## Configure customer preferences (optional)
When you create a customer, it gets the default statement processing settings of the customer class it belongs to. For each customer, you can change the following settings related to statement processing:
Statement type
: You specify what type of statement a customer prefers, balance-forward or open-item. For details, see [Statement cycles - overview](/visma-net-erp/help/customer-ledger/manage-credit-policy/statement-cycles/statement-cycles-overview/).
Print statements
: You select this check box if you want to make statements of this customer available for mass-printing in the [Print statements (AR503500)](/visma-net-erp/help/customer-ledger/customer-ledger-windows/print-statements-ar503500/) window. For details, see [Print customer statements or send them by email](/visma-net-erp/help/customer-ledger/manage-credit-policy/statement-cycles/print-customer-statements-or-send-them-by-email/).
Send statements by email
: You select this check box if you want to make statements of this customer available for mass-emailing in the [Print statements (AR503500)](/visma-net-erp/help/customer-ledger/customer-ledger-windows/print-statements-ar503500/) window. For details, see [Print customer statements or send them by email](/visma-net-erp/help/customer-ledger/manage-credit-policy/statement-cycles/print-customer-statements-or-send-them-by-email/).
Multi-currency statements
: You select this check box if you want statements of this customer to be created in multi-currency format. Such statements are displayed for mass-processing (printing or emailing) if the **Foreign currency statements** check box is selected in the [Print statements (AR503500)](/visma-net-erp/help/customer-ledger/customer-ledger-windows/print-statements-ar503500/) window. For details, see [Statement cycles - overview](/visma-net-erp/help/customer-ledger/manage-credit-policy/statement-cycles/statement-cycles-overview/).
If needed, you can modify the **Customer statement** (AR641500) report (for local customers) or the **Customer statement (currency)** (AR642000) report (for foreign customers) to format the statements to better meet your needs.
## Prepare statements (required)
Before you prepare statements, make sure that you have applied open payments from customers to the corresponding invoices (if any) and calculated any overdue charges to avoid incorrect calculation of aged balances.
You use the [Prepare statements (AR503000)](/visma-net-erp/help/customer-ledger/customer-ledger-windows/prepare-statements-ar503000/) window to prepare statements for all statement cycles or for only selected ones. The system prepares statements in the appropriate format required for printing them or sending them by email to customers. When statements are prepared, you can view them, regenerate them (if, for instance, you have discovered that a document was missing), print them, or send them by email.
Because the process of generating statements may require significant time, you should schedule it to be performed at the most convenient time. For details on preparing statements, see [Prepare customer statements](/visma-net-erp/help/customer-ledger/manage-credit-policy/statement-cycles/prepare-customer-statements/).
## Viewing statements (optional)
You can preview a statement that you have printed or emailed by using the [Print statements (AR503500)](/visma-net-erp/help/customer-ledger/customer-ledger-windows/print-statements-ar503500/) window.
Also, Visma Net provides the following inquiries that display a detailed statement history:
+ By statement cycle: [Statement history summary (AR404000)](/visma-net-erp/help/customer-ledger/customer-ledger-windows/statement-history-summary-ar404000/)
+ By customer: [Customer statement history (AR404600)](/visma-net-erp/help/customer-ledger/customer-ledger-windows/customer-statement-history-ar404600/)
## Regenerate statements (optional)
Prepared statements will not be affected by new transactions. If you discover some missing documents after the customer statements have been generated, you can create and release these documents and then regenerate the statements. Printed and emailed versions of the updated statement are marked with appropriate notes if previous statement versions have been printed or emailed already (the **Printed** and **Emailed** check boxes, respectively, of a statement are selected).
You can regenerate statements by using the following windows:
+ [Print statements (AR503500)](/visma-net-erp/help/customer-ledger/customer-ledger-windows/print-statements-ar503500/). You use the **Regenerate statement** action in this window to regenerate statements for customers of a particular statement cycle.
+ [Customers (AR303000)](/visma-net-erp/help/customer-ledger/customer-ledger-windows/customers-ar303000/). You use the **Regenerate last statement** action in this window to regenerate the most recent statement of the selected customer.
+ [Statement cycles (AR202800)](/visma-net-erp/help/customer-ledger/customer-ledger-windows/statement-cycles-ar202800/). You use the **Regenerate last statement** action in this window to regenerate statements of the selected statement cycle.
## Print statements (optional)
You can print statements on paper to send them to customers by postal mail, by using the [Print statements (AR503500)](/visma-net-erp/help/customer-ledger/customer-ledger-windows/print-statements-ar503500/) window. The **Print statement** action marks processed statements as printed or the **Printed** check box of each statement is selected automatically. For details, see [Print customer statements or send them by email](/visma-net-erp/help/customer-ledger/manage-credit-policy/statement-cycles/print-customer-statements-or-send-them-by-email/).
## Email statements (optional)
You can generate emails with statements by using the [Print statements (AR503500)](/visma-net-erp/help/customer-ledger/customer-ledger-windows/print-statements-ar503500/) window. The **Email statement** action marks processed statements as emailed or the **Emailed** check box of each statement is selected automatically. The system generates the body of the email and the attachment according to the settings of the **STATEMENT** mailing. For details, see [About mailings for customers](/visma-net-erp/help/customer-ledger/manage-mailings/about-mailings-for-customers/).
Related pages
Concepts
Tasks
Windows
About statement schedule types
/visma-net-erp/help/customer-ledger/manage-credit-policy/statement-cycles/about-statement-schedule-types
page
You can schedule preparation of statements for the selected cycle ID with the help of the options in the Schedule type field:
2026-02-19T17:09:06+01:00
# About statement schedule types
You can schedule preparation of statements for the selected cycle ID with the help of the options in the Schedule type field:
Weekly
: Statements will be generated each week, on the day specified in the **Day of the week** field.
Twice a month
: Statements will be generated twice a month, on the days specified in the **Day of month 1** and **Day of month 2** fields.
Fixed day of month
: Statements will be generated each month, on the day specified in the **Day of month 1** field (such as 15 if invoicing occurs on the 15th day of each month).
End of month
: Statements will be generated on the last day of each month.
End of financial period
: Statements will be generated on the last day of each financial period of the current year or on the end date specified for the financial period in the [Financial periods (GL201000)](/visma-net-erp/help/general-ledger/general-ledger-windows/financial-periods-gl201000/) window.
Related pages
Tasks
Windows
Choose a statement cycle for overdue charges
/visma-net-erp/help/customer-ledger/manage-credit-policy/statement-cycles/choose-a-statement-cycle-for-overdue-charges
section
These settings only apply if the Set default overdue charge by statement cycle check box on the General settings tab in the Customer ledger preferences (AR101000) window is selected.
2026-02-19T17:09:06+01:00
# Choose a statement cycle for overdue charges
These settings only apply if the Set default overdue charge by statement cycle check box on the General settings tab in the Customer ledger preferences (AR101000) window is selected.
For more information: [Customer ledger preferences (AR101000)](/visma-net-erp/help/customer-ledger/customer-ledger-windows/customer-ledger-preferences-ar101000/).
If you deselect the check box, the system applies the overdue charges defined to the customer class.
1. Go to the [Statement cycles (AR202800)](/visma-net-erp/help/customer-ledger/customer-ledger-windows/statement-cycles-ar202800/) window.
1. In the **Cycle ID** field, select a cycle ID.
1. Select the check box **Require payment application before statement processing**.
1. Select the **Apply overdue charges** check box.
1. Optional: Select the check box **Require overdue charges calculation before statement**.
1. In the **Overdue charge ID** field, select an **overdue charge ID**.
1. Click .
For released documents of customer accounts where this check box is selected, you can change this default value on the **Financial details** tab in the [Sales invoices (AR301000)](/visma-net-erp/help/customer-ledger/customer-ledger-windows/sales-invoices-ar301000/) window.
Related pages
Concepts
Windows
Prepare customer statements
/visma-net-erp/help/customer-ledger/manage-credit-policy/statement-cycles/prepare-customer-statements
page
You can prepare customer statements by using the Prepare statements (AR503000) window.
2026-02-19T17:09:06+01:00
# Prepare customer statements
You can prepare customer statements by using the Prepare statements (AR503000) window.
For more information: [Prepare statements (AR503000)](/visma-net-erp/help/customer-ledger/customer-ledger-windows/prepare-statements-ar503000/).
You can prepare customer statements by using the [Prepare statements (AR503000)](/visma-net-erp/help/customer-ledger/customer-ledger-windows/prepare-statements-ar503000/) window.
Customer statements will be prepared in the appropriate format
to be printed or sent by email.
(You can also prepare statements to be sent in both
formats.)
The statement format depends on the customer settings.
## Before you start
Before you prepare customer statements, make sure the payment application process has been performed for the customer accounts associated with the appropriate statement cycles, as described in: [About Apply payments automatically](/visma-net-erp/to-be-deleted/about-apply-payments-automatically/).
1. Go to the [Prepare statements (AR503000)](/visma-net-erp/help/customer-ledger/customer-ledger-windows/prepare-statements-ar503000/) window.
> [!NOTE]
> You can use filtering to narrow the documents that are listed when you open the window.
1. Do one of the following:
+ To prepare statements for all statement cycles, click **Process all** in the window toolbar.
+ To prepare statements for only selected statement cycles, select the appropriate unlabelled check boxes and click **Process** in the window toolbar.
> [!NOTE]
> If the process of statements preparation was interrupted for some reason, the system will prepare statements for all customer accounts selected during the next run of the process.
Related pages
Concepts
Tasks
Windows
Prepare statements
/visma-net-erp/help/customer-ledger/manage-credit-policy/statement-cycles/prepare-statements
section
2026-02-19T17:09:06+01:00
# Prepare statements
## Before you start
The system prepares the statements in the format you have specified for each customer, for example to be sent by email or to be printed.
1. Go to the [Prepare statements (AR503000)](/visma-net-erp/help/customer-ledger/customer-ledger-windows/prepare-statements-ar503000/) window.
1. Select a date in the **Prepare for** field. All statement cycles whose next statement date is before or the same as the date in this field are loaded to the table along with the newly created statement cycles with blank next statement dates. You can also prepare the statements in advance.
1. Optional: To include future statement cycles, you can change the date in the **Company** drop-down list in the top right corner. Click the arrow and change the date.
1. Select the check boxes for the cycles you want to process and click **Process**. If you want to process all the cycles, leave the check boxes unmarked and click **Process all**.
1. When the processing is finished, in the left column on each cycle's row.
 is displayed
## What is next?
Continue to the Print statements window to print or email your statements. See [Print statements](/visma-net-erp/help/customer-ledger/manage-credit-policy/statement-cycles/print-statements/).
Related pages
Concepts
Tasks
Windows
Print statements
/visma-net-erp/help/customer-ledger/manage-credit-policy/statement-cycles/print-statements
page
2026-02-19T17:09:06+01:00
# Print statements
## Before you start
Before you can print statements, you have to prepare them. See [Prepare statements](/visma-net-erp/help/customer-ledger/manage-credit-policy/statement-cycles/prepare-statements/).
1. Go to the [Print statements (AR503500)](/visma-net-erp/help/customer-ledger/customer-ledger-windows/print-statements-ar503500/) window.
1. In the **Actions** field, select what you want to do. The default action is **Print statement**, but you can also email or regenerate statements or decide not to print or email them.
1. In the **Statement cycle** field, select the statement cycle you want to process. You can only process one cycle at a time.
1. In the **Message** field, you can write a message that will be printed to all customer statements.
1. Click **Process**. The statement will be displayed and you can review it before you print or email it.
To set up or change your printing preferences for a customer, see: [Set customer print and email preferences](/visma-net-erp/help/customer-ledger/manage-customers/set-customer-print-and-email-preferences/).
Related pages
Concepts
Tasks
Windows
Print customer statements or send them by email
/visma-net-erp/help/customer-ledger/manage-credit-policy/statement-cycles/print-customer-statements-or-send-them-by-email
page
You can print customer statements (to send them to customers by postal mail) and send statements by email in the Print statements (AR503500) window.
2026-02-19T17:09:06+01:00
# Print customer statements or send them by email
You can print customer statements (to send them to customers by postal mail) and send statements by email in the Print statements (AR503500) window.
For more information: [Print statements (AR503500)](/visma-net-erp/help/customer-ledger/customer-ledger-windows/print-statements-ar503500/).
You can print customer statements (to send them to customers by postal mail) and send
statements by email in the [Print statements (AR503500)](/visma-net-erp/help/customer-ledger/customer-ledger-windows/print-statements-ar503500/)
window.
The window lists only statements that were previously prepared.
For details, see: [Prepare customer statements](/visma-net-erp/help/customer-ledger/manage-credit-policy/statement-cycles/prepare-customer-statements/).
1. Go to the [Print statements (AR503500)](/visma-net-erp/help/customer-ledger/customer-ledger-windows/print-statements-ar503500/) window.
1. In the top part, select the statement cycle for which customer statements will be processed.
1. In the **Statement date** field, check the date of the customer statements to be sure that it is the date you want to use.
1. In the **Actions** field, do one of the following:
+ To print statements to send them to customers by postal mail, select **Print statement**. As a result, the system displays the list of customers (for the selected statement cycle) that prefer to get a printed version of a statement or customers that have the **Print statement** check box selected in the [Customers (AR303000)](/visma-net-erp/help/customer-ledger/customer-ledger-windows/customers-ar303000/) window.
+ To send statements to customers electronically by email, select **Email Statement**. As a result, the system displays the list of customers (for the selected statement cycle) that prefer to get a statement by email or customers that have **Send statements by email** check box selected in the [Customers (AR303000)](/visma-net-erp/help/customer-ledger/customer-ledger-windows/customers-ar303000/) window.
1. In the window toolbar, do one of the following:
+ To process all the listed statements, click **Process all**.
+ To process only selected statements, select the unlabeled check boxes for the statements and click **Process**.
Related pages
Concepts
Tasks
Windows
Write-off methods
/visma-net-erp/help/customer-ledger/manage-credit-policy/write-off-methods
section
2026-02-19T17:09:06+01:00
# Write-off methods
Write-off methods - overview
/visma-net-erp/help/customer-ledger/manage-credit-policy/write-off-methods/write-off-methods-overview
page
You can use write-off functionality to implement the direct write-off and allowance methods.
2026-02-19T17:09:06+01:00
# Write-off methods - overview
You can use write-off functionality to implement the direct write-off and allowance methods.
In this topic, you will read about how write-off methods are used and what transactions are generated when you implement the direct write-off or allowance method.
## Direct write-off method
Your business may use the direct write-off method for financial reporting when you can determine that an amount will be uncollectible in the period when the sale took place and that the amount represents an insignificant amount, as with bank charges. The direct write-off method ignores VAT amounts previously paid to a tax authority on the documents being written off. You may need to manually record the written-off amounts and the corresponding VAT amounts to use them for adjustments to the tax return.
In the direct method, a write-off requires a journal entry that increases an expense account
(the Balance write-off account) and a journal entry that decreases accounts
receivable for the customer. You configure a reason code that determines the expense
account and then write off an amount from a customer invoice by using this reason
code.
Accounts are affected as shown below.
|Account|Debit|Credit|
|---|---|---|
|Balance write-off account|Amount|0.0|
|Customer ledger account|0.0|Amount|
If you write off customer credits, the amount will be recognised as income, and the customer balance of accounts receivable will be increased. You configure a reason code that determines the income account and then write off an amount from a customer invoice by using this reason code. Accounts are affected as shown in the following table.
|Account|Debit|Credit|
|---|---|---|
|Credit write-off account|0.0|Amount|
|Customer ledger account|Amount|0.0|
If a customer pays a debt that has been written off, you enter the payment as usual and do not
apply it to any document.
You then write off the payment by using a document of the
**Credit write-off** type.
## Allowance method
The allowance method is based on the idea that some of customer debts will not be paid, although companies don't know in advance which customers will not pay. This method involves using two special accounts:
+ Allowance for doubtful accounts: This contra asset account to accounts receivable contains the estimated amount of the debts that will not be collected. The estimate may be a percentage of sales or an amount based on an ageing analysis of sales receivables.
+ Bad debts expense: This is a temporary expense account that reports credit losses for only the period shown on the income statement.
The allowance method is used as follows: At the end of the accounting period, you
estimate the amount to become uncollectible in accounts receivable and manually
update accounts by using the [Journal transactions (GL301000)](/visma-net-erp/help/general-ledger/general-ledger-windows/journal-transactions-gl301000/) window.
Accounts are affected as shown below.
|Account|Debit|Credit|
|---|---|---|
|Bad debts expense|Amount|0.0|
|Allowance for doubtful accounts|0.0|Amount|
You configure a reason code that points to the Allowance for doubtful accounts
account.
When a specific customer's account is identified as uncollectible, you
write off debts by using this reason code.
Accounts are affected as shown below.
|Account|Debit|Credit|
|---|---|---|
|Allowance for doubtful accounts|Amount|0.0|
|Customer ledger account (customer account)|0.0|Amount|
Under the allowance method, a write-off does not change the net realisable value of
sales receivables.
It simply reduces sales receivables and the allowance for bad
debts by equivalent amounts.
Related pages
Concepts
Tasks
Windows
About write-off setup
/visma-net-erp/help/customer-ledger/manage-credit-policy/write-off-methods/about-write-off-setup
page
Setting up write-off functionality is similar for the direct write-off and allowance methods.
2026-02-19T17:09:06+01:00
# About write-off setup
Setting up write-off functionality is similar for the direct write-off and allowance methods.
To use the functionality of write-offs, you need to configure the following entities:
+ General ledger accounts to record balance and credit write-offs to.
+ Reason codes to point to the general ledger account and subaccount where write-offs are to be recorded.
+ Customer accounts with write-off functionality enabled and write-off limits specified. If these accounts already exist, you just need to change their settings.
In this topic, you will read about setting up write-off functionality and additional information that you may need during configuration.
## Write-off process setup
To use the write-off functionality, you perform the following steps:
1. You configure the general ledger accounts and subaccounts to be used for writing off expenses by using the [Chart of accounts (GL202500)](/visma-net-erp/help/general-ledger/general-ledger-windows/chart-of-accounts-gl202500/) window as follows:
+ For the direct write-off method, you configure an expense account (for instance, the Balance write-off account) and subaccounts (if needed).
+ For the allowance method, you configure a contra asset account to accounts receivable (for instance, Allowance for doubtful accounts) and an expense account (for example, Bad debts expense) and subaccounts (if needed).
1. In the [Reason codes (CS211000)](/visma-net-erp/help/inventory/inventory-windows/reason-codes-cs211000/) window, you configure reason codes that point to the general ledger accounts you have configured in Step 1:
+ For the direct write-off method, you create a reason code that points to the expense account and subaccount to be used for writing off expenses. You can configure different reason codes to distribute write-offs to different accounts or use one reason code for all such expenses.
+ For the allowance method, you create a reason code that points to the contra asset account (Allowance for doubtful accounts) and subaccount. Then you write off bad debts by using this reason code directly from an invoice and make the entries manually for the contra asset account in the [Journal transactions (GL301000)](/visma-net-erp/help/general-ledger/general-ledger-windows/journal-transactions-gl301000/) window.
For details, see [Add a reason code](/visma-net-erp/help/customer-ledger/manage-credit-policy/write-off-methods/add-a-reason-code/).
1. You enable write-off functionality for a group of customer accounts by using the [Customer classes (AR201000)](/visma-net-erp/help/customer-ledger/customer-ledger-windows/customer-classes-ar201000/) window or individually for a customer account by using the [Customers (AR303000)](/visma-net-erp/help/customer-ledger/customer-ledger-windows/customers-ar303000/) window. For details, see [Enable or disable write-offs](/visma-net-erp/help/customer-ledger/manage-credit-policy/write-off-methods/enable-or-disable-write-offs/).
### After configuration is done, you can
+ Write off balances directly from an invoice when you apply a payment to it by using the [Customer payments (AR302000)](/visma-net-erp/help/customer-ledger/customer-ledger-windows/customer-payments-ar302000/) window.
+ Write off balances or credits of several documents at once by using the [Write-off balances and credits (AR505000)](/visma-net-erp/help/customer-ledger/customer-ledger-windows/write-off-balances-and-credits-ar505000/) window.
+ Write off balances directly from an invoice when you apply a payment (created to match a bank transaction) to it by using the [Process bank transactions (CA306000)](/visma-net-erp/help/cash-management/cash-management-windows/process-bank-transactions-ca306000/) window.
## Default reason codes
By using the [Customer ledger preferences (AR101000)](/visma-net-erp/help/customer-ledger/customer-ledger-windows/customer-ledger-preferences-ar101000/) window, you can specify the reason codes to be used by default for writing off credits and balances. The system will fill in the reason codes specified here in the **Reason code** field in the [Write-off balances and credits (AR505000)](/visma-net-erp/help/customer-ledger/customer-ledger-windows/write-off-balances-and-credits-ar505000/) window, as well as in the [Customer payments (AR302000)](/visma-net-erp/help/customer-ledger/customer-ledger-windows/customer-payments-ar302000/) window, when you select the type of write-off operation.
Related pages
Concepts
Tasks
Windows
Add a reason code
/visma-net-erp/help/customer-ledger/manage-credit-policy/write-off-methods/add-a-reason-code
section
You define reason codes on the Reason codes (CS211000) window.
2026-02-19T17:09:06+01:00
# Add a reason code
You define reason codes on the Reason codes (CS211000) window.
For more information: [Reason codes (CS211000)](/visma-net-erp/help/inventory/inventory-windows/reason-codes-cs211000/).
You define reason codes on the[Reason codes (CS211000)](/visma-net-erp/help/inventory/inventory-windows/reason-codes-cs211000/) window.
For each reason code, you must specify with what transaction it
will be used.
The transaction type determines the Visma Net workspace the reason code can be used in.
You can define the reason codes for the
following types of transactions originated from the Customer ledger workspace:
credit write-off and balance write-off.
Before doing the following, make sure that the General ledger accounts and subaccounts you are going to use for write-offs are configured.
1. Go to the [Reason codes (CS211000)](/visma-net-erp/help/inventory/inventory-windows/reason-codes-cs211000/) window.
1. Click .
1. In the **Reason code** field, type the identifier of the reason code. An alphanumeric string of up to 10 characters may be used.
1. In the **Description** field, type a short description of the reason code.
1. In the **Usage** field, select the option indicating where the reason code will be used:
+ To use the reason code for writing off credits, select **Credit write-off**.
+ To use the reason code for writing off balances, select **Balance write-off**.
1. In the **Combine sub. from** field, construct a subaccount mask. Point to each segment and press F3 to open the list of options.
1. In the **Account** field, select the account to be updated by the transaction amount for transactions marked by the reason code.
1. In the **Subaccount** field, specify a subaccount according to the mask. Point to each segment and press F3 to open the list of options.
1. Click .
Related pages
Concepts
Tasks
Windows
Create reason codes
/visma-net-erp/help/customer-ledger/manage-credit-policy/write-off-methods/create-reason-codes
section
2026-02-19T17:09:06+01:00
# Create reason codes
1. Go to the [Reason codes (CS211000)](/visma-net-erp/help/inventory/inventory-windows/reason-codes-cs211000/) window.
1. Click .
1. In the **Reason code** field, click  to see the next free number for you to enter in this field.
1. Enter the number in the **Reason code** field.
1. Enter a **Description** for your reason code.
1. In the **Usage** field select one of the following usages:
1. **Sales**
1. **Issue**
1. **Receipt**
1. **Adjustment**
1. **Transfer**
> [!NOTE]
> To create reason codes for write-offs, see: [Create reason codes for write-offs](/visma-net-erp/help/customer-ledger/manage-credit-policy/write-off-methods/create-reason-codes-for-write-offs/).
1. In the **Account** field, click  to select the account that the reason code will affect.
1. In the **Subaccount** field, enter the subaccount that the reason code will affect.
1. Click .
> [!NOTE]
> Reason codes are also used for stocktaking reviews. The default code for a stocktaking review is **4**.
Related pages
Concepts
Tasks
Windows
Enable or disable write-offs
/visma-net-erp/help/customer-ledger/manage-credit-policy/write-off-methods/enable-or-disable-write-offs
section
You can define write-offs to be enabled by default for customers grouped under a particular class or modify the default setting for a particular customer of the class.
2026-02-19T17:09:06+01:00
# Enable or disable write-offs
You can define write-offs to be enabled by default for customers grouped under a particular class or modify the default setting for a particular customer of the class.
You use the [Customer classes (AR201000)](/visma-net-erp/help/customer-ledger/customer-ledger-windows/customer-classes-ar201000/) window to configure default write-off settings for each class and the [Customers (AR303000)](/visma-net-erp/help/customer-ledger/customer-ledger-windows/customers-ar303000/) window to override default class settings for particular customers.
## Set the default write-off settings for customers of a customer class
1. Go to the [Customer classes (AR201000)](/visma-net-erp/help/customer-ledger/customer-ledger-windows/customer-classes-ar201000/) window.
1. In the **Class ID** field, select the customer class that you want to enable or disable write-offs for.
1. On the **General information** tab, in the **Default financial and payment settings** area, do the following:
1. Select the **Enable write-offs** check box if you want to allow write-off operations for customers of this customer class or clear the check box to disable write-offs for customers of the class.
1. If you have enabled write-offs for the class, in the **Write-off limit** field, type the maximum value that may be written off for each application line for documents of customers of the class. All balances and credits that are less than this value may be written off.
1. Click .
You can then change default write-offs settings for each customer individually.
## Override default write-off settings for a customer
1. Go to the [Customers (AR303000)](/visma-net-erp/help/customer-ledger/customer-ledger-windows/customers-ar303000/) window.
1. In the **Customer number** field, select the customer that you want to enable or disable write-offs for.
1. On the **General settings** tab, in the **Financial settings** area, do the following:
1. Select the **Enable write-offs** check box if you want to allow write-off operations for the selected customer or clear the check box to disable write-off operations.
1. If you have enabled write-offs for the class, in the **Write-off limit** field, type the maximum value that may be written off for each application line. All balances and credits that are less than this value may be written off.
1. Click .
Related pages
Concepts
Tasks
Windows
Create reason codes for write-offs
/visma-net-erp/help/customer-ledger/manage-credit-policy/write-off-methods/create-reason-codes-for-write-offs
section
2026-02-19T17:09:06+01:00
# Create reason codes for write-offs
## Before you start
In the [Reason codes (CS211000)](/visma-net-erp/help/inventory/inventory-windows/reason-codes-cs211000/) window you can create reason codes for **Balance write-offs** and **Credit write-offs**. These are used in the [Write-off balances and credits (AR505000)](/visma-net-erp/help/customer-ledger/customer-ledger-windows/write-off-balances-and-credits-ar505000/) and [Process bank transactions (CA306000)](/visma-net-erp/help/cash-management/cash-management-windows/process-bank-transactions-ca306000/) windows.
> [!NOTE]
> Reason codes are mandatory for performing write-offs on your invoices or credit notes
> [!NOTE]
> Reason codes are also used for stocktaking reviews. The default code for a stocktaking review is **4**.
1. Go to the [Reason codes (CS211000)](/visma-net-erp/help/inventory/inventory-windows/reason-codes-cs211000/) window.
1. Click .
1. In the **Reason code** field, click  to see how many reason codes already exist: use the next available number for your new reason code.
1. In the  -field, fill in the number of your new reason code.
1. In the **Description** field, enter the reason for your write-off.
1. In the **Usage** field select one of the following:
1. **Balance write-off** - to write-off an underpayment. or
1. **Credit write-off** - to write-off an overpayment.
1. In the **Account** field, click  to select the account the reason code will affect.
1. In the **Subaccount** field, enter the subaccount the reason code will affect.
1. Click .
Related pages
Concepts
Tasks
Windows
Write off balances and credits
/visma-net-erp/help/customer-ledger/manage-credit-policy/write-off-methods/write-off-balances-and-credits
page
By using the Write-off balances and credits (AR505000) window, you can view the balances and credits (of appropriately low amounts) of customers for which write-offs are allowed.
2026-02-19T17:09:06+01:00
# Write off balances and credits
By using the Write-off balances and credits (AR505000) window, you can view the balances and credits (of appropriately low amounts) of customers for which write-offs are allowed.
For more information: [Write-off balances and credits (AR505000)](/visma-net-erp/help/customer-ledger/customer-ledger-windows/write-off-balances-and-credits-ar505000/).
By using the [Write-off balances and credits (AR505000)](/visma-net-erp/help/customer-ledger/customer-ledger-windows/write-off-balances-and-credits-ar505000/) window, you
can view the balances and credits (of appropriately low amounts) of customers for
which write-offs are allowed.
You can select the documents to be written off.
## Before you start
Make sure that reason codes are properly configured and write-offs are enabled. For details, see: [About write-off setup](/visma-net-erp/help/customer-ledger/manage-credit-policy/write-off-methods/about-write-off-setup/).
## Write off small balances
1. Go to the [Write-off balances and credits (AR505000)](/visma-net-erp/help/customer-ledger/customer-ledger-windows/write-off-balances-and-credits-ar505000/) window.
1. In the **Type** field, select one of the following options:
+ To write off underpayments: **Balance write-off**
+ To write off overpayments: **Credit write-off**
1. In the **Doc. date** field, select the date when the write-off will be performed.
The system automatically fills in the **Post period** field based on the selected document date.
1. In the **Branch** field, select the branch for which you want to display data. The field is automatically filled with the branch you have access to.
1. Optional: In the **Customer** field, select the customer for which you want to write off small balances from the list of customers for which write-offs are permitted.
1. In the **Reason code** field, select the reason code you want to mark write-off transactions with. The reason code defines the account and subaccount to be used for writing off credits or balances. The field is automatically filled with the default reason code specified in the [Customer ledger preferences (AR101000)](/visma-net-erp/help/customer-ledger/customer-ledger-windows/customer-ledger-preferences-ar101000/) window.
In the table, the system lists the
documents for which the balance amount (underpayment or overpayment,
depending on the selected write-off type) is below the limit.
After you
increase the limit amount, you can write off the balances that exceed the
default limit.
1. To write off balances for documents, do one of the following:
+ To write off the small balances for particular documents, select the unnamed check box in the document row for each document, and then click **Process** in the window toolbar.
+ To write off the small balances for all listed documents, click **Process all** in the window toolbar.
After processing has been successfully completed, you can view the batch in the [Journal transactions (GL301000)](/visma-net-erp/help/general-ledger/general-ledger-windows/journal-transactions-gl301000/) window.
Related pages
Concepts
Tasks
Windows
Write-off underpayments or overpayments
/visma-net-erp/help/customer-ledger/manage-credit-policy/write-off-methods/write-off-underpayments-or-overpayments
section
2026-02-19T17:09:06+01:00
# Write-off underpayments or overpayments
## Before you start
To be able to write off, you have to enable this in the settings for your customer: [Enable write-offs for customer](/visma-net-erp/help/customer-ledger/manage-customers/enable-write-offs-for-customer/).
1. Go to the [Write-off balances and credits (AR505000)](/visma-net-erp/help/customer-ledger/customer-ledger-windows/write-off-balances-and-credits-ar505000/) window.
1. In **Type**, select the write-off operation you want to use:
1. **Balance write-off** - to write-off an underpayment.
1. **Credit write-off** - to write-off an overpayment.
1. Select a **customer** by clicking .
1. Optional: Select a **post period** by clicking .
1. Select a **reason code** by clicking . If there is no relevant reason code: [Create reason codes for write-offs](/visma-net-erp/help/customer-ledger/manage-credit-policy/write-off-methods/create-reason-codes-for-write-offs/).
1. Go to the table, and select the invoices you want to process.
1. Click:
1. Process the selected invoices, or
1. Process all in the list of invoices / credit notes, and create batches with status **Posted** or **Unposted**.
The write-offs are posted to the general ledger.
Related pages
Concepts
Tasks
Windows