Understanding OAuth
Access to resouces and APIs in Visma is done through Visma Connect. This is an identity provider. The OAuth2 flow is used to authorize users and services to access the desired resources. You need to know the basics of OAuth in order to understand the authorization process and build your integration with Business NXT.
What is OAuth2?
OAuth is a standard that allows websites or applications to access, on behalf of an user, resources hosted by other apps (servers). The term OAuth stands for “Open Autorization” and the number 2 refers to the 2.0 version of the standard. The standard allows users to grant client applications consented access to what resources they can access without sharing credentials.
OAuth is not intended to authenticate users (that is verifying that a user is who he claims to be) but to authorize them. That means granting access to resources such as remove APIs.
You can read more about OAuth2 here:
Roles
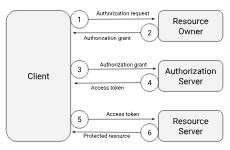
The OAuth standard defines a set of roles that represent components of an authorization system. These roles/components are the following:
- Resource owner: the system/user that owns a resource and that grants access to that resouce.
- Client: the system that requires access to a protected resource.
- Authorization server: a server that receives requests from the Client for access tokens and issues them after authenticating the Resource owner and obtaining consent for the requested access.
- Resource server: a server that protects the resources and receives access requests to them from the Client.
The interactions between these componets are illustrated in the following image:

Access tokens
In order to grant access to resources, OAuth2 uses access tokens. An access token is basically a document that describes the authorization to access resouces on behalf of a user. The OAuth2 standard does not define a format. The JSON Web Token (JWT) is the widely used format. Visma Connect uses the JWT format for access tokens.
The JWT token is a base64 encoded document. Typically, you should not be concerned with the content of a token. For debugging purposes, however, you can use the jwt.io website to inspect the content of a JWT access token. Its payload looks as follows:
{
  "nbf": 1648744531,
  "exp": 1648748131,
  "iss": "https://connect.visma.com",
  "aud": "https://business.visma.net/api/graphql",
  "client_id": "...",
  "sub": "42fd1681...",
  "auth_time": 1648744530,
  "idp": "Visma Connect",
  "llt": 1648641021,
  "acr": "3",
  "jti": "0271242A...",
  "sid": "203b1c01...",
  "iat": 1648744531,
  "scope": [
    "openid",
    "email",
    "profile",
    "business-graphql-api:access-group-based"
  ],
  "amr": [
    "pwd",
    "otp"
  ]
}
An access token contains information such as:
- issuer (
iss) - the destination of the token (
aud) - issued time (
iat) - expiration time (
exp) - subject - whom the token refers to (
sub) - scopes - list of granted scopes (
scope)
The one what you need to know about are the scopes.
You can read more about access tokens here:
ID token vs Access token vs Refresh token
When you read about OAuth tokens, there are three terms that come up and can be confusing:
- ID token: this is a document that proves that a user has been authenticated and can carry information about the user. The ID token was introduced by OpenID Connect (OIDC) which is an open standard for authentication used by many identity providers, including Google, Facebook, and Apple.
- Access token: this is a document that carries information about the authorization to a resource.
- Refresh token: this is a special kind of token that is used to obtain additional access tokens. An ID or access token is valid for a specific period of time (like 30 seconds or 60 minutes for instance). A refresh token is used to retrieve new access tokens without the need to re-authenticate the user. A refresh token is requested alongside the initial request for an ID and access token and must be stored (securely) by the application.
You can read more about these kinds of tokens here:
Scopes
Scopes are reasons for which access to a resource is requested. For instance, there can be a scope for reading data, one for inserting and updating, one for deleting. Scopes depend on the resource server.
Business NXT defines a single scope, called business-graphql-api:access-group-based for web applications and business-graphql-service-api:access-group-based for services.
However, in case of a web application, when you register it with Visma Developer Portal, you need to set the following scopes: email, openid, and profile. Upon reqesting an access token, you need to specify the following scopes: business-graphql-api:access-group-based openid email. These extra scopes are not necessary for services.
Read more about this here:
Grants
Grants are steps a client performs to get authorization for accessing a resource. The authorization framework defines several grant types for different scenarios:
- Authorization Code
- Implicit
- Authorization Code with Proof Key for Code Exchange (PKCE)
- Resource Owner Credentials
- Client Credentials
- Device Authorization Flow
- Refresh Token Grant
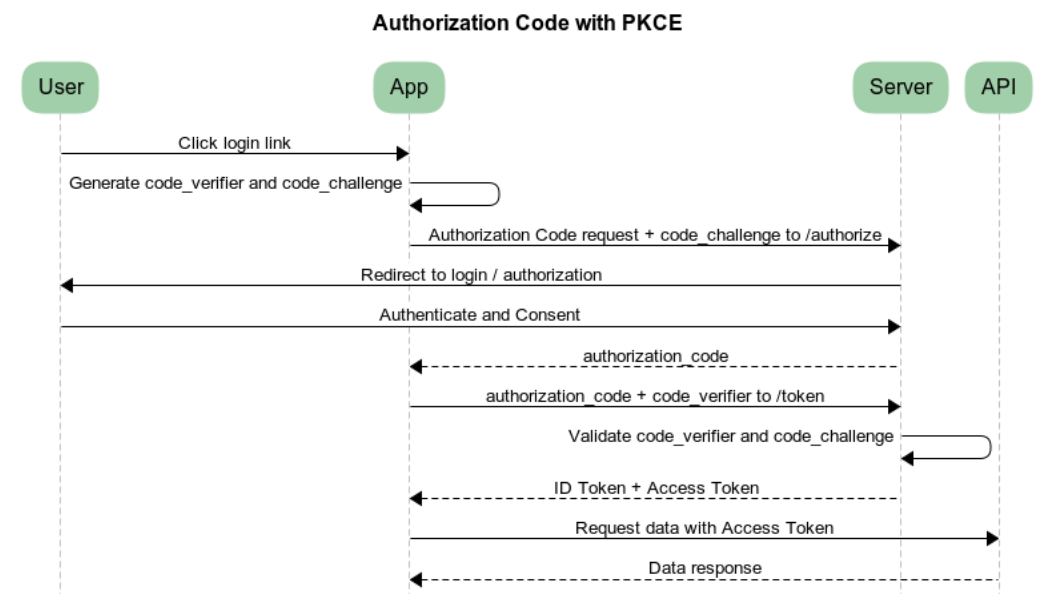
The grant type used for Business NXT is Authorization Code with PKCE. This flow consists of the following steps:
- The user clicks a login button/link in the application.
- The application creates a random
code_verifierand from it generates acode_challenge. - The application makes an authorization request to the
/authorizeendpoint of the authorization server with the generatedcode_challenge. - The authorization server redirects the user to the login and authorization page.
- The user authenticates (using a selected option) and may be displayed a consent page that lists the permissions the application is requesting.
- The authorization server stores the
code_challengeand redirects the user back to the application, providing a one-time-useauthorization_code. - The application sends the
code_verifierand theauthorization_codeto the/tokenendpoint of the authorization server. - The authorization server verifies the
code_challengeand thecode_verifier. - The authorization server returns an ID token, an access token, and optionally, a refresh token.
- The application uses the access token to call an API.
- The API responds with the requested data.

You can read more about grants here:
Endpoints and redirect URLs
Endpoints and a redirect URL are key parts of the OAuth flow.
An authorization server exposes several endpoints that are used at various steps in the authorization flows:
| Endpoint | Description |
|---|---|
/authorize |
Interact with the resource owner and obtain an authorization grant. |
/token |
Obtain an access token and/or an ID token by providing an authorization grant or refresh token. |
/endsession |
End the session associated with the given ID token. |
/userinfo |
Return claims about the authenticated end user. |
To get the URLs of the Visma Connect endpoints check this page.
A redirect URL is a URL to which the authorization server will redirect the user after the user successfully authorizes an application. A redirect URL contains sensitive information. The authorization server must not redirect the user to arbitrary (unsecure) locations. In order to ensure the user is redirected to an apppropriate location, the developers of the application are required to register one or more redirect URL when they create the application.
Visma Developer Portal requires you to provide a redirect URL when you register your application in the system. You can read more about that here: Web Application registration.