Import accounting data
There are several ways to import accounting data into Period & Year. Read more about the different alternatives below.
To import data, simply click the button Setup import source at the top of the page and choose which type of import you would like to do. You can also import data under Settings - Settings.
The status of the import can be seen in Settings - Import settings.
Period & Year automatically suggests linking to a reference account with different priorities depending on whether a client account has been manually created in Period & Year, or whether it is imported from an import source.
When importing via an import source, the reference account is linked based on the following priority:
- Import source mapping (standard mapping for selected import source defined by Period & Year)
- Periode & Year mapping
Read more about Chart of accounts.
Tripletex
- To setup import:
Select import source Tripletex in the list.
Paste your Tripletex API Employee token or Accounting office token for authentication and save your changes.
To open up for API-access and create an API Employee token please read this information in Tripletex.
The application name should be Period & Year.
It is also possible to create an accounting office token for multiple clients. Please read this information on how to proceed.
Select Import from Tripletex to start the import.
PowerOffice Go
- To setup import:
Select import source PowerOffice Go in the list.
Paste your PowerOffice Go Client key for authentication and save your changes.
To create a client key, log in to PowerOffice Go and go to Settings- Extensions, select Add extensions and Visma Period & Year from the drop down. Copy the displayed client key.
Click OK to save.
Select Import from PowerOffice Go to start the import.
The PowerOffice Go import supports agricultural clients.
Read more about Import from agriculture clients.
eAccounting
- To setup import:
Select import source eAccounting in the list.
Select Import from Visma eAccounting to start the import.
- Note
The user in Period & Year must also be an administrator in eAccounting to complete the import.
Visma Business
- To setup import:
Select import source Visma Business in the list.
Paste your Visma Business client id and pairing key for authentication and save your changes.
NoteWhen importing from Visma Business, an "agent" must be installed in advance for communication between Period & Year (cloud) and Visma Business (local installation). Click on this link for more information on how to install the agent and how to receive a pairing key.
- Click the button Import from Visma Business to start the import.
Visma Net
- To setup import:
Select import source Visma Net in the list.
Click on Connect client.
Select which client you want to link in the client list that appears in Visma Net.
- Note
The user in Period & Year must ensure that they have access to the same clients in Visma Net and Period & Year in order to be able to connect the clients and later run imports.
- Select branches if the client you are connected to uses multiple branches.
- Important
The clients and/or branches in Visma Net and Period & Year MUST use the same organization number.
- Click on Save changes.
The client is now connected to the associated client in Visma Net and ready for import.
- Click on Save changes.
- Click on the button Import from Visma Net to start the import.
- Reconnect client
The connection to the client in Visma Net is valid for 3 months. You must then reconnect to import new accounting data.
Business NXT
- To setup import:
Select import source Business NXT in the list.
Select Import from Business NXT to start the import. :
- Note
The user in Period & Year must ensure that the clients in Business NXT and Period & Year use the same organization number.
Finago (24SevenOffice)
- To setup import:
Select import source Finago (24SevenOffice) in the list.
Enter your ERP User name and Passwordand save your changes.
Select Import from Finago (24SevenOffice) to start the import.
DNB Regnskap
- To setup import:
Select import source DNB Regnskap in the list.
Select Import from DNB Regnskap to start the import.
Fill in the username and password to login to DNB Regnskap.
NoteThe login to DNB Regnskap is valid for 45 days then you must reconnect to import new accounting data.
Click Allow to give Period & Year access to your data in DNB Regnskap.
Select which client to import from the client list in DNB Regnskap.
Click Continue to start the import process and be redirected to Period & Year. >
The DNB Regnskap import supports agricultural clients.
Read more about Import from agriculture clients.
Duett Økonomi
- To setup import:
Select import source Duett Økonomi in the list.
Paste your Duett Økonomi Client API key for authentication and save your changes.
TipClient API key can be found in the following menu in Duett Economy: Settings - Company setup integrations.
Read more about activation of the integration at Duett Økonomi.
Click Save changes.
Click Import from Duett Økonomi to start the import.
NotePlease note that the integration imports financial statements, and not tax statements with voucher type 200-299 from Duett. Vouchers with voucher type 200-299 will not be imported to Period & Year.
The Duett Økonomi import supports agricultural clients.
Read more about Import from agriculture clients.
Eika Regnskap
- To setup import:
Select import source Eika Regnskap in the list.
Click Import from Eika Regnskap to start the import.
Fill in the username and password to login to Eika Regnskap.
NoteThe login to Eika Regnskap is valid for 45 days then you must reconnect to import new accounting data.
Click Allow to give Period & Year access to your data in Eika Regnskap.
Select which client to import from the client list in Eika Regnskap.
Click Continue to start the import process and be redirected to Period & Year.
The Eika Regnskap import supports agricultural clients.
Read more about Import from agriculture clients.
SpareBank 1 Regnskap
- To setup import:
Select import source SpareBank 1 Regnskap in the list.
Select Import from SpareBank 1 Regnskap to start the import.
Fill in the username and password to login to SpareBank 1 Regnskap.
NoteThe login to SpareBank 1 Regnskap is valid for 45 days then you must reconnect to import new accounting data.
Click Allow to give Period & Year access to your data in SpareBank 1 Regnskap.
Select which client to import from the client list in SpareBank 1 Regnskap.
Click Continue to start the import process and be redirected to Period & Year.
The SpareBank 1 Regnskap import supports agricultural clients.
Read more about Import from agriculture clients.
Systima
- To setup import:
Select import source Systima in the list.
Select Import from Systima to start the import.
Fill in the username and password to login to Systima.
NoteThe login to Systima is valid for 30 days then you must reconnect to import new accounting data.
Unimicro
- To setup import:
Select import source Unimicro in the list.
Select Import from Unimicro to start the import.
Fill in the username and password to login to Unimicro.
NoteThe login to Unimicro is valid for 45 days then you must reconnect to import new accounting data.
Click Allow to give Period & Year access to your data in Uni Economy.
Select which client to import from the client list in Unimicro.
Click Continue to start the import process and be redirected to Period & Year.
The Unimicro import supports agricultural clients.
Read more about Import from agriculture clients.
Xledger
- To setup import:
Select import source Xledger in the list.
Paste your Xledger API token.
- The API token can be found under the following menu options in Xledger and requires the user to have the role of administrator: Administration > System Access > GraphQL > API Tokens
- It is recommended to create your own named API token for the use of Period & Year and which respectively has read and write access to the following scopes:
Scope Read access Write access Common: - Company x - Entity x - ObjectValue x - Period x - PeriodStatusItem x - Url x General ledger: - Account x - Account balance x - GLImportItem x x - JournalEntry x - Transaction x - TransactionHeader x Click Save changes.
Click Import from Xledger to start the import.
NoteThe user in Period & Year must ensure that the clients in XLedger and Period & Year use the same organization number.
SAF-T file
- To set up import:
Select import source SAF-T file in the list.
The import supports the following file formats:
- SAF-T files in XML format.
- SAF-T files in XML format packed in ZIP format.
Select Import from SAF-T file and Select file button to select your file.
Click Continue to start the import process.
SIE4 file
- To set up import:
Select import source SIE4 file in the list.
Select Import from SIE4 file and Select file button to select your file.
Click Continue to start the import process.
Microsoft Excel
- To set up import:
Select import source Microsoft Excel in the list.
When importing from Microsoft Excel, it is important that the file has the following format layout.
Column A2 Column B2 Column C2 Column C1 Column D2 Column D1 Account number Account description Closing balance Year Closing balance Year 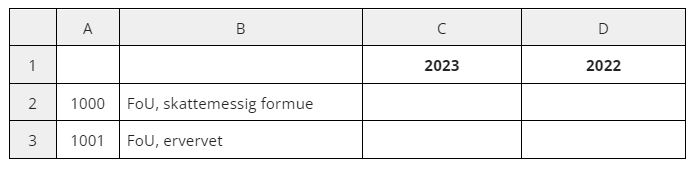
Account number - One row for each account in the trial balance for the actual accounting year.
Account description - Assigned account name from the accounts (ERP system).
Closing balance - Closing balance on the actual account for the imported accounting year.
Year - Year-end closing year, can be last year and/or this year.
When importing deviating accounting years, the following format must be used in the heading for the year: dd.mm.yyyy-dd.mm.yyyy

Import from Excel does not include any transactional data, only annual balances. This means that it is more relevant for Year-end closing than for Period-end.
An excel file can contain up to two accounting years, which makes it possible to import the current and previous year from the same Excel file.
If you choose to import two financial years in separate Excel files, you must ensure that you import the previous year before the current year. This is necessary for the program to calculate the correct opening balance for the current year.
A standard client chart of accounts based on the reference chart of accounts in Period & Year is created automatically during import.
Click on Import from Microsoft Excel and the Select file button to select your file.
Click Continue to start the import process.
When importing data from the ERP system, all accounting data from the last three financial years that you have created in the ERP system is imported into Period & Year.